SEO title: AI Video Editing Tips for What to Fix First in a Rushed Cut Meta description: A rushed first cut rarely needs more effects. These AI video editing tips start with what the viewer must understand, then repair speech, captions, framing, and sound in the order the audience notices.
AI Video Editing Tips for What to Fix First in a Rushed Cut
Quick summary
A rushed first cut rarely needs more effects first. Check what the viewer should understand, remove repeated or misleading material, then repair speech, captions, framing, and sound one visible problem at a time. In ChatCut, name the clip or time range, describe the change, and play the returned section before repeating it across the project.
A first cut can be technically complete and still feel wrong: the opening takes too long, a cutaway explains a different idea, or a caption changes what the speaker meant. The useful question is which problem is stopping the viewer from following the point. Fix that problem before polishing the rest of the timeline.
Open the project in ChatCut, select the recording or timeline you want to inspect, and ask for one bounded change such as, “Remove the repeated take after the first explanation. Keep the qualification and the final example.” ChatCut returns an editable result you can play against the original. Once that join reads correctly, continue with the next issue instead of asking one broad prompt to redesign the whole video.
Fix the story before you polish the picture
When the cut feels aimless, return to the point you want the viewer to understand. Check the source selection, opening, and order of ideas before trimming more time.
1. Give the editor the right source and audience
Identify the files the editor should use, the viewer, and the intended outcome. Keep original recordings and organize unused takes separately instead of deleting source files as a cleanup shortcut.
Use the product walkthrough and separate microphone recording. Make a tutorial for first time users who need to finish account setup. Keep the setup steps and the final successful result.
Check the imported assets before continuing, especially when several files have similar names.
2. Agree on the opening before recutting
Ask the agent to propose the opening and order of ideas. Read the proposal against the recording, then accept or correct it before editing.
Summarize the main points and recommend an opening. Identify any missing context. Wait for me to confirm the structure before changing the timeline.
This approach appears in ChatCut’s published tutorial. It makes a disagreement about the story easier to correct before the project gains more layers.
3. Remove repetition before speeding up the speaker
Remove abandoned attempts and repeated explanations first. Then inspect smaller gaps and fillers. A shorter runtime is useful only when the remaining thought stays complete.
Wistia’s 2026 report analyzed more than 13 million videos and 79 million viewing hours on its platform, alongside a survey of more than 900 professionals. Shorter videos generally had higher percentage engagement, while a longer video could still earn more total watch time. This is platform research, not a controlled test of jump cuts. Choose the measure that fits the task: a viewer completing account setup needs all the necessary steps, even if adding one lowers the percentage watched.
In ChatCut, Transcript deletions cut recorded time ranges. The Transcript guide explains source selection and the Pauses control. Listen before removing a hesitation that might convey uncertainty or a deliberate qualification.
4. Compare a new structure with your earlier cut
Duplicate the timeline before trying a different structure. Name both versions and state the intended version in your next prompt.
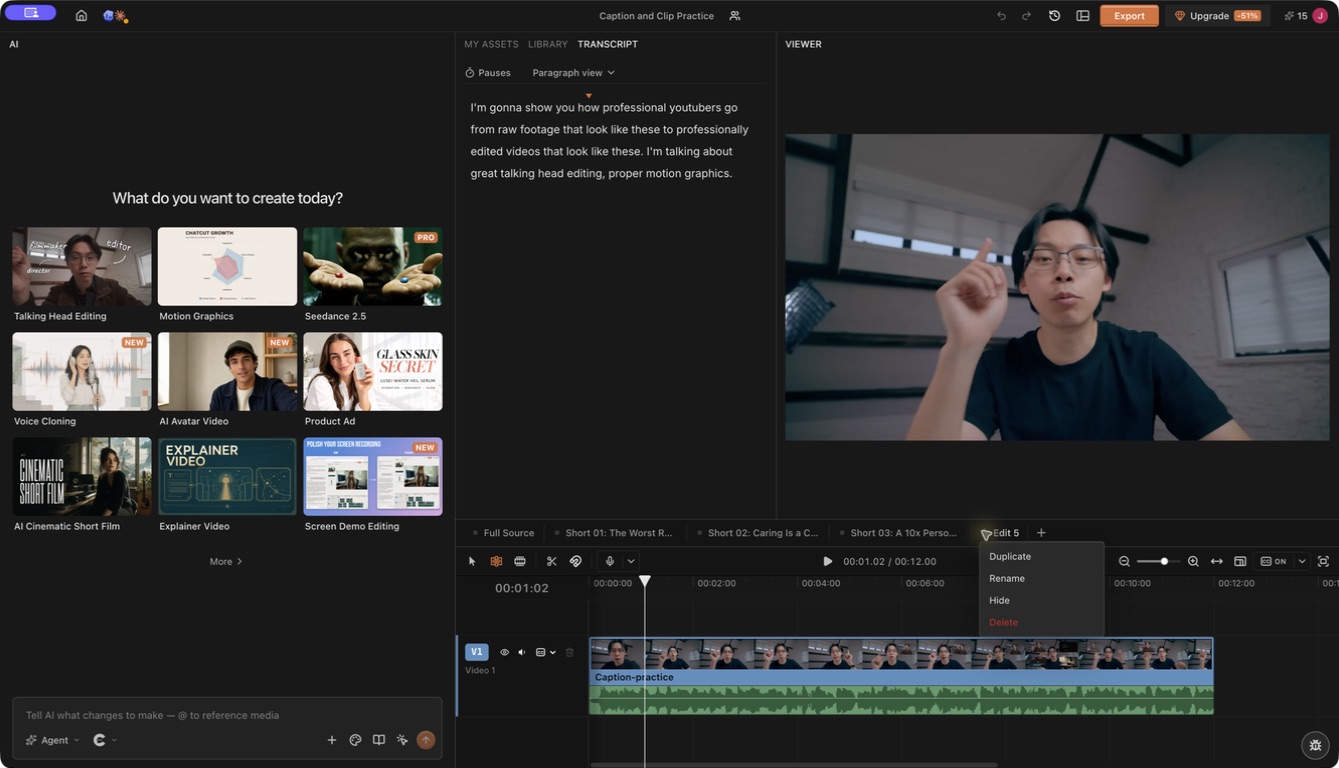
Use the timeline tab menu to Duplicate the cut, then Rename the alternative after the change you are testing. Select that tab before asking for a new opening.
Play the alternative opening with the rest of the piece. If it depends on information you moved later, restore the context or choose another opening.
Make every layer support the sentence it accompanies
Watch for the moment when a shot, caption, or sound pulls attention away from the explanation. Correct that layer and play it with the dialogue again.
5. Replace a shot that explains the wrong thing
Use a recording, image, or graphic that explains the current sentence. A visually impressive insert can still make the explanation less clear.
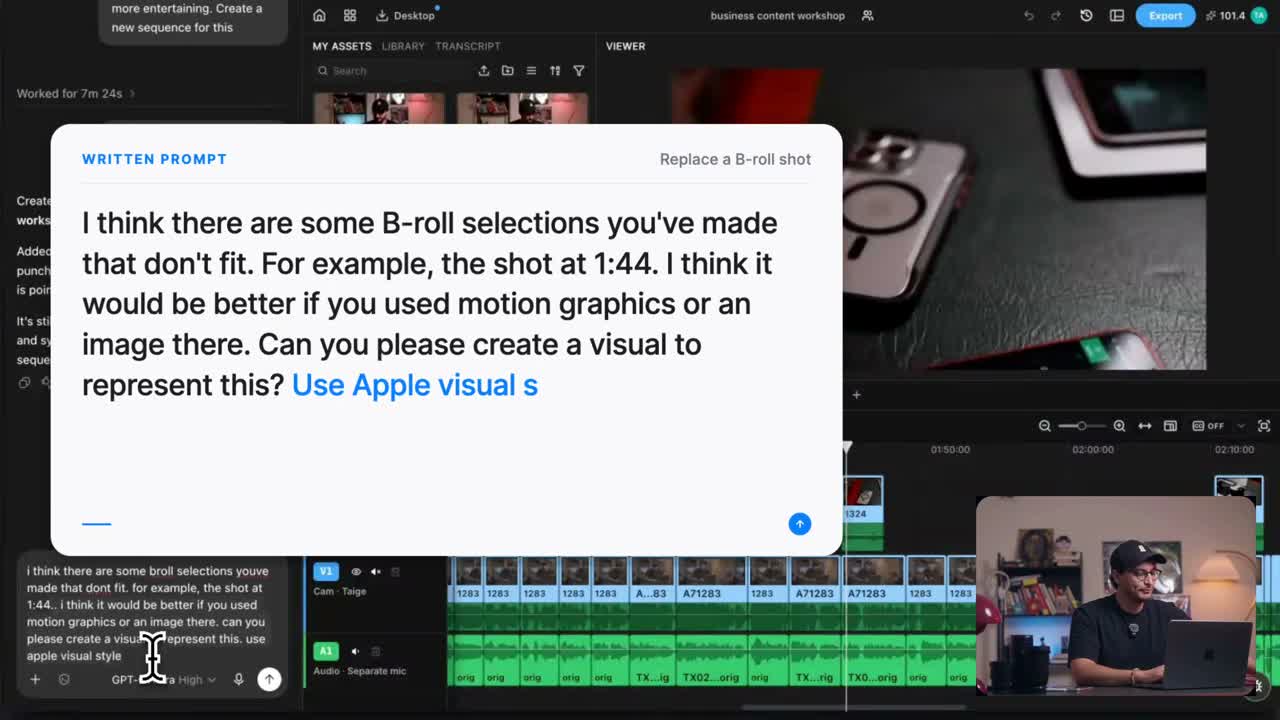
Replace the supporting shot at [time] with a diagram of [relationship]. Keep the speaker’s audio and the surrounding edit.
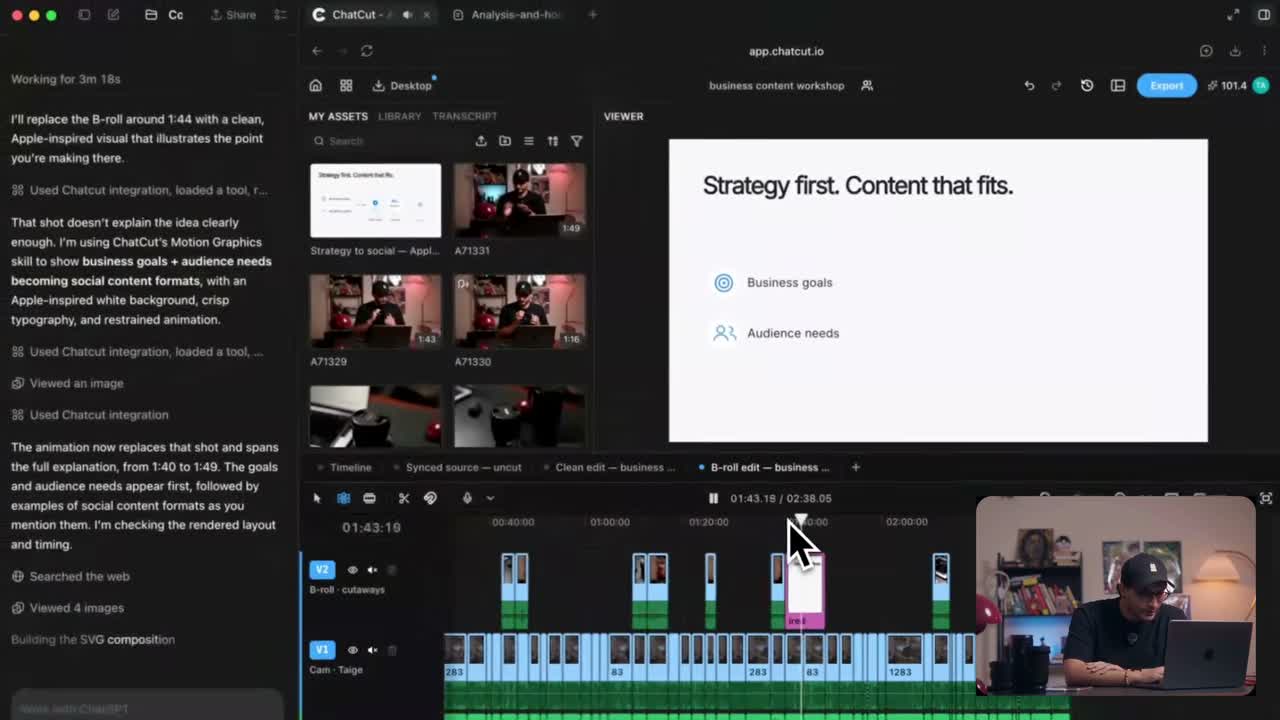
At 7:09 in the tutorial, the request points to 1:44 in the project and asks for a graphic or image instead. The next frame below shows the resulting explanation.At 7:18 in the published tutorial, a graphic replaces an unsuitable supporting shot. Its purpose is to explain the spoken point.
6. Make the voice clear before mixing music
Listen to the speech on its own for noise, level changes, and sync. If you use ChatCut’s AI Voice Isolation, compare the processed result with the original; reducing noise can also affect the sound of the voice.
Place music on a separate audio track. With Audio ducking, dialogue can act as the anchor and music as the follower. Listen through pauses to ensure the music does not rise distractingly between words.
7. Fix the caption without cutting the recording
Use Content to fix the text viewers read. Deleting words in Transcript removes the recorded passage instead.
Check a name, a number, and the busiest frame in the video. Then review the whole caption track. A single quick scan does not guarantee every error is caught, especially after cuts change the timing.
8. Balance exposure and color between shots
Compare adjacent shots for exposure and color before applying the same LUT everywhere. One preset cannot guarantee a match between footage recorded under different lighting.
ChatCut’s Library and effects controls let you add a supported LUT or effect to a clip and adjust exposed properties. Play the cut between shots and inspect skin tones and bright areas after the change.
Keep each correction local and check the file viewers receive
Give the correction a boundary: one clip, time range, caption, or visual. Keep an earlier version so you can compare the result before using the same treatment elsewhere.
9. Name the clip and range that need changing
Describe the problem as it appears in the viewer, then specify the desired result.
In Short 03, the two faces are cropped during [range]. Reframe that section so both faces remain visible. Keep the dialogue, captions, duration, and surrounding cuts.
The recorded case uses this kind of local instruction. Review the entry and exit frames as well as the middle of the corrected section.
10. Reuse the design that already works
Save a caption style or a suitable graphic after reviewing it on a real project. In ChatCut, Caption style → Save current style stores the current caption design for reuse.
Apply it to the next recording and check again. A position that avoided one speaker’s face may cover a different composition. Reusable instructions should preserve the intent while allowing source specific corrections.
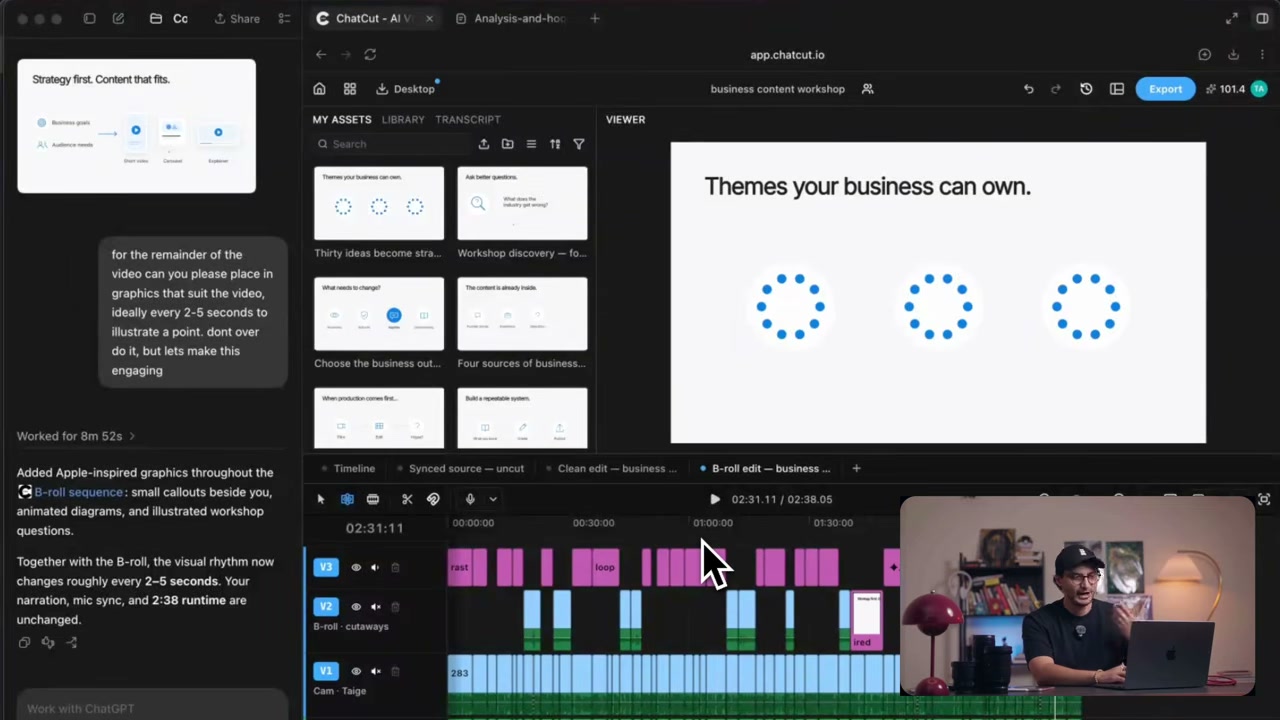
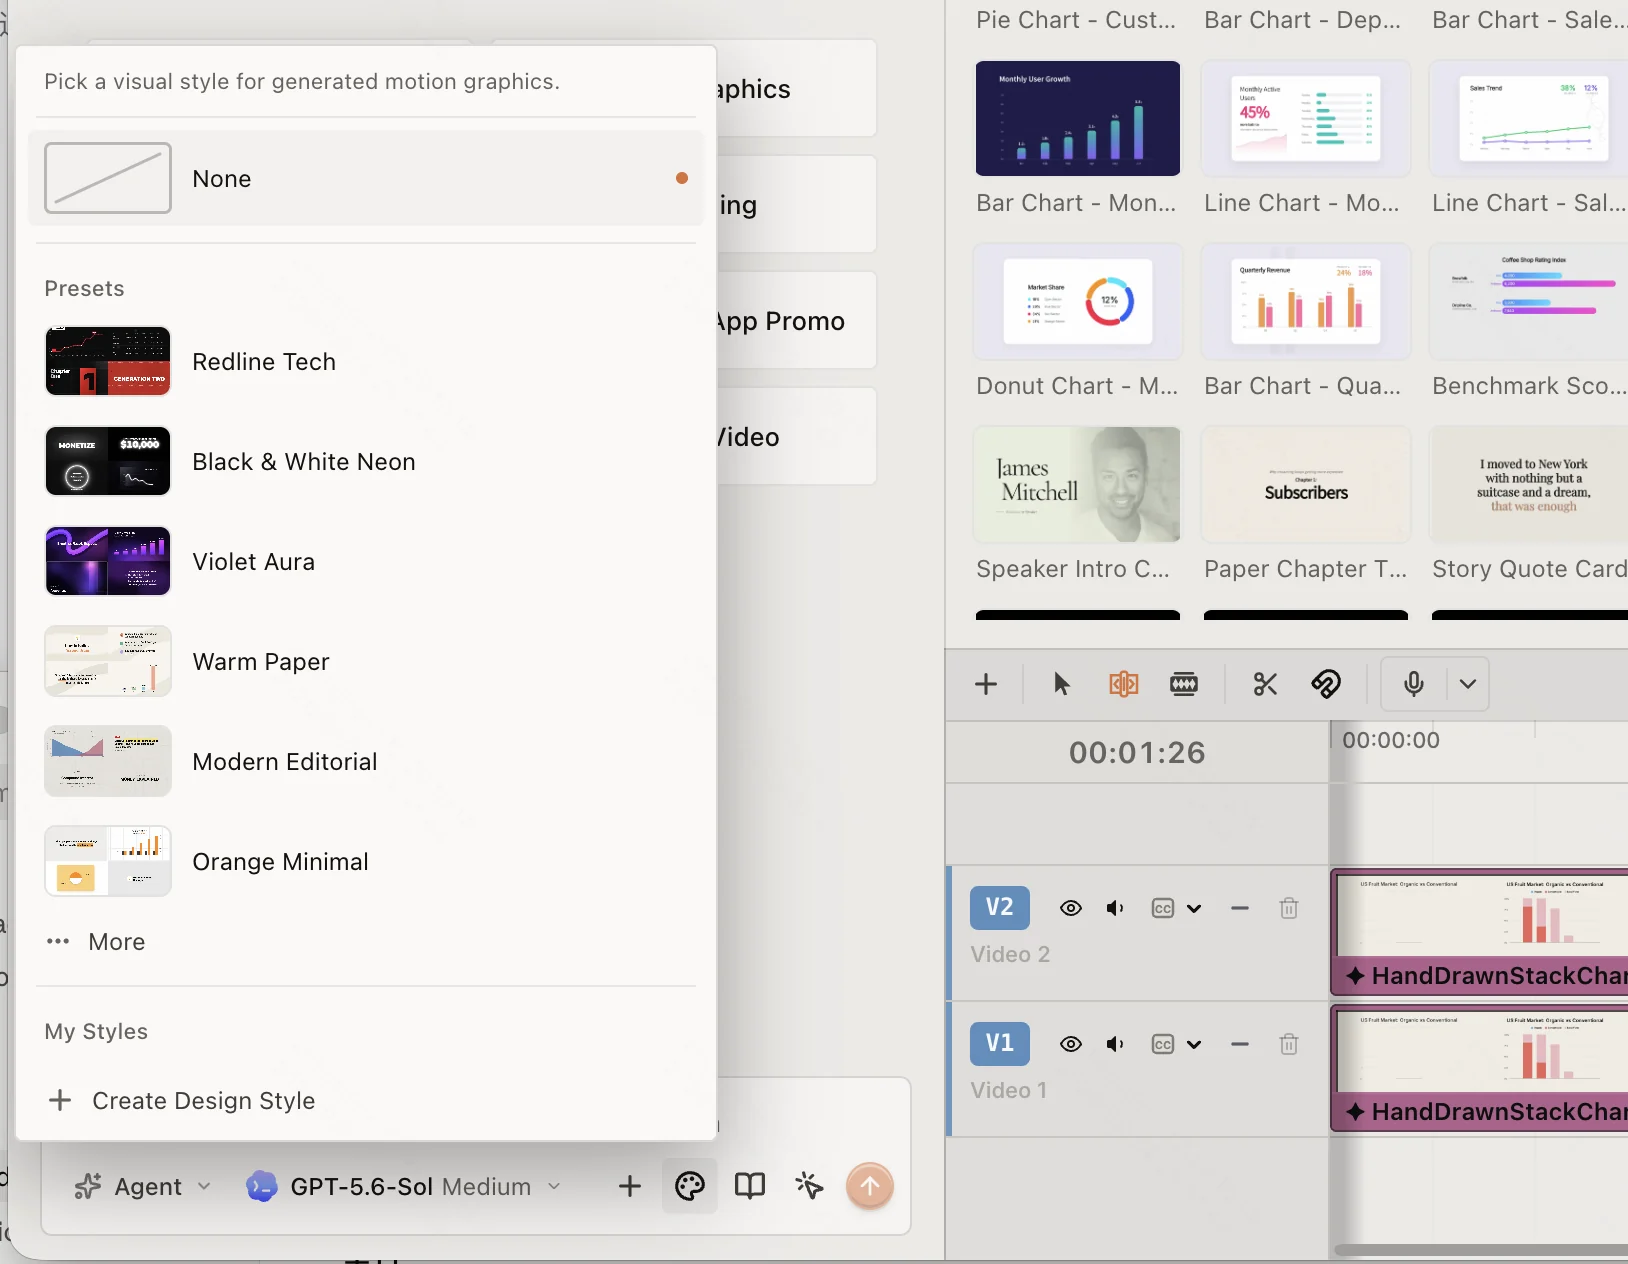
For the appearance of generated graphics, open the palette icon in the AI composer and choose or create a Design Style. This is separate from saving a caption preset. Keep workflow instructions in a Skill and the graphic’s visual direction in a Design Style.
At 8:20 in the same tutorial, the graphic is visible in the viewer and on the layered timeline. Compare its wording, color, and placement with nearby graphics. Saving a style is useful only after this result reads clearly.
11. Repair the crop for each destination
Create the versions you need and inspect their crops independently. A 9:16 short, a square feed clip, and a horizontal tutorial show different portions of the picture.
Check faces, captions, logos, screen controls, and important gestures. If a tutorial becomes unreadable in a vertical crop, create a closer view of the action rather than shrinking the entire desktop into the frame.
12. Check the file your viewer will receive
Inspect the downloaded video outside the editor. Check picture, sound, start, end, orientation, captions, and any range selected for export.
For an XML handoff, also inspect the destination timeline. Some items do not travel in XML, and rendered graphics do not become native editable compositions in the destination editor.
Frequently asked questions
What should I fix first in an AI video edit?
Check whether the opening and order of ideas deliver the point the viewer came for. Correct source selection and structure before polishing captions, transitions, or graphics. An attractive effect cannot repair a missing explanation.
Will shortening my video always improve engagement?
No. Percentage watched and total watch time answer different questions. The Wistia research discussed above observes both; it does not prove that extra cuts improve every video. Keep the steps or context required by your viewer’s task, then remove material that gets in the way.
What should I do with a generated shot that looks good but feels wrong?
Name the timeline range and explain the point the image needs to support. Replace the shot with suitable footage, an image, or a graphic, then play it with the surrounding narration. Judge whether the viewer can understand the idea more clearly.
How detailed should a correction prompt be?
Specify the affected clip or range, the problem, the desired result, and what must stay. For example: “Reframe these two speaker layers so both faces remain visible. Keep the dialogue, captions, timing, and surrounding cuts.” Replay the affected section after the change.
How do I reuse a look without copying the whole old edit?
Save a caption preset for text appearance and a Design Style for the visual direction of generated graphics. Save a Skill for a repeatable editing method. Apply them to the new source, then check placement, selected quotes, and timing again.
Should every video have fast jump cuts?
No. Match the rhythm to the subject and delivery. Keep a pause when it helps the viewer understand or feel the point.
Can AI save a fixed number of hours?
That requires a measured comparison with the same source and review standard. These tips improve how you direct and inspect the work; they do not establish a universal speed gain.
A better first cut starts with the problem the viewer can feel
Begin with the point, audience, and opening. Remove repeated takes only when the remaining thought stays complete, replace a shot when it explains the wrong idea, and keep speech, captions, framing, and music on the layers where you can review them. In ChatCut, state the affected clip or range, the desired result, and what must remain, then play the change before applying the same rule elsewhere.
Finish by watching the exported file from the first frame to the last correction. Reuse a caption style, Design Style, or Skill only after it survives a different piece of footage; a reusable setting can speed up a decision, but it cannot replace listening and looking at the new cut.
SEO title: ChatGPT Plugins for Creators Who Edit Videos Every Week Meta description: Recurring video work gets easier when useful editing decisions carry over. ChatCut Skills let creators save a method and apply it to the next recording.
ChatGPT Plugins for Creators Who Edit Videos Every Week
Quick summary
A reusable video workflow should preserve decisions that still make sense on the next recording, such as keeping context and checking faces after reframing. Save that method as a ChatCut Skill, attach it to a new request, and supply the new source, audience, and output. Review every new cut because a saved method cannot choose the right quote for a different episode.
If you edit the same kind of episode every week, the repeated work is usually not the button clicks. It is remembering the rules: keep the qualification with the quote, show the whole product action, protect both speakers in a vertical crop, and check names before export. Those rules are worth reusing. A guest’s answer, timestamp, or strongest moment is not.
In ChatCut, open a project that already contains a method you trust. Use the Skills menu to save the editing process, then open the next project, attach that Skill in the composer, and add the new audience and source ranges. Ask it to propose the cut before it creates timelines. You get a visible proposal and an editable result to compare with this week’s recording.
Separate rules that transfer from details that expire
Keep the rules you would want applied to another guest’s recording, such as preserving the context of a quote and checking both faces after a layout change. Supply that next guest’s name, chosen passages, timestamps, and output names in the new brief.
For a weekly interview, the reusable method might be: propose complete ideas, preserve qualifications, wait for the creator’s choices, build separate timelines, review framing and captions, and export approved cuts. The next episode still needs new editorial selection. A previous guest’s strongest quote cannot become a rule for every future guest.
Reuse in the method
Supply for the next recording
Preserve the question when its answer needs context
This episode’s source files and intended audience
Keep each accepted idea on its own named timeline
Which ideas and source ranges were accepted
Review both faces after a layout change
This recording’s cameras and speaker positions
Check names and numbers against the audio
This guest’s name and specialist vocabulary
Play the final files before distribution
Required platform, format, destination, and approval
A Skill is guidance, not a media file or a finished edit. It does not establish a fixed processing time, an export allowance, or permission to publish.
Save the method after the cut has earned your trust
Open a project where you and the agent have worked out an approach worth repeating. Review the timeline first so you can describe what worked and what needed correction.
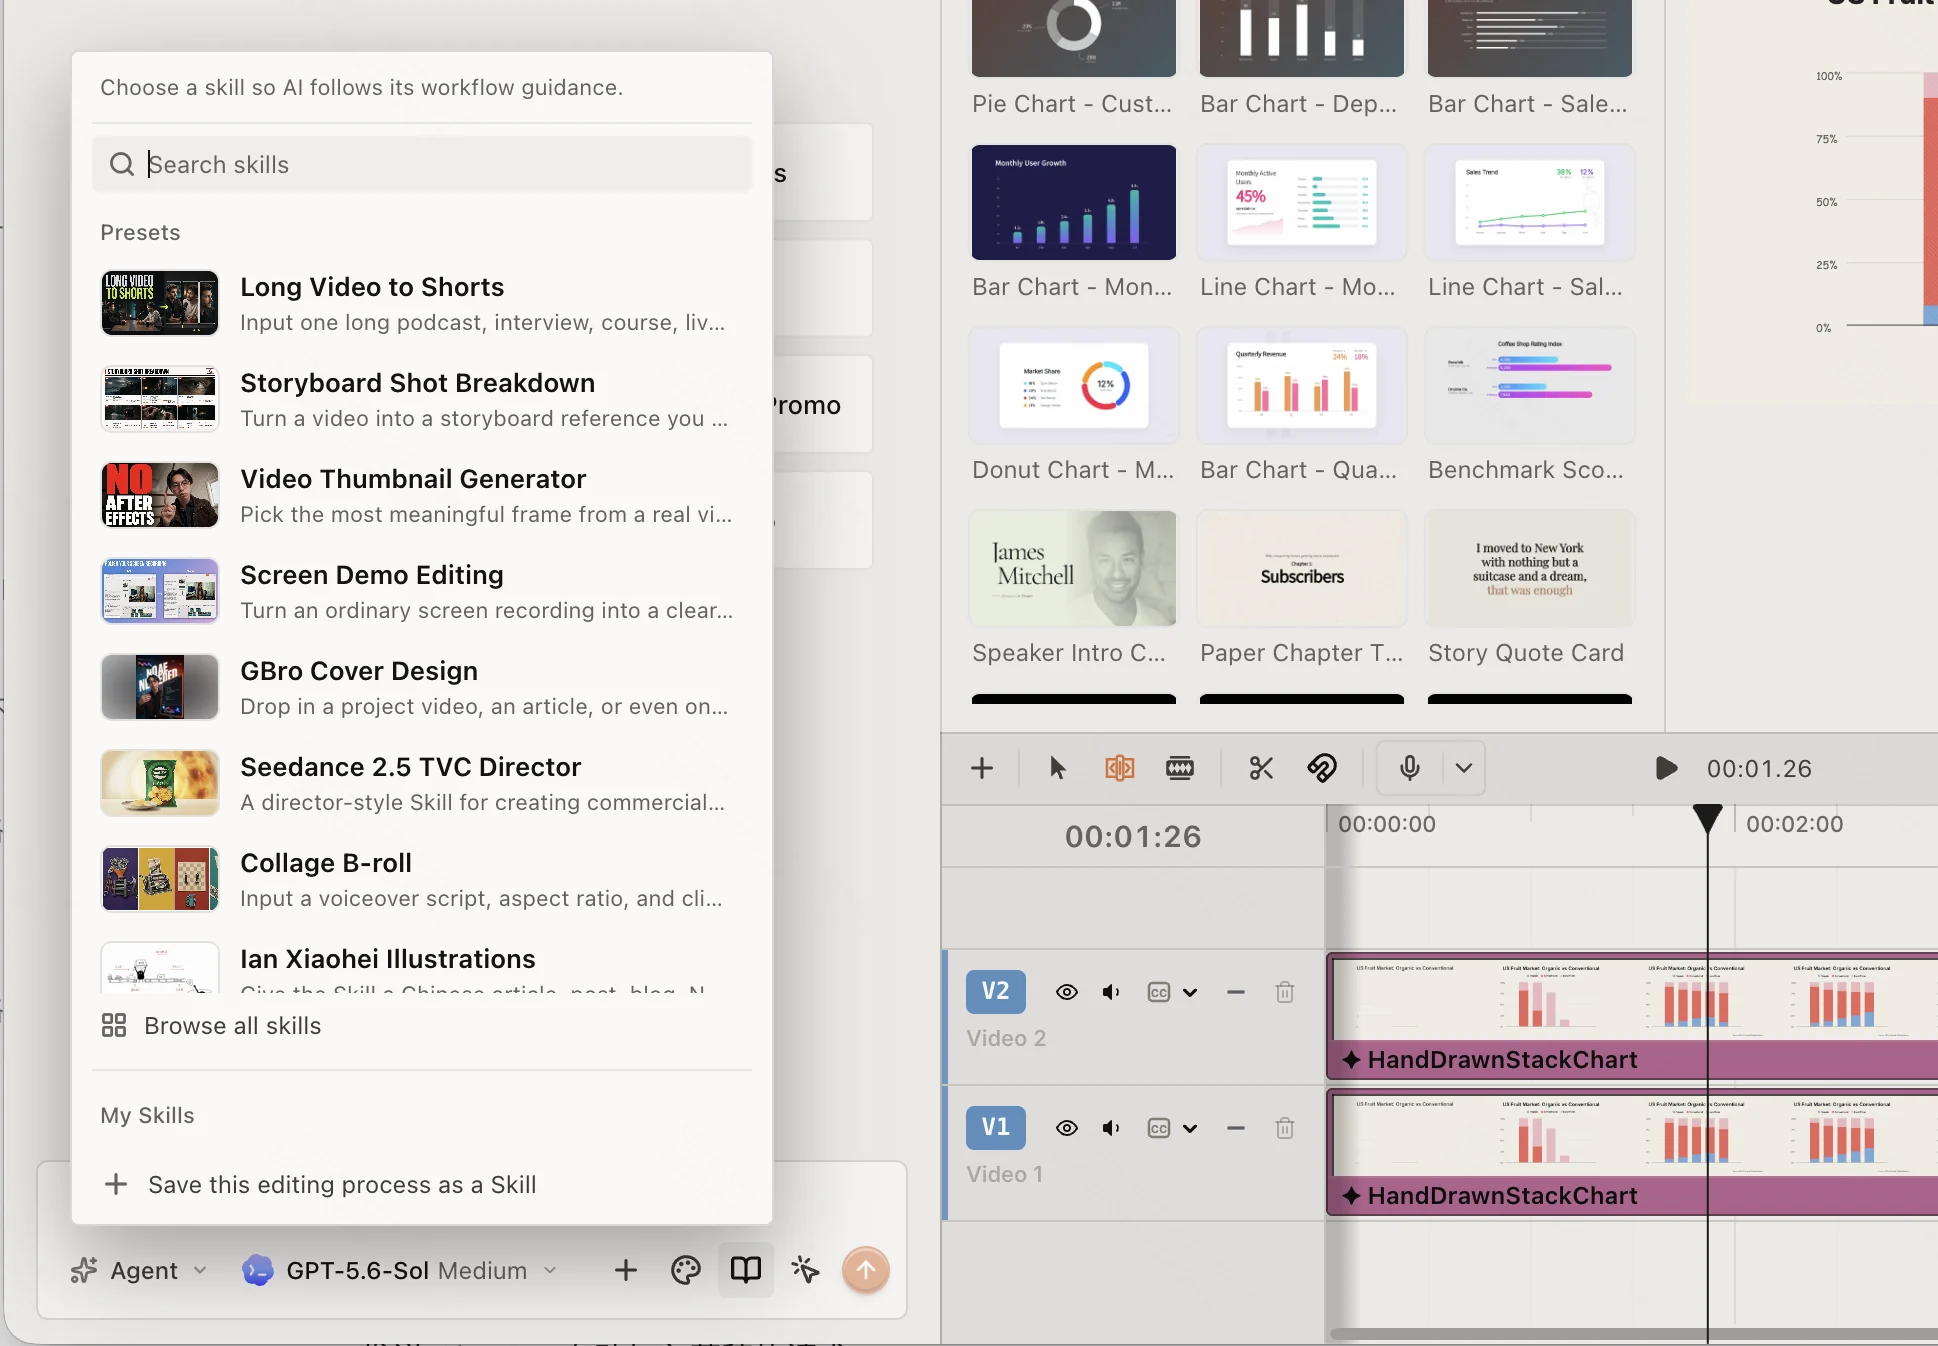
Open the book icon under the composer. The Skills menu provides both existing workflows and Save this editing process as a Skill. Use the save action after an approach works on your footage.
Select Save this editing process as a Skill and send the request it adds to the draft. Answer questions about missing steps or preferences, then review the agent’s summary before confirming the save. This documented flow records the process without changing the timeline or assets.
For example, ask it to retain the rule that highlights must make sense outside the episode. If the summary says “always make three 30 second clips,” correct that before saving unless it is truly your recurring requirement. A convenient choice in one project should not silently become a permanent constraint.
Give the saved workflow a recognizable name such as “Interview clips for hiring managers.” Find it under My Skills. The documentation says personal Skills are available across your ChatCut projects; you do not need to duplicate the old project merely to reuse its method.
Give the saved method a new brief and new evidence
Create or open the next project and import the new source through My Assets. In the AI composer, open the book icon, find your workflow under My Skills, and select it. Confirm that it appears as an attachment before sending a project specific request.
Use the attached interview workflow on this week’s recording for first time hiring managers. Propose complete ideas about evaluating candidates. Keep the conditions attached to each recommendation and identify any missing context. Show the candidate ranges before creating separate vertical timelines.
This is an example brief. Change the audience and subject to match the source. The attached Skill supplies the method; the prompt supplies the current job. According to the Skills guide, the attachment guides that request. Attach it again when a later request should use the same workflow.
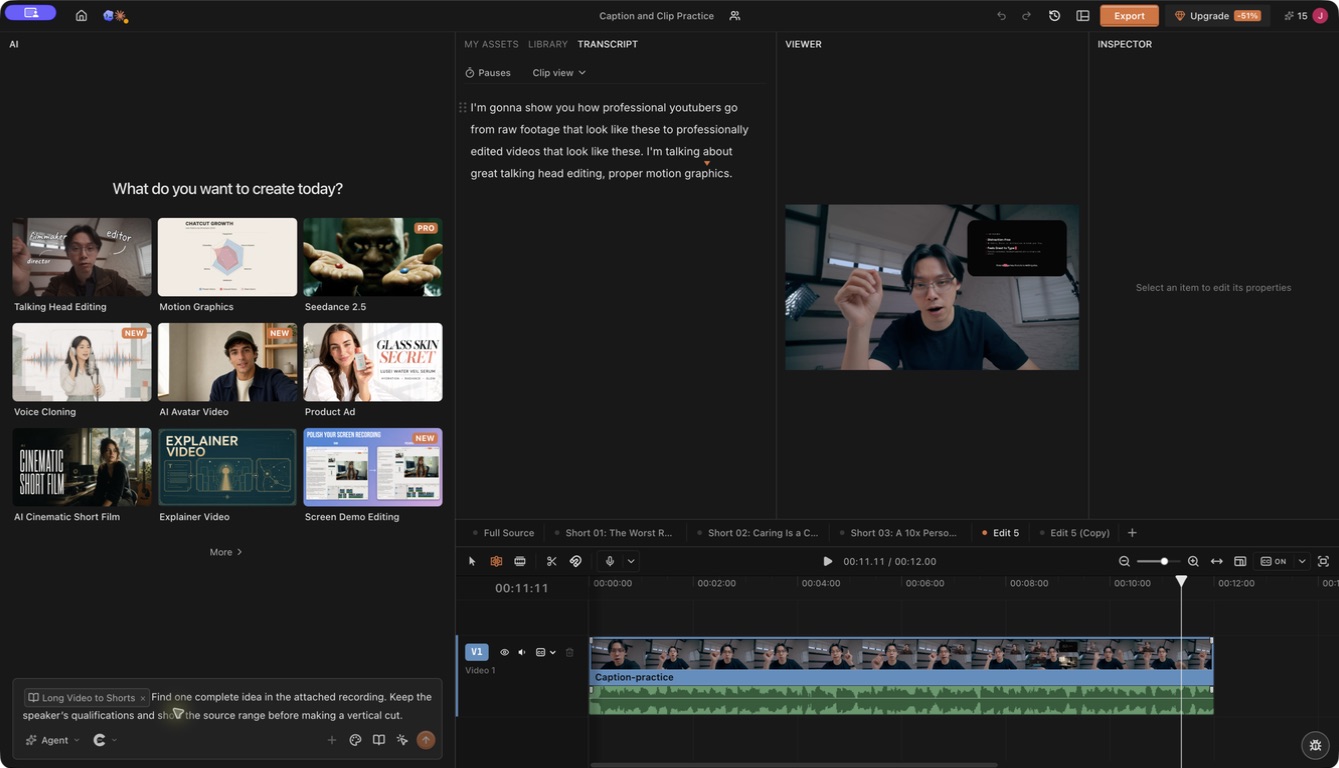
After selection, the Skill appears as a chip inside the composer. Here, the preset Long Video to Shorts is attached to an unsent example brief. Choose your saved method under My Skills for your own workflow, then supply this project’s recording and request before sending.
Review the proposed clips against the original conversation, approve the useful ones, and inspect the resulting timelines. A saved instruction cannot determine whether a new answer is accurate or complete without considering that recording.
Use a preset when the source already matches its job
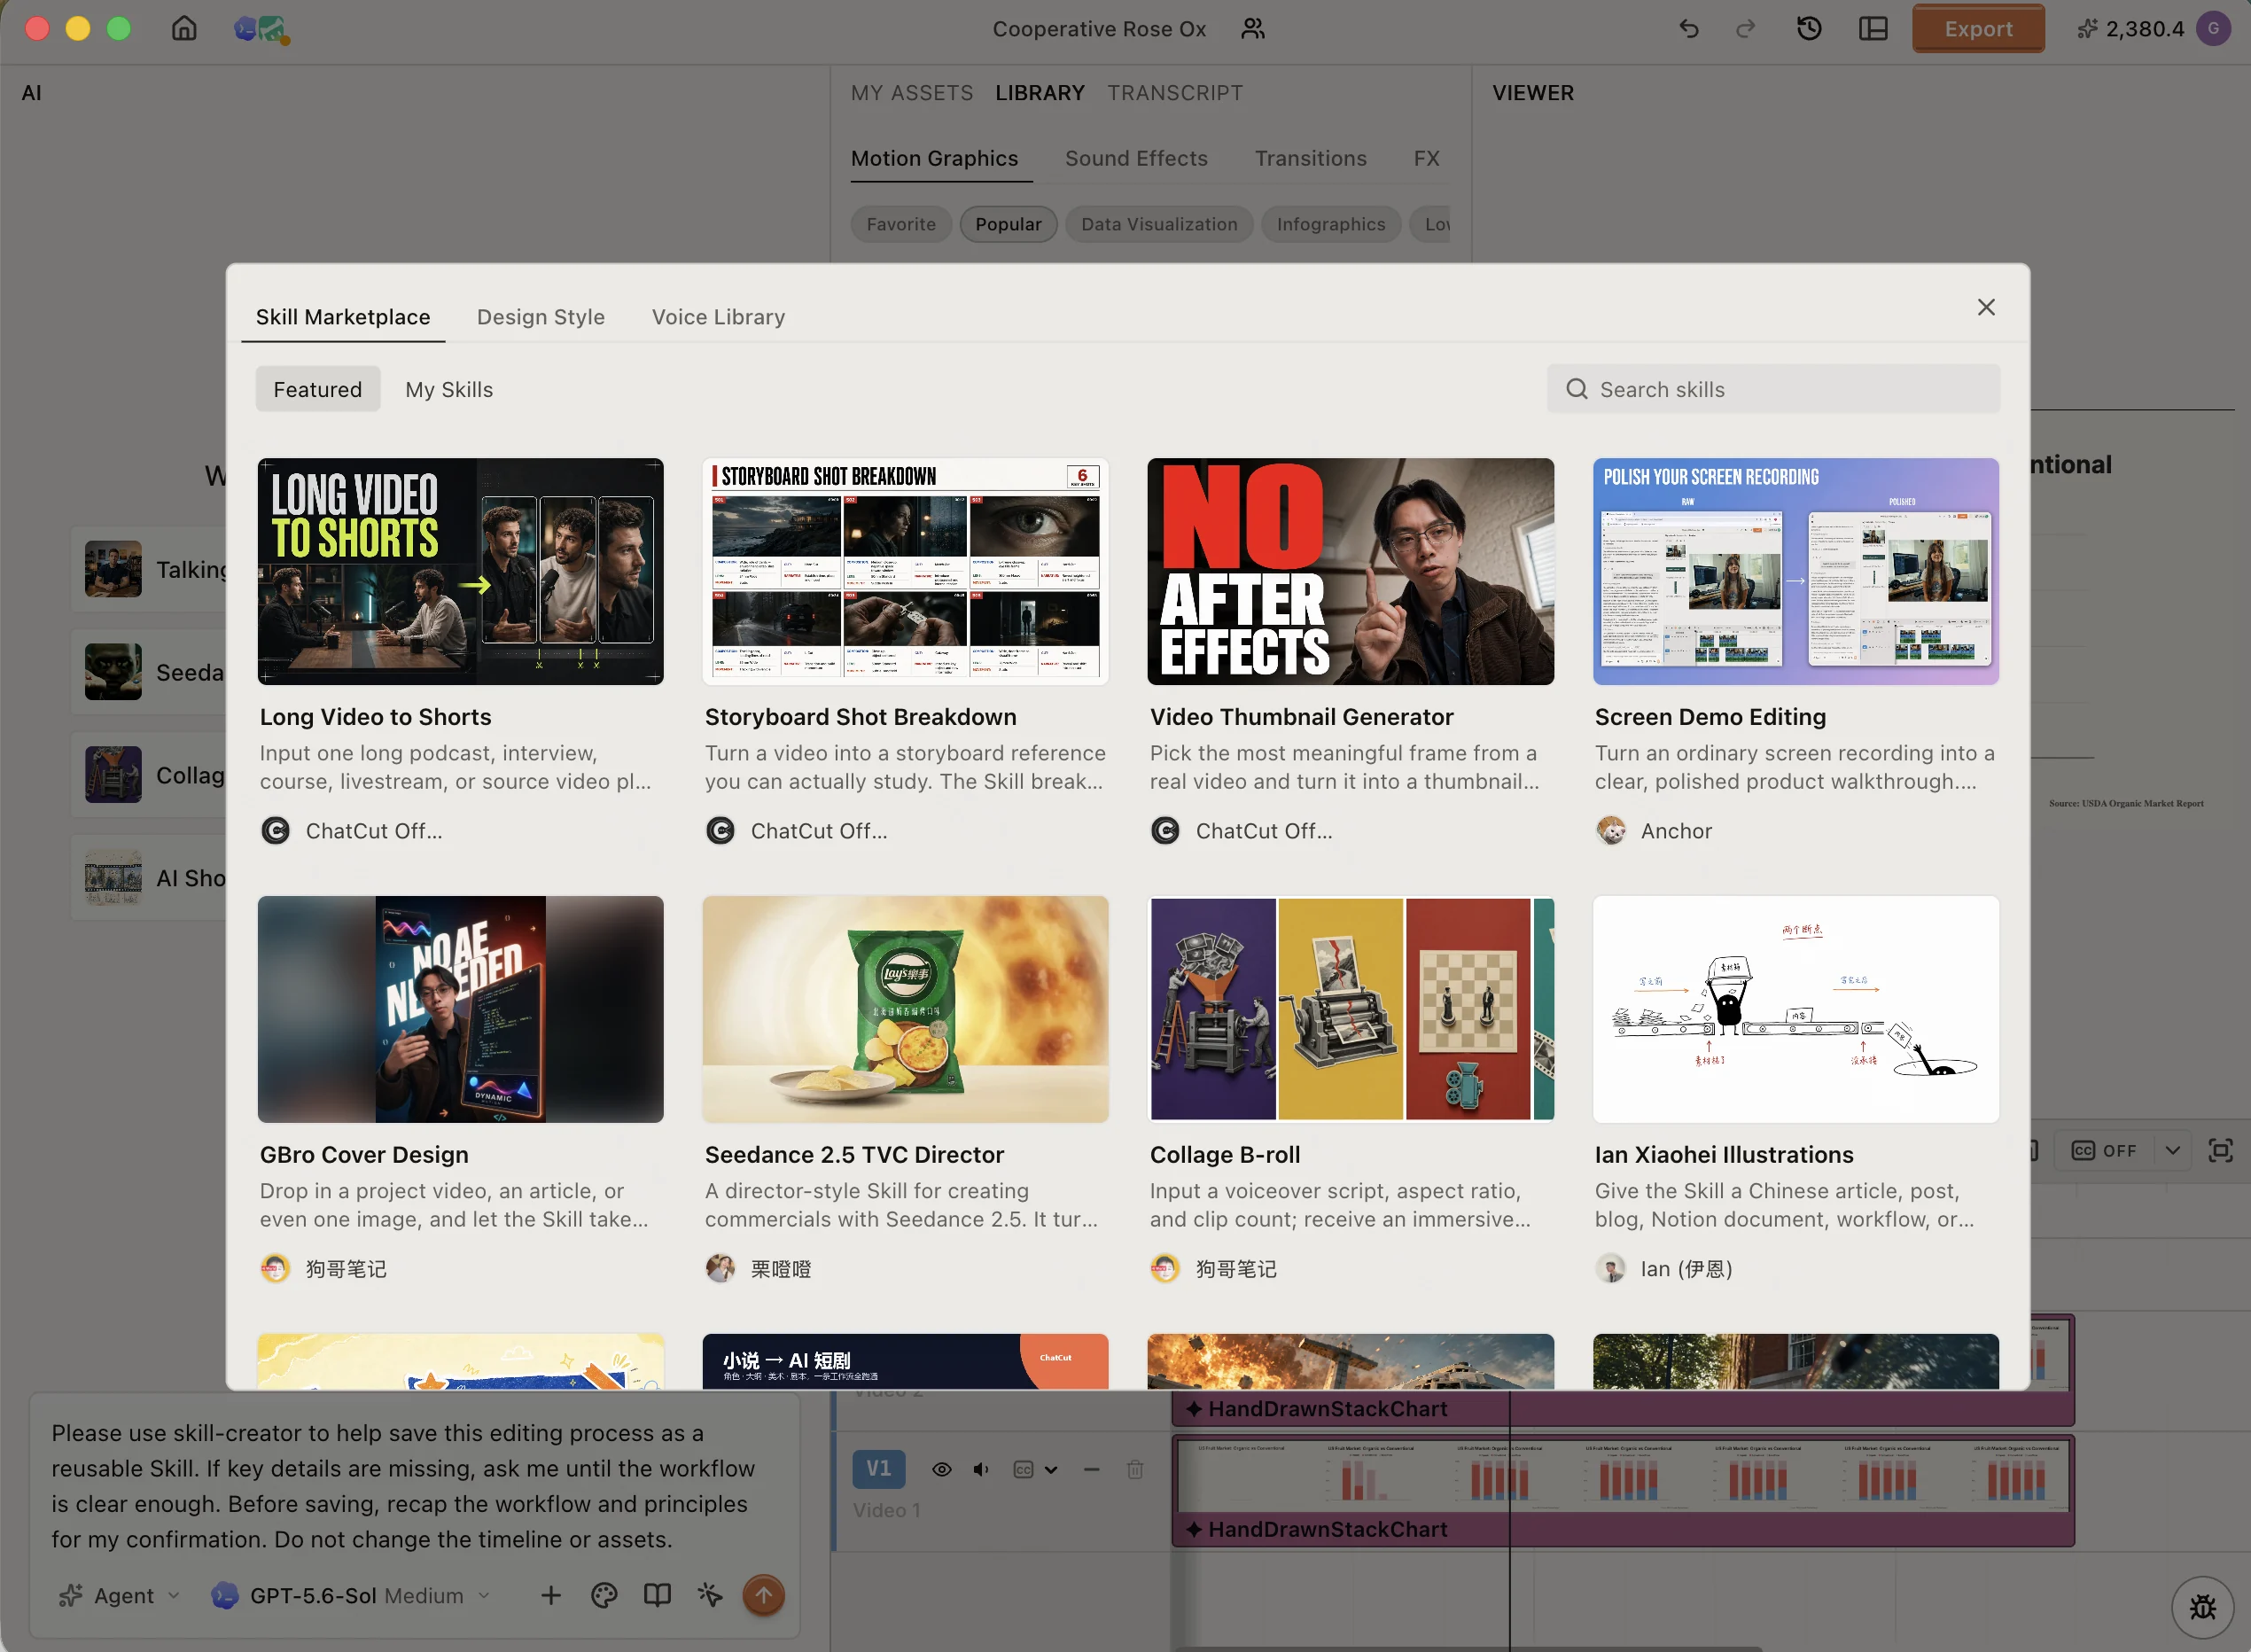
Open Skills → Browse all skills to enter the marketplace. Review the description, author, and available previews, then choose Use this Skill and add the source and intended result to the draft.
Choose Browse all skills to review a workflow’s description, author, and previews. The pictured Long Video to Shorts and Screen Demo Editing entries address different source tasks. Select a workflow for the source you actually have.
Long Video to Shorts is a starting point for extracting complete ideas from an interview or similar recording. Screen Demo Editing addresses a screen demonstration, where preserving the click and resulting state can matter more than tightening every pause. Read the selected entry’s instructions and compare its first result with your source before adopting the process.
Keep workflow, graphics, and captions in their own controls
For the same selection and review method on next week’s interview, save a Skill. For graphics that share a visual direction, use a Design Style. For the same caption type and emphasis, save a caption preset. You can reuse all three while adjusting each to the new footage.
If every new interview should follow the same selection and review sequence, save a Skill. If graphics should share fonts, colors, and a logo treatment, use a Design Style. If captions should share their type and emphasis, use Caption style → Save current style. Review the actual placement on each new recording, because a previously safe position may cover a new speaker’s face.
Use the palette beside the book icon for the visual direction of generated graphics. Keep the Skill attachment for the editing method. Review both on the next source, because neither a saved method nor a saved look decides which new quote belongs in the video.
Make the final editorial decisions on every recording
Choose the clips for the new audience, verify the speaker’s context, correct names and numbers, and review the framing. Confirm any new generation estimate and the intended export. The recorded editing cases show why local corrections matter: one project reports finished clips, while a separate project needs a two speaker reframe and remains unexported.
If the workflow repeatedly makes the same mistake, revise the process you intend to save. If the problem occurs only once, target that clip and range in a regular prompt. Adding every exception to the reusable instructions makes the next job harder to direct.
After the video is approved, a document or publishing connection can support the next handoff when it exposes the required action. Specify the destination and whether you want a draft or publication. The Skills workflow shown here does not demonstrate an automatic research, design, video, and publishing chain across other services.
Frequently asked questions
What part of my recurring video workflow should I save?
Save the selection criteria, editing sequence, and review checks that worked across the project. For an interview series, that might include keeping complete answers and checking faces in each vertical version. Supply the next episode’s quotes, timestamps, audience, and priorities in a fresh brief.
How do I save a successful editing method in ChatCut?
Open the completed project, review what worked, and use the Skills save flow in the editor’s composer. Check the proposed summary before saving it under a useful name. The Skills guide describes the process; saving the method leaves the existing timeline and assets unchanged.
Should I save a Skill, a Design Style, or a caption preset?
Use a Skill for the editing method, a Design Style for the visual direction of generated graphics, and a caption preset for text appearance. You can reuse them together, but each still needs review against the new footage and intended result.
How do I apply a saved workflow to the next recording?
Import the new source, open the book icon in the composer, and select the workflow under My Skills. Confirm its attachment is visible, add the current brief and source references, then send the request. Selecting the Skill alone does not execute an edit.
Which decisions do I still need to make for every episode?
Choose the useful quotes, check the speaker’s context, correct names and numbers, and review framing and sound. Confirm any generation estimate and the intended export. A reusable method cannot decide whether this new recording’s argument, crop, or final file is correct.
Is a ChatCut Skill installed as a Codex plugin?
These are separate controls. The Agent Plugin connects the external desktop task to editing tools. The Skills controls described here are in ChatCut’s editor composer. Do not assume a personal Skill is automatically installed or attached in another host.
Can I rename the saved workflow?
Open the three dot menu beside it in My Skills and choose Rename. Use a name that describes the recurring job rather than one episode’s title.
Will this reduce editing time by a measured amount?
No controlled timing comparison is provided here. The documented benefit is reusing the method across projects while keeping the current brief and review decisions explicit.
Reuse the method, then read the new recording
Save a Skill only after a real edit shows which selection and review rules transfer. Attach it to the next project, supply the new audience, quotes, and output, and inspect the proposed clips before you create or export them. Keep Design Styles and caption presets focused on appearance.
A reusable workflow gives you a strong starting point, not a finished episode. If the same mistake appears across recordings, revise the Skill; if it belongs to one clip, fix that range in a local request and keep the method simple.
SEO title: How to Create Tutorial Videos Viewers Can Follow Meta description: A tutorial works when a viewer can pause, follow the step, and see the same result. Capture the starting state and each visible outcome, then cut the waiting without deleting the evidence.
How to Create Tutorial Videos Viewers Can Follow
Quick summary
A tutorial works when a viewer can pause, perform the action, and see the same result. Define the starting state, record each required action and its visible outcome, then remove waiting and repeated attempts without removing evidence that a step succeeded.
A tutorial is not a screen recording with a voice laid over it. The viewer needs to know where to start, what changed after each action, and how to recognize success. If a click is visible but its result is hidden, the lesson asks the viewer to guess.
In ChatCut, import the screen recording and narration, then ask for a bounded first cut: “Keep the starting settings, each required action, and the final result. Remove waiting and repeated attempts, but preserve the feedback that shows a step succeeded.” Play the returned timeline at normal speed and pause after each action. That check tells you whether the edit teaches the task before you spend time on labels and transitions.
Define what the viewer must be able to repeat
Write one sentence describing what the viewer will finish. Add what they must have open or prepared, and what they should see when it works. Use those three lines to decide which actions belong in the recording.
For a software tutorial, an example outcome might be “export a captioned video and a matching SRT.” The starting state is an imported recording with transcription finished. The success check is a playable video and subtitle file that match. These are practice choices, not required topics or defaults.
List each action with where it happens and what the viewer should see afterward. If a step requires a particular account, version, or file, show that before asking the viewer to click. Prepare a small representative example instead of exposing private production data.
Capture the action and the state it creates
Use a recorder that captures the screen, microphone, and optional camera at the quality you need. ChatCut includes screen, camera, and voiceover recording.
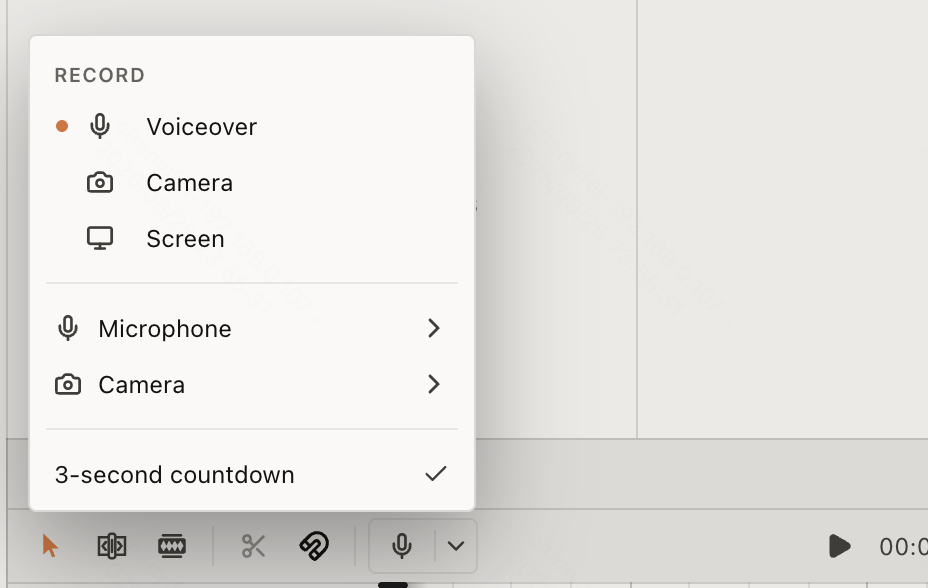
In ChatCut, open the chevron beside Record and choose Screen under Recording settings. Select the left side of Record, choose the screen or window in the system picker, and start the take. Stop with the recording control or the system sharing control. The recording is saved to My Assets and placed at the starting playhead position.
In Recording settings, choose Screen, check the microphone and countdown, then use Record to open the system sharing picker. After stopping, play the asset to check that the intended window and voice were captured.
The recording guide explains microphone selection and the optional countdown. Browser and operating system permissions differ, so make a short test and check the resulting file before recording the whole lesson.
OBS Studio is another option when you want a separate recording setup with scenes and multiple sources. Loom, Screen Studio, and Camtasia are other recording options. Compare platform support and sharing features against the way you intend to deliver the tutorial.
Keep proof beside the instruction
Keep the interface readable and give each important action a visible result. Close unrelated windows, suppress notifications, and use example data suitable for sharing.
Move the cursor deliberately to the relevant control and name it as you use it. Pause long enough for the viewer to see the response. If a process takes time, record its beginning and completed state so an edit can remove waiting without pretending the operation is instantaneous.
When you make a mistake, stop briefly and repeat the complete step. Leave enough space around the new take to make a clean cut.
For example, when teaching subtitle export, capture the click on Export, the selection of Subtitles, the format choice, and the downloaded result. You can remove the wait between those states while retaining the states themselves. A narration saying “download the file” over an unchanged dashboard leaves the viewer to guess the missing operation. If a common error is useful to teach, keep a separate recording of the error and the recovery.
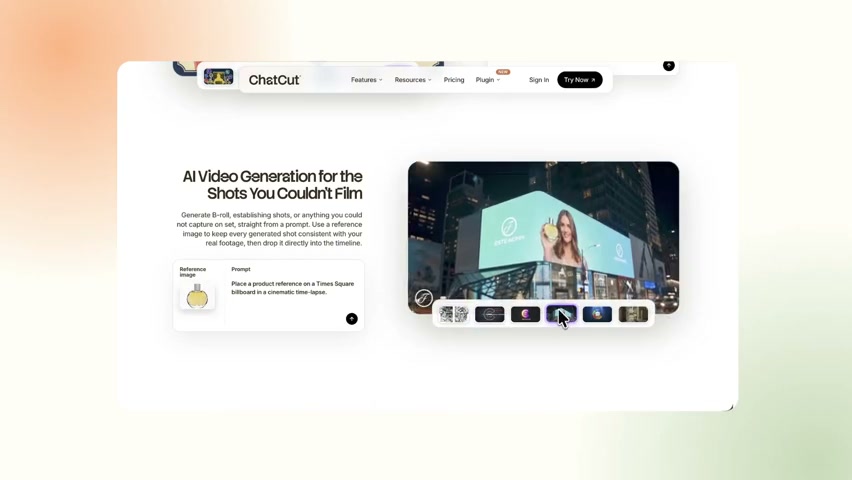
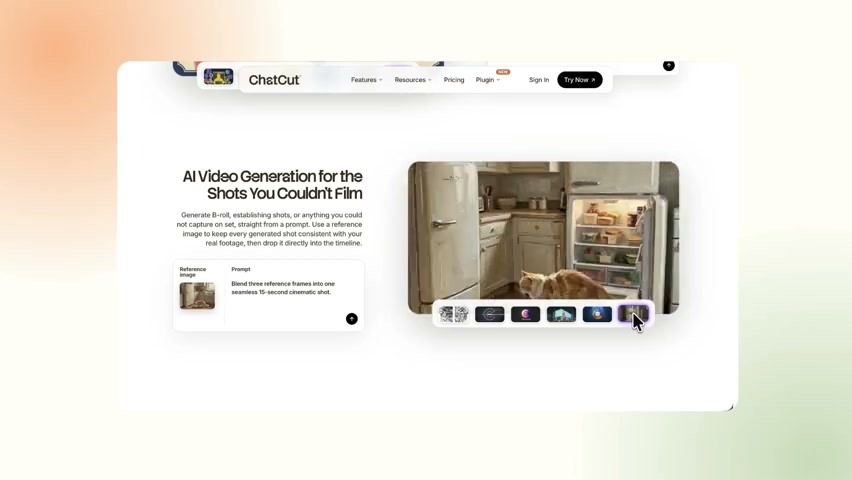
At 1:40 in the Screen Demo Editing catalog preview by Anchor, the cursor and selected thumbnail stay visible below the result. Retain this relationship when shortening a demonstration: viewers need to see which control produced the picture.At 1:50 in the same preview, another thumbnail is selected and the picture has changed. Keep the selected control and its resulting state together. For small labels, judge readability at your actual delivery size rather than assuming a decorative frame helps.
Tighten the lesson without deleting evidence
Keep the promised result, setup, required actions, and final check in a sequence the viewer can follow. Remove waiting and repeated attempts only after you have confirmed that each necessary action and response still appears.
Import the screen recording and narration. Use transcript editing to locate repeated explanations, then inspect the picture before cutting. A sentence can be redundant while the screen underneath it contains an essential action.
Make this tutorial about [outcome]. Keep the starting settings, each required action, and the final result. Remove repeated attempts and waiting, but preserve feedback that shows a step succeeded. Flag any instruction whose matching screen action is missing.
If the action and narration do not agree, rerecord the line or the screen step. Do not use a generated interface as evidence that the real software behaved that way.
Make the target readable while preserving orientation
Zoom when the viewer needs to read or locate a small control. Add a short label or arrow when the relationship is still unclear after framing the real screen carefully.
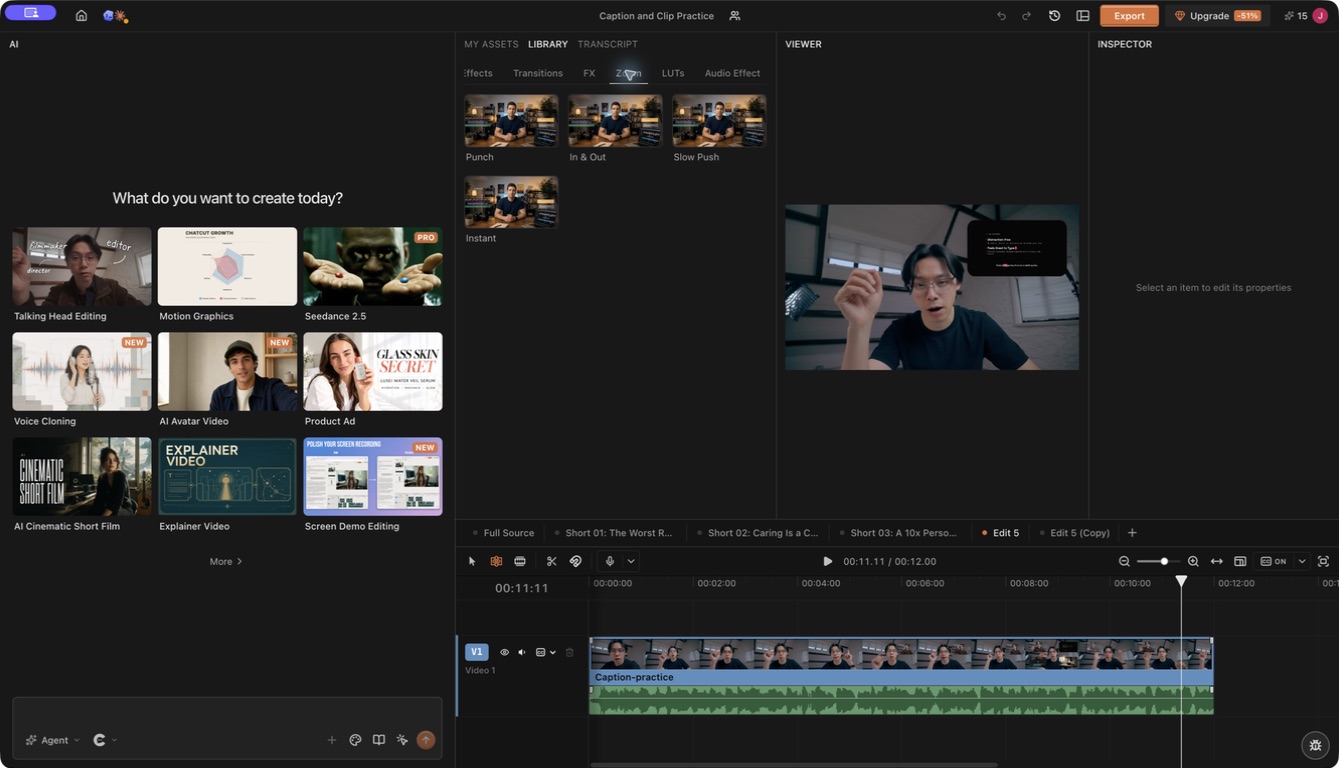
ChatCut’s effects guide documents Library effects, LUTs, Zoom, and Transitions. A supplied zoom can be dragged onto a compatible video clip and adjusted through the properties it exposes. Use a short section to check the framing and timing.
Open Library → Zoom and preview the available movements. Drag a suitable one onto the clip, then use the exposed properties to direct attention to the control. Instant magnifies without an animated move; choose according to what the lesson needs.
Give a callout a specific job:
During [range], label the Export button with “Export.” Keep the label away from the settings the viewer must read, and remove it after the action finishes.
Preview the sequence at the expected viewing size. If a label overlaps a menu that opens later, change its position or end it earlier. Remove decorative movement that competes with the instruction.
Give viewers a way to find and replay a step
Turn on Captions after the spoken edit is stable, then correct visible wording in Content. Check product names, menu labels, keyboard shortcuts, and numbers against the actual interface.
Keep captions away from the control being demonstrated. If a phrase flashes too quickly, review its grouping and the time available. Do not assume a familiar social caption preset fits a dense software screen.
Use clear section titles for longer tutorials. When your publishing platform supports chapters, prepare times from the final exported version.
At 0:40, the same finished preview marks the next subject with “Motion Graphics.” Use a chapter title that names the next task or subject, then return to the relevant screen. This is a visible chapter card, not proof that platform chapter metadata was exported.
Guo, Kim, and Rubin’s 2014 study of edX video engagement analyzed 6.9 million viewing sessions across four courses. Viewers used tutorials differently from lectures, including more skimming and rewatching. For your edit, make each step easy to revisit: show its control, keep the resulting screen state, and title the chapter after the task. This was an observational study of those courses, not proof that every tutorial must fit a universal duration limit. Timeline markers are editing notes; do not assume they automatically become published chapters.
Use the finished file as a learner
Follow the tutorial using a clean starting state and check that every necessary step appears. If that is not possible, have someone familiar with the task review the instructions and record what remains untested.
Play the exported file outside the editor. Inspect small interface text, cursor movement, narration, captions, and the final result. Export a matching SRT when the destination supports it and that is the delivery you need.
Choose resolution according to the source and how clearly the interface must be read. ChatCut’s Export documentation describes the available controls. Export a short section with small interface text and check its readability before rendering the full tutorial.
Frequently asked questions
How do I record my screen and narration in ChatCut?
Open Recording settings, choose Screen, and check the microphone and countdown. Start recording through the system sharing picker and capture the intended window or screen. After stopping, play the resulting asset to confirm the action and voice were both recorded.
What should I write before recording a software tutorial?
State what the viewer will finish and what they must already have open or prepared. For each step, write where to act, what to do, and what should appear next. Record the resulting state as well as the click so the viewer can tell whether the step worked.
How long should a tutorial be?
Long enough to complete the promised task without missing steps. Split independent tasks when each needs its own starting state and outcome. Use clear step boundaries so a viewer can revisit one action without replaying the entire explanation.
How do I zoom into a small control without confusing viewers?
Show enough of the interface to establish where the control sits, then use Library → Zoom and its properties to direct attention. Check the start and end of the move. Keep the next action visible and return to a wider view when the workflow changes location.
How do I check that viewers can follow the finished tutorial?
Follow the exported tutorial from its stated starting point. Try reading the smallest control label at the expected viewing size, and compare captions and narration with the actual interface. Confirm that every action leads to a visible result and that the promised final task can be completed.
Do I need a camera?
No, if the screen and narration explain the task. Use a camera when seeing the person or a physical demonstration adds useful information.
Can I create one for free?
Check the recorder and editor’s actual limits. ChatCut includes recording and core editing, while cloud export allowance, agent use, and generated assets have their own plan or credit rules.
Can AI create the whole explanation from a prompt?
It can help plan, assemble, and revise it. The instructions still need to match the real product and a result the viewer can reproduce.
A tutorial is finished when another person can repeat it
Write the task as a result the viewer can verify, record the starting state and every required action, and trim only the waiting or failed attempts that do not teach anything. In ChatCut, use the recording and narration as the source, describe what must stay, and check the returned timeline at the same pause points a learner will use.
Export the lesson, follow it from the actual file, and confirm the labels, captions, cursor position, and final state are visible. A clean timeline matters only when it still carries the evidence needed to complete the task.
SEO title: How to Edit Videos Without Premiere Pro and Keep Control Meta description: A Premiere Pro alternative needs to handle your hardest editing task. This guide covers AI editing, a test with your footage, and export or project handoff checks.
How to Edit Videos Without Premiere Pro and Keep Control
Quick summary
Leaving Premiere Pro is a workflow choice. Match the alternative to the hardest part of the job, test one representative recording through import, editing, captions, sound, and export, then check which project features and assets survive the handoff.
People leave Premiere for different reasons. A creator may want a faster way to cut spoken footage, a team may need a simple social edit, or an editor may still require detailed color, audio, and effects. The right alternative depends on the part of Premiere you are trying to replace, not on the cheapest feature list.
Use a short version of your real project as the test. In ChatCut, import the recording, open Transcript, and ask, “Make a concise introduction. Keep the problem, demonstration, and next action. Remove repeated takes but preserve qualifications.” Play the editable timeline, add captions and sound, and export it. If you need a native project or complex effects, run the same source through the desktop alternative before you move the full job.
Choose what you are trying to replace
Match the editor to the hardest part of your job. A spoken interview, a clip with designed text, and a project needing detailed color work can lead you to different choices. The table compares documented routes; it does not rank six editors from a shared test.
Editor
A useful starting reason
Check before a full project
ChatCut
Transcript cuts, agent instructions, and an editable timeline
Connection, cloud export allowance, and generation charges
DaVinci Resolve
Editing, color, audio, and effects in one desktop application
Hardware, media compatibility, and Free versus Studio features
Clipchamp
Straightforward clip assembly and text
Current export settings and account entitlements
Shotcut
A free, open source desktop timeline
Import, playback, and export with your actual files
CapCut
An existing social video workflow you already know
Feature availability, assets, and export terms for your region and plan
Canva
Video assembled with designs and brand material
Required editing controls and asset permissions in your account
DaVinci Resolve is a complete editor. Its color, Fusion, and Fairlight workspaces are part of a broader production workflow; the free application and Studio have different capabilities. Do not assume a feature shown in a Studio demonstration is included free.
Clipchamp provides clip editing, text, and other common video tools. Shotcut offers a desktop timeline and a documented set of format and filter capabilities. Import a short file and export it before committing to either for a large delivery.
CapCut and Canva are also options for short social edits and designed video layouts. Check the export watermark, included assets, and AI allowance in the account you will use before building a project around a paid feature.
Test the file that could break the move
Try a source file that can reveal a problem before you commit. For a phone clip, inspect rotation and any HDR color change. For an OBS recording, confirm that the microphone and game tracks arrive. For an ongoing Premiere project, transfer a small sequence with its actual media. Importing an MP4 successfully does not establish that the editor can reproduce a native Premiere project.
For a free desktop timeline across those systems, Shotcut’s download page provides macOS, Windows, and GNU/Linux builds. At this September 18, 2026 check, the current release is 26.8.1; its macOS build requires macOS 12 or later, and the current Windows choices cover Windows 10 and 11. Older systems have separate older releases. Use the download matching your OS and processor, then test your source codec and playback.
For a browser route, ChatCut and Clipchamp avoid choosing a native editor package, but your browser still needs media access and usable playback. Treat a desktop application, its web editor, and an external agent plugin as separate routes when checking compatibility.
Follow the cost and resolution to the final file
Follow the cost through to the file you need. Check whether you can use your chosen tools and assets, export at the required resolution, and make another version without exhausting an allowance.
ChatCut’s current Free and Pro guide includes manual timeline editing, uploads, transcription, and standard project work in Free. Free web and cloud video rendering has a cumulative 60 minute account allowance. Generation consumes credits, and some model or output capabilities require Pro.
The export limits guide distinguishes cloud rendering from local Desktop export. A local export option also does not imply that every AI generation task runs on your computer.
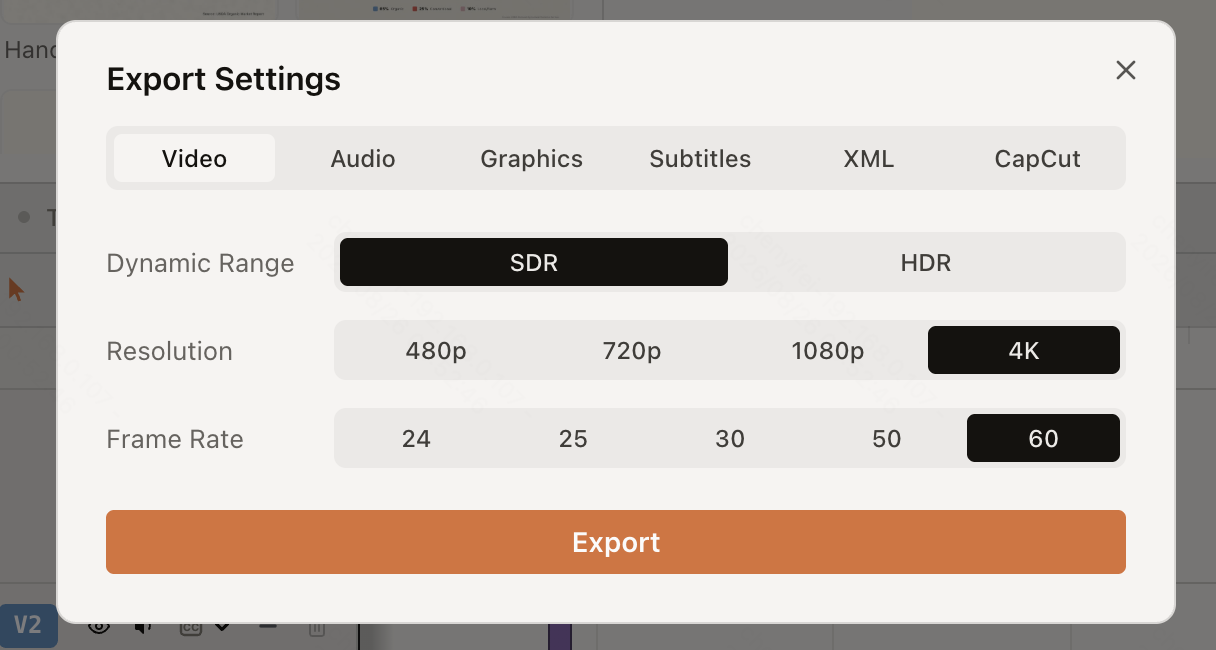
For an independent video you want to finish without a cloud duration allowance, ChatCut Desktop’s local video export supports 4K and does not use the Free cloud video quota. The documented 4K setting targets a short side of 2160 pixels, so consider the canvas orientation. Audio, graphics, and some export bundles may still use cloud rendering. Choose the video route you need before comparing “free export” claims.
Keep source files and any licenses for music, fonts, or stock media. A project that opens successfully is not yet proof that all its selected assets can be used in the intended delivery.
Use a small real project as the migration test
Build the story first, then add captions and sound. Use a short recording for this practice so you can inspect every cut.
1. Import the footage
Open a project and use My Assets to upload the source. Place it on the timeline and wait for processing. For a separate microphone recording, import both files and check alignment before editing.
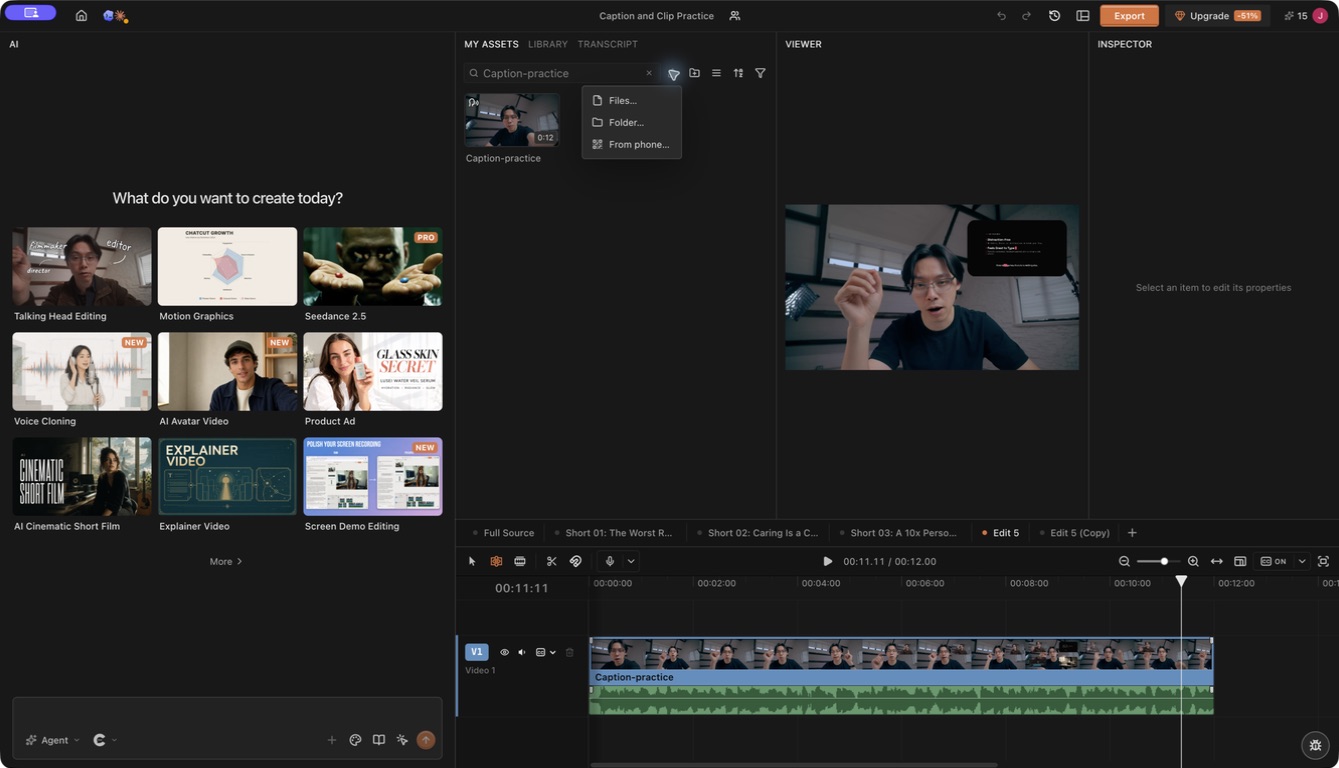
Open My Assets, select the Import icon, and choose Files for your recording. After import, look for its thumbnail in the media pool. This practice project uses a short public tutorial excerpt.
You can also work through the Agent Plugin in a supported desktop app. That setup is separate from opening the ChatCut web editor.
2. Remove the parts the viewer does not need
Open Transcript and select an abandoned take or repeated explanation. Delete it to cut the corresponding recorded range, then play the join.
For a broader first pass, describe the intended audience and the parts that must stay:
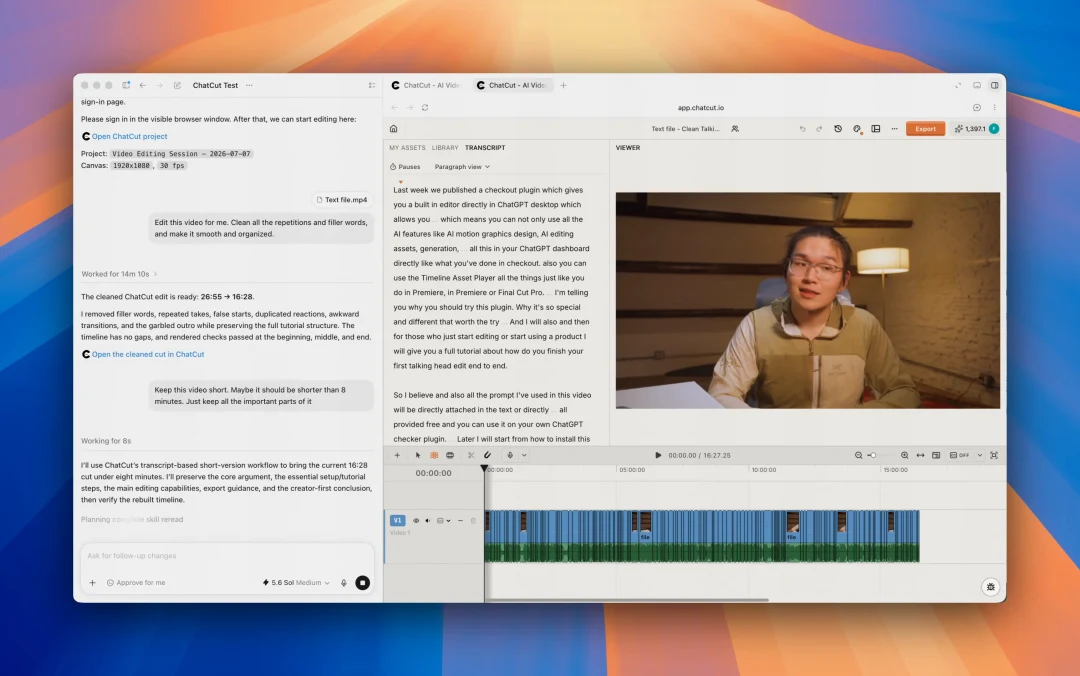
The published walkthrough shows the cleanup request beside a real cut: the response reports 26:55 reduced to 16:28 and the timeline contains the separate segments. A later request for under eight minutes is still being processed in this frame.
Make a concise introduction from this recording. Keep the problem, the demonstration, and the next action. Remove repeated takes, but preserve qualifications and pauses that help the explanation.
3. Add captions and supporting material
Turn on Captions, correct names and numbers in Content, and inspect the style over several frames. Deleting words in Transcript changes the recording, so use Content when only the caption is wrong.
Add a supporting shot or graphic where the viewer needs to see something the words alone do not explain. Keep it on its own track so its timing and placement remain adjustable.
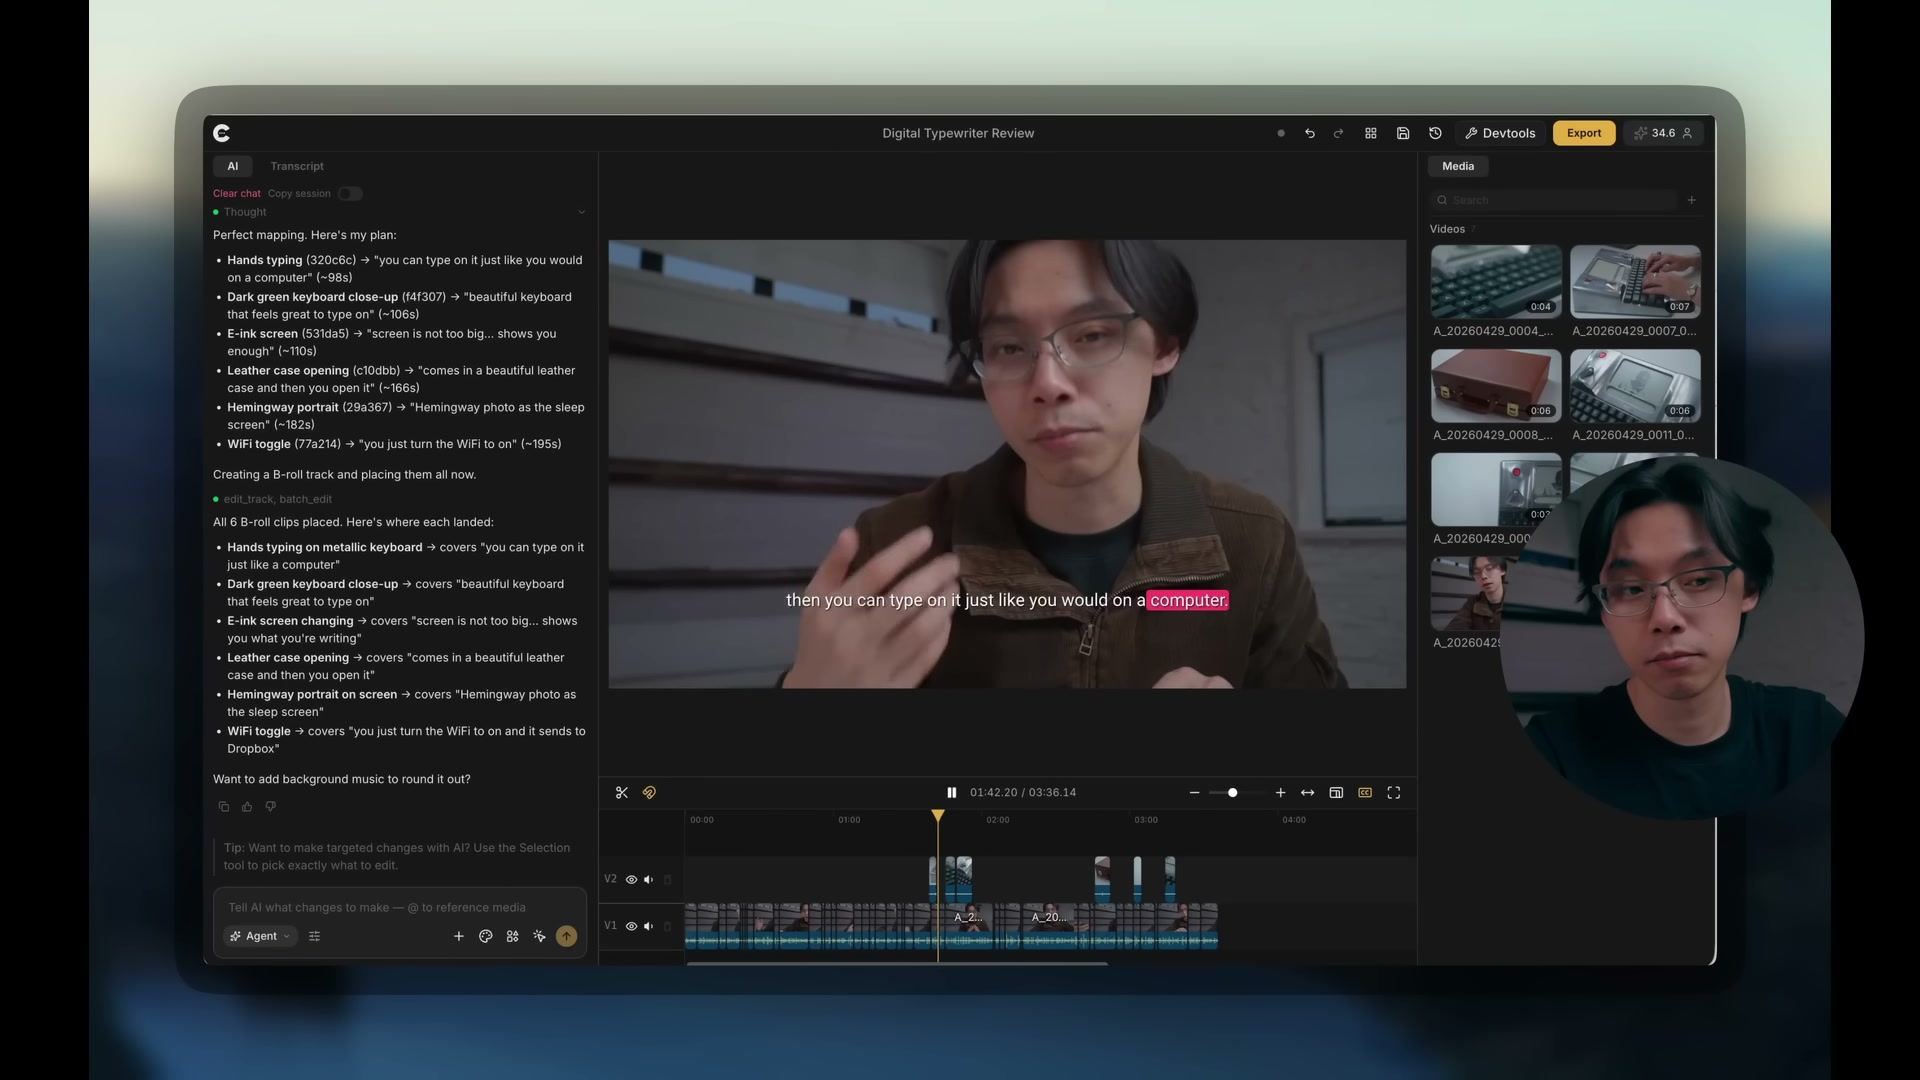
In a separate published project, captions sit over the speaker and real product recordings are available in the media pool. Match each supporting shot to the spoken feature. This shows the type of finished sequence to inspect when testing an alternative editor.
4. Mix sound and export
Keep dialogue and music on separate audio tracks. Adjust the music under the speech and listen through quiet passages. For automatic ducking in ChatCut, set dialogue as the anchor and music as the follower through the track header controls.
Open Export and choose the required format and range. Play the actual file outside the editor, checking its beginning, ending, picture, sound, captions, and orientation.
In the Video tab, choose resolution and frame rate for your source and delivery. For a 1080p source, start by checking a matching 1080p export. Selecting 4K does not recover detail absent from the recording.
Protect the handoff your client actually needs
If your client needs the native Premiere project or your cut depends on its plugins, keep that requirement in the decision. Try transferring a small sequence before choosing an alternative for the rest of the job.
For a new independent project, you can choose the editor that fits your preferred way of working. For an ongoing project, test a small handoff first. ChatCut’s XML export can transfer a supported timeline to Premiere Pro or DaVinci Resolve, but captions, effects, transitions, and other items can be omitted.
An XML handoff is not the same as preserving every native project feature. Keep original media and a reference video available, and verify the imported timeline before replacing the existing workflow.
Frequently asked questions
Which free Premiere Pro alternative should I try first?
For a desktop timeline, consider Shotcut; for broader editing, color, effects, and audio work, consider DaVinci Resolve’s free version. For transcript and agent editing, try ChatCut. Check the tools, assets, and export limits your actual job requires before committing the project.
Which option works on Mac, Windows, or Linux?
Shotcut provides builds for all three. Choose the supported version for your operating system and processor. Browser editors such as ChatCut and Clipchamp provide another route. Test the actual codec, rotation, color, audio tracks, and playback on the computer you will use.
Can I export a 4K video without a cloud rendering quota?
ChatCut Desktop’s local video export supports 4K and does not consume its Free cloud video allowance. The documented 4K size uses a 2160 pixel short side. Confirm that you are using local Video export; other outputs or bundles can follow different rendering routes.
Can I move my existing Premiere project to another editor?
Test a small sequence with its actual media before moving the full job. Confirm the supported transfer format, relink the sources, and inspect cuts, captions, effects, and transitions. If the client requires the native Premiere project or a particular plugin, include that requirement in the decision.
What is the simplest way to finish a video without Premiere?
Import a short recording, place it on the timeline, and cut the repeated material. Add captions in Content and keep music on its own track. Play the complete sequence, export the required format, and inspect the downloaded file before moving to a larger project.
Can I edit without installing a desktop application?
ChatCut and Clipchamp offer browser editing. Your browser still needs access to the media and any required permissions. On a managed computer, follow the organization’s rules for uploads and software access.
Is DaVinci Resolve only for finishing?
No. It includes editing as well as color, visual effects, motion graphics, and audio work. Choose it for the complete workflow when those controls fit your project.
Can a beginner use a timeline editor?
Yes. Start with import, cut, playback, and export on a short clip. Transcript and agent instructions provide additional ways to express an edit; they do not remove the need to review it.
Is this a test of six editors on the same footage?
No. The choices above follow documented workflows. A fair speed or quality comparison would require the same source, task, output requirements, and review standard.
Leave Premiere only after the replacement survives your test
Name the hardest part of your current project, then test a representative source through import, cutting, captions, sound, and export. ChatCut is a useful route for transcript and agent edits when you want an editable timeline; Resolve or another desktop editor may fit better when the project depends on detailed color, effects, audio, or native Premiere features.
Check what transfers, what must be rebuilt, and which export or generation limits apply. Play the actual file and inspect the handoff before you move the rest of the project.