How to Add Subtitles to a Video That Viewers Can Read
You can add subtitles to a video by generating a transcript, correcting the words, and checking when each line appears. The finished subtitles can be saved into the picture or exported as an SRT file for a compatible player to turn on and off.
Readable subtitles let more people follow the same video. W3C’s accessibility guidance explains their value for people who cannot hear the audio and those who process written information more easily. Correct names, readable timing, and meaningful sound descriptions help carry the explanation across.
In ChatCut, you can correct caption text without cutting the speaker’s recording, preview it over the footage, and choose the appropriate export. That gives you a way to fix a misspelled name, check its timing, and deliver subtitles for the video or player your audience will use.
How to add subtitles to a video
Adding subtitles is four steps, whichever editor you open. Transcribe the speech into timed text. Correct the words that the recognizer misheard, most often names, product terms, and numbers. Adjust the line breaks and timing so each line stays on screen long enough to read. Then deliver the result in the form your destination accepts, either burned into the picture or as a separate file.
Automatic text needs a correction pass. A misheard name can confuse who is being discussed, and a missing “not” can reverse the meaning. Check those words against the voice before styling the captions.
ChatCut’s AI captions include transcription and manual caption editing on the Free plan. The walkthrough below takes you from the first captions to a file you can use. Export options and costs are covered with the delivery steps and FAQs.
1. Add captions to your video
In ChatCut, upload your recording, put it on the timeline, and wait for the speech to turn into text.
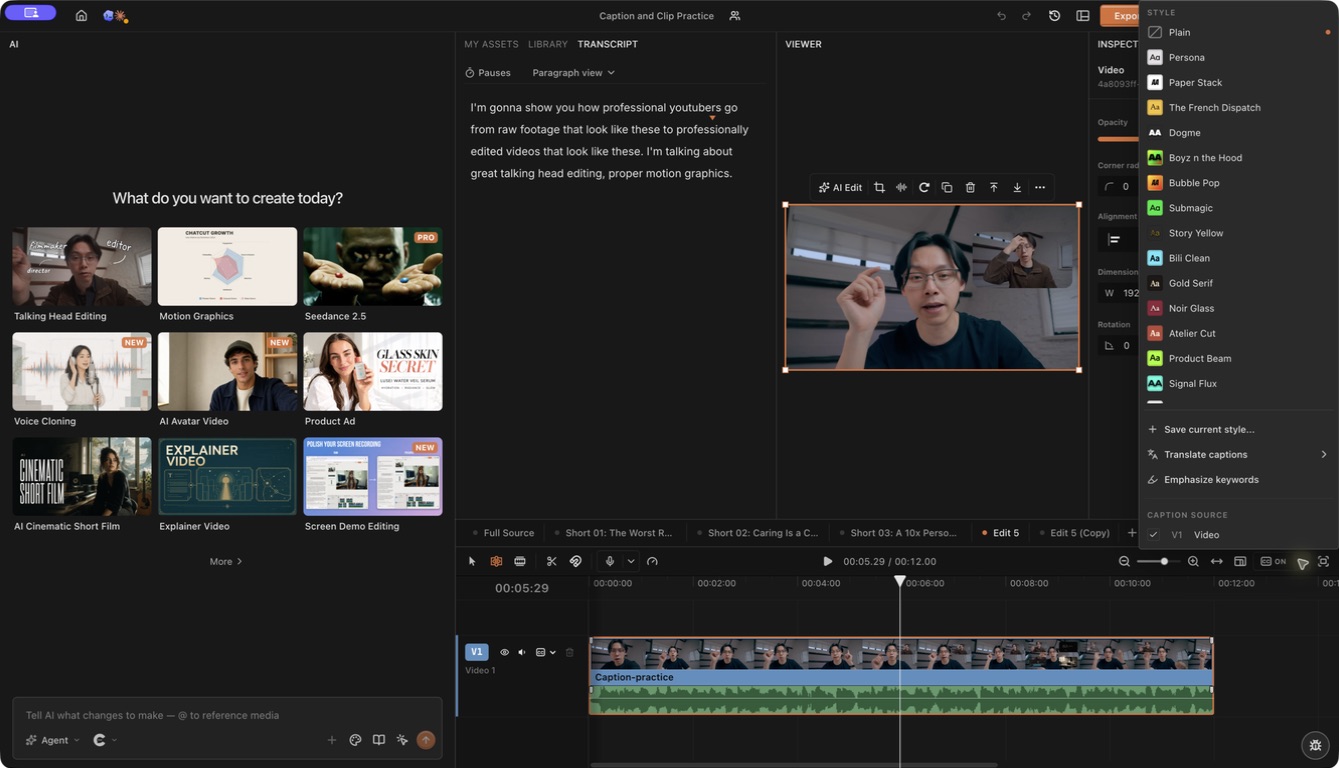
Below the video, select the left side of the Captions control to show the words. The arrow beside it opens Caption style. Choose Plain, Netflix, or TikTok Pop as a starting point.
After the first pass, correct a wrong word in Content. Selecting words in Transcript and pressing Delete cuts that part of the recording, which is a different operation.
You can also ask the Agent to add captions. In our talking head tutorial, the creator asks for captions in the conversation. The next playback shows the words over the speaker.
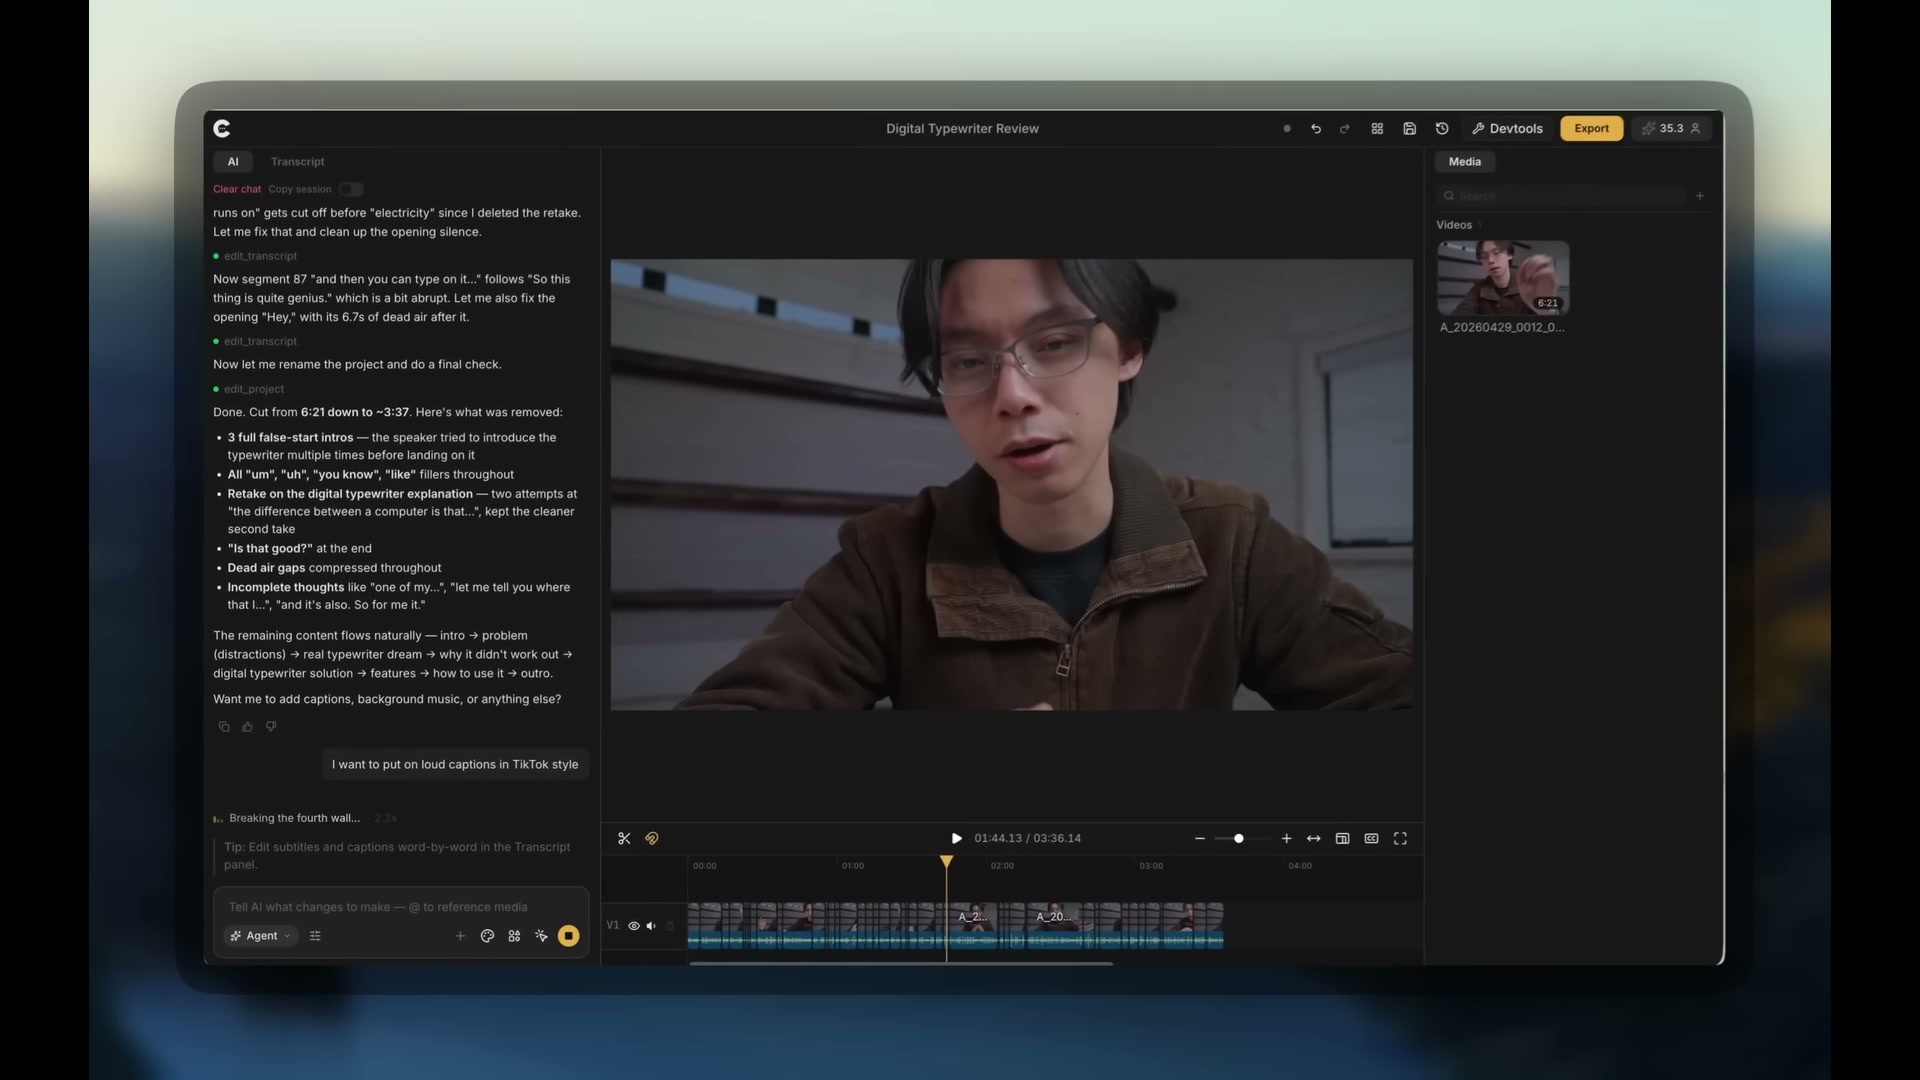
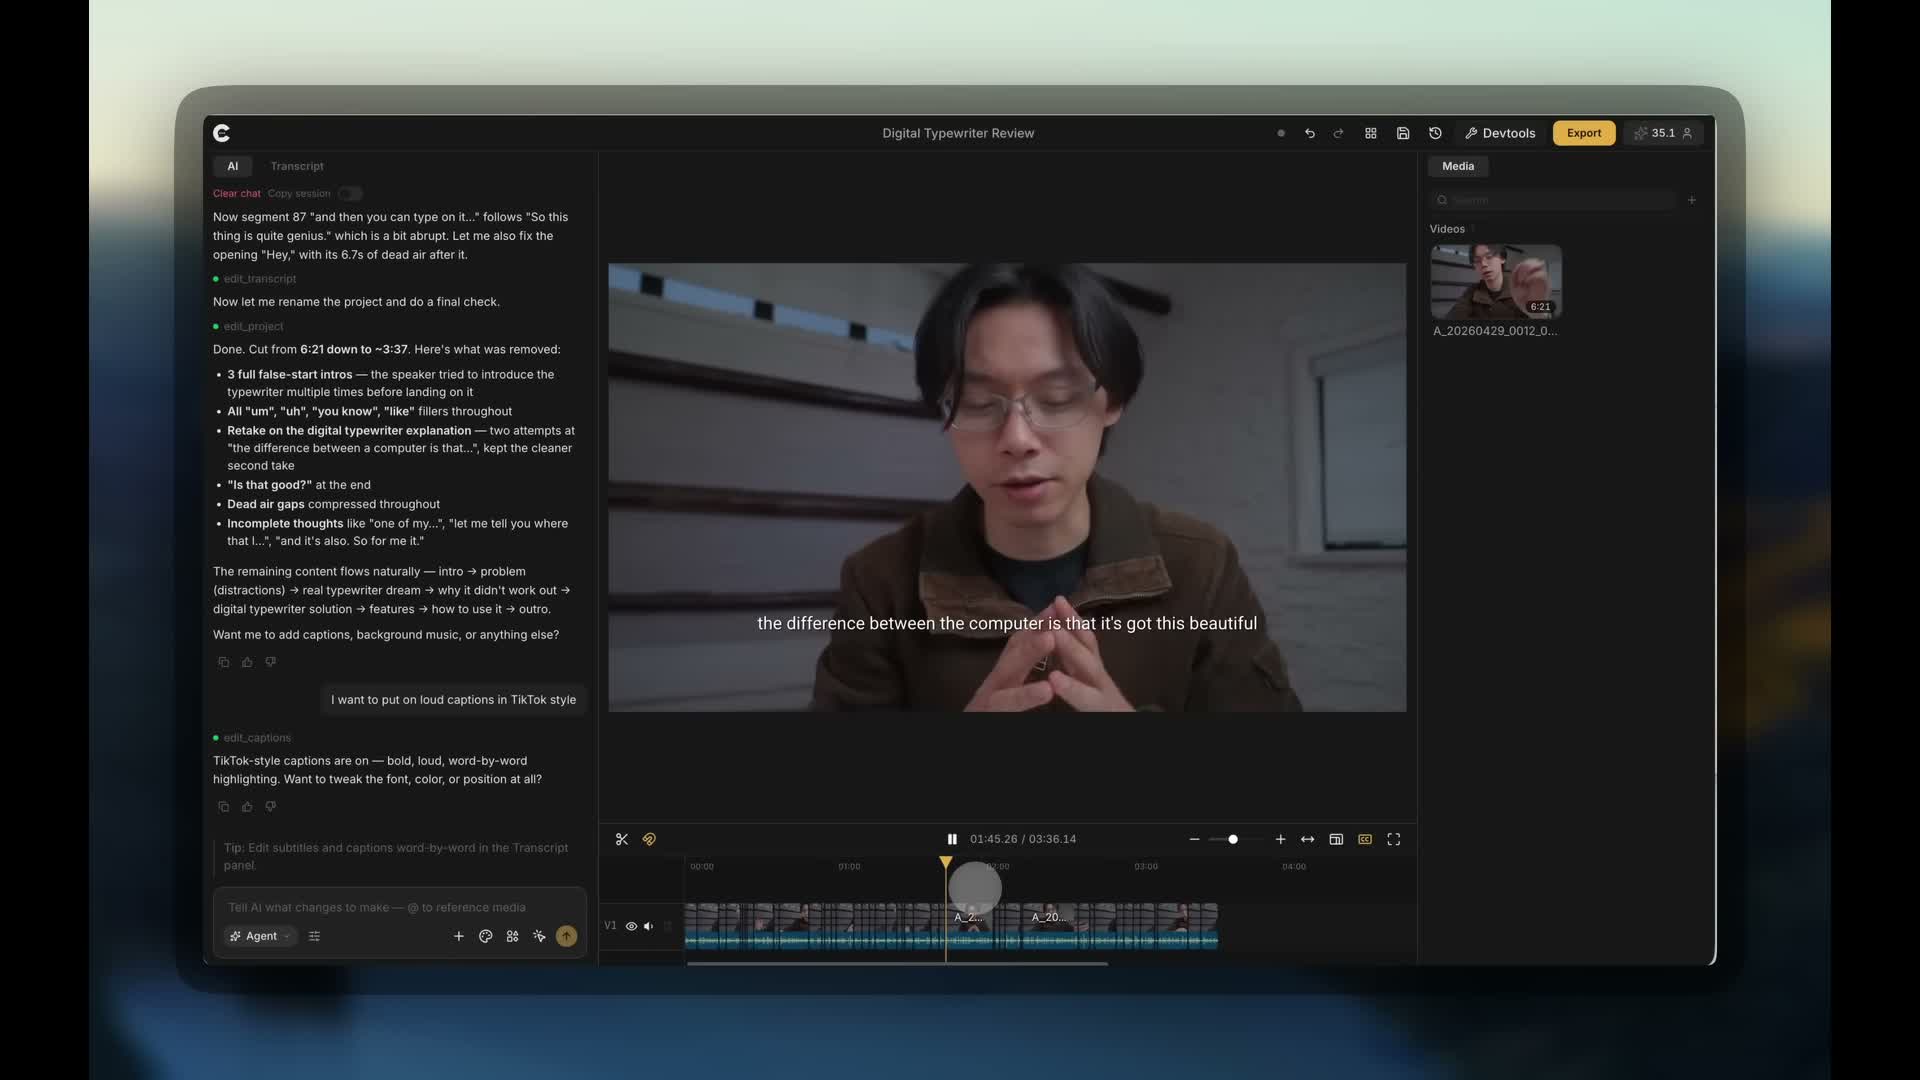
If the captions follow the wrong speaker, check the source track. A project can have speech on more than one video or audio track. Use the V1/V2 or A1/A2 selector to choose the one you want. The caption guide explains the controls.
2. Correct subtitle text without cutting the voice
With captions turned on, open Content. Each caption appears as a block of text, called a card in ChatCut. You can correct its words or split and join the blocks.
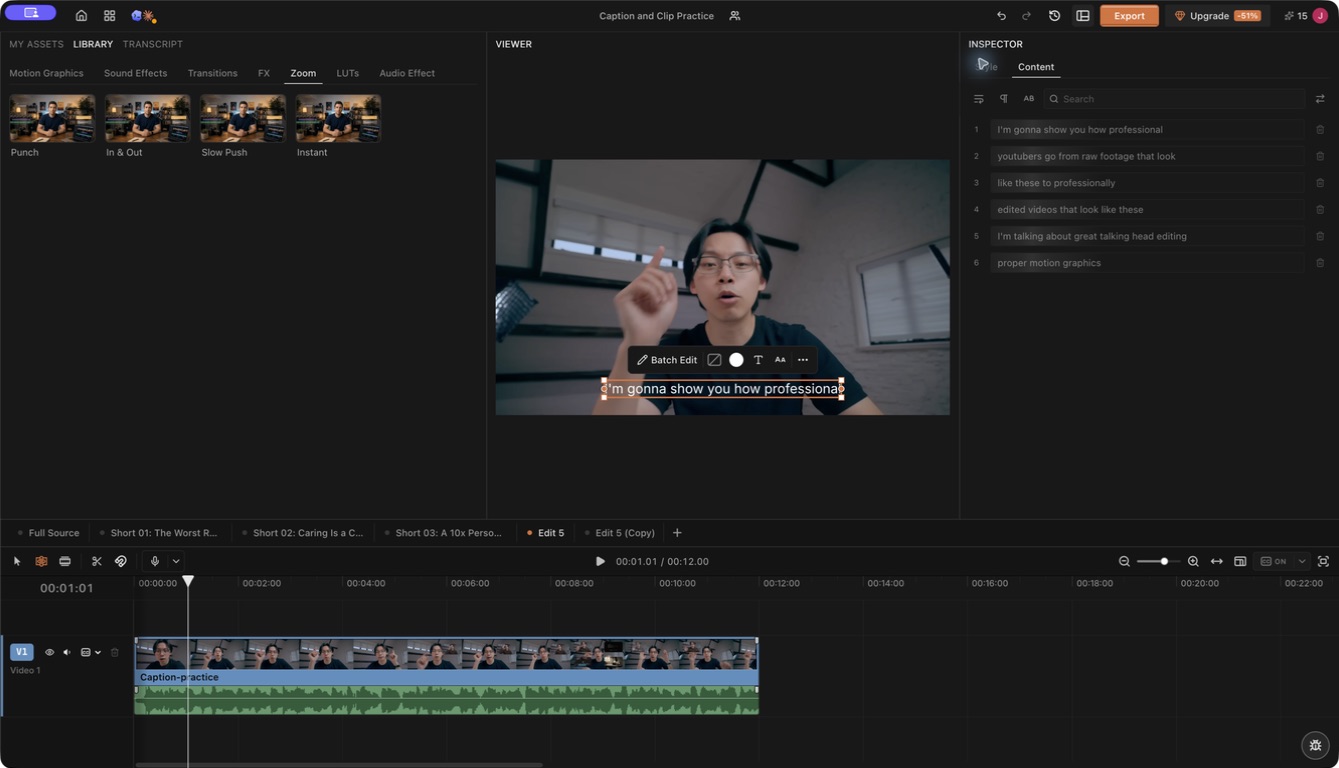
Treat the automatic text as a first draft. Start with names, numbers, and terms the software may have misheard. Listen to the sentence, correct the caption, then play it again. For a mistake that appears throughout the video, use search and replace in Content.
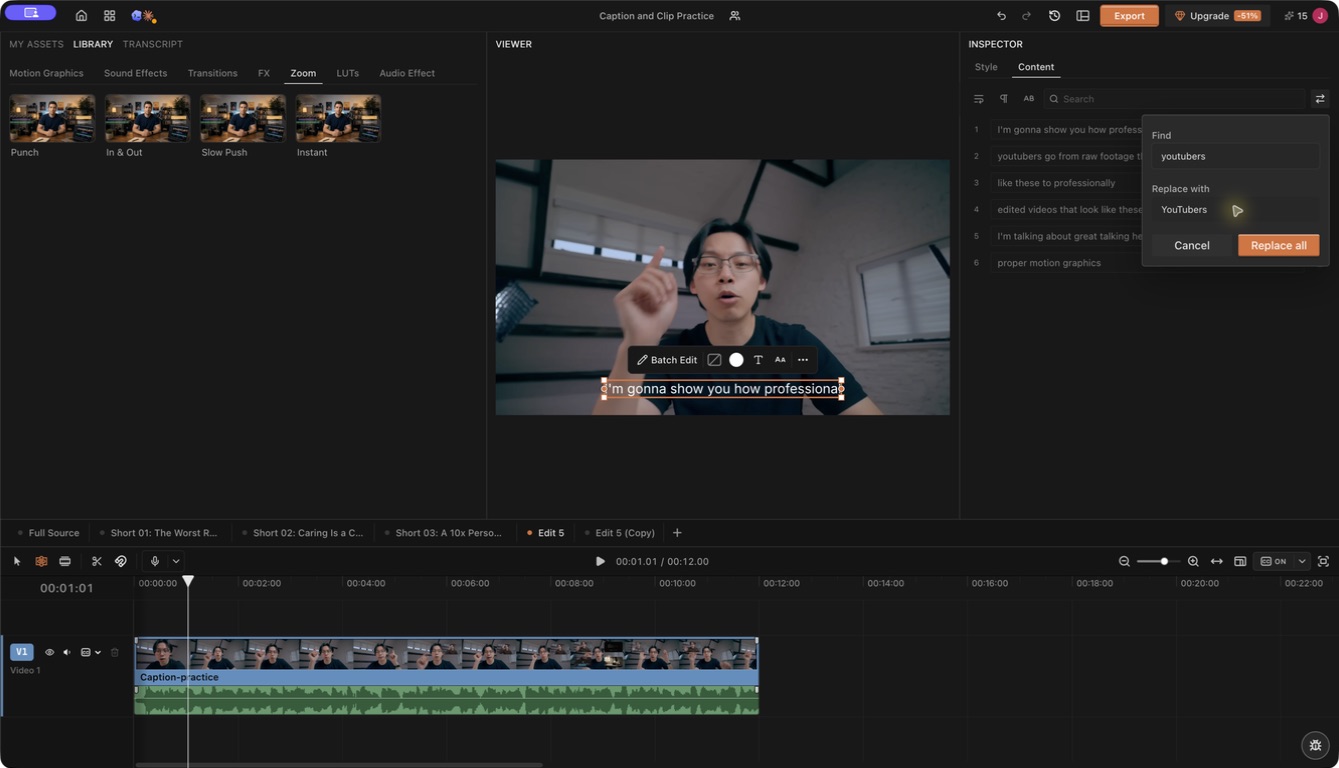
Keep the speaker’s meaning intact. “We can’t ship on Friday” must not become “We can ship on Friday.” Short words can change the whole message. The BBC subtitle guidelines recommend keeping the original speech when there is time to show it. Avoid rewriting a speaker’s words just to make a caption shorter.
The controls below separate changes to the visible words from changes to the recording.
| What you want | What to use |
|---|---|
| Correct a misspelled name | Edit the caption text in Content |
| Break a long caption into smaller pieces | Split the caption in Content |
| Join text that changes too quickly | Merge the captions in Content |
| Remove a sentence from the recording | Select its words in Transcript and delete |
| Hide one caption but keep the speech | Delete the caption in Desktop 0.2.28 or later |
Content editing works on Web and in Desktop 0.2.25 or later. If the controls are missing, check your version against the caption editing update.
3. Adjust subtitle timing, line breaks, and style
Open Caption style with the arrow beside Captions. Try a preset over a few shots. Choose the one you can read comfortably, even when the background changes.
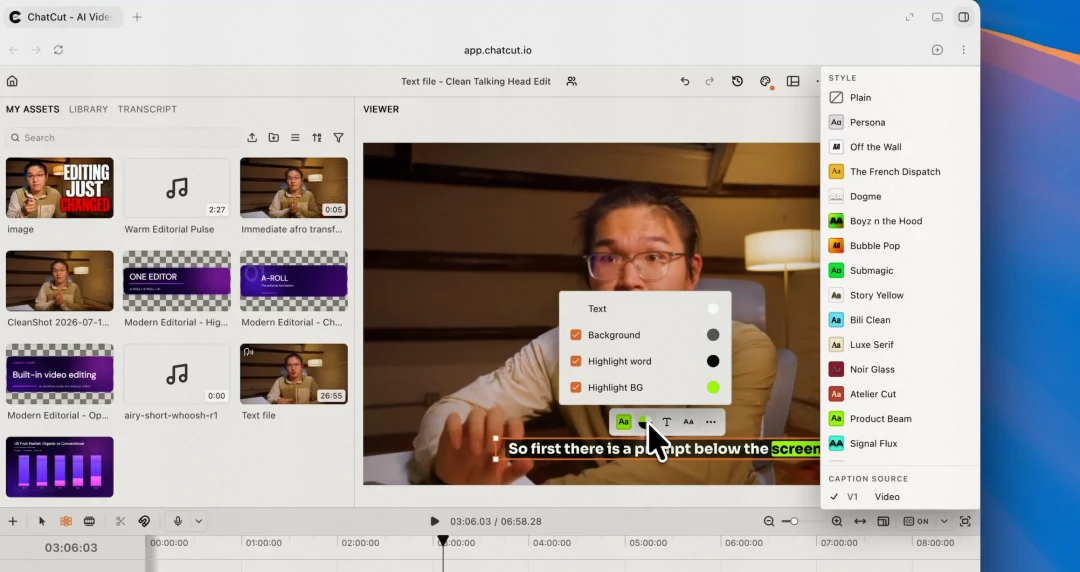
Watch the brightest part of the video. If the words disappear into the picture, add a background or adjust the text color. If they cover a face or product, move them. On a phone, leave room for the app’s buttons and description too.
Keep phrases together
A caption can have every word right and still be awkward to read. Netflix’s line treatment guidance says to avoid separating a first name from a last name, or an adjective from its noun. That is a useful principle when grouping words in ChatCut too.
For example, take the sentence “Send the final draft to Maya Chen before Friday.” Keep “Maya Chen” together. In Content, split or merge the captions so one ends after “final draft” and the next begins with “to Maya Chen.” Replay the sentence to check the change.
Match the words to the voice
Read each caption as it plays. The BBC’s timing guidance recommends matching the subtitle to the start and pace of speech. Check that the words appear when the speaker says them. Watch speaker changes especially closely.
If captions flash past too quickly, review the grouping in Content. Merging captions can reduce how often the text changes, but it does not create more reading time. Keep checking the full sentence against the voice.
The BBC recommends 160 to 180 words per minute. As an example, “Keep the product name visible throughout this shot” has eight words and takes about 2.67 seconds at 180 words per minute. If those words flash for one second, merging cards alone cannot solve the reading problem. Review the available speech time and surrounding shot before changing the caption.
The same guide allows up to two lines for landscape or square video and up to three for vertical video. These are BBC delivery guidelines, not ChatCut defaults or a requirement to fill every available line. Keep related words together and leave the important picture readable.
Leave room for the picture
Viewers also need to see what is happening behind the words. The BBC’s positioning guidance recommends avoiding important visual information. In a product tutorial, that could be the button being pressed or a label on the device. Adjust the caption’s position and check the next shot too.
To emphasize a word, select it in Content. You can change its color, background, or size. Use the highlight for a name or phrase that matters. Too many competing colors make the sentence harder to follow.
4. Export captions in the video or as SRT
For a social clip where the caption design should always be visible, export the video with its words turned on. To let viewers choose, export the video without visible captions and supply a matching SRT. The first route makes the words part of the picture; the second gives a compatible player a separate caption track.
An SRT file contains the subtitle text and the times each caption appears and disappears. Each time is written as a timecode, such as 00:00:03,000 for three seconds into the video.
| What you need | What to export |
|---|---|
| A video with your caption colors, position, and highlights | Video with captions turned on |
| Subtitles that viewers can switch off in a compatible player | Video with captions turned off, plus an SRT file |
| A copy of the words to read or reuse | Plain text (.txt) |
For a captioned video, keep captions on and select Export → Video. Open the finished file and watch a few sentences to check the text and timing.
For an SRT, turn captions on and wait for the speech on your chosen track to finish transcribing. Select Export → Subtitles, then choose SubRip (.srt). The file contains the captions or translation you are viewing. See the export guide for the available formats.
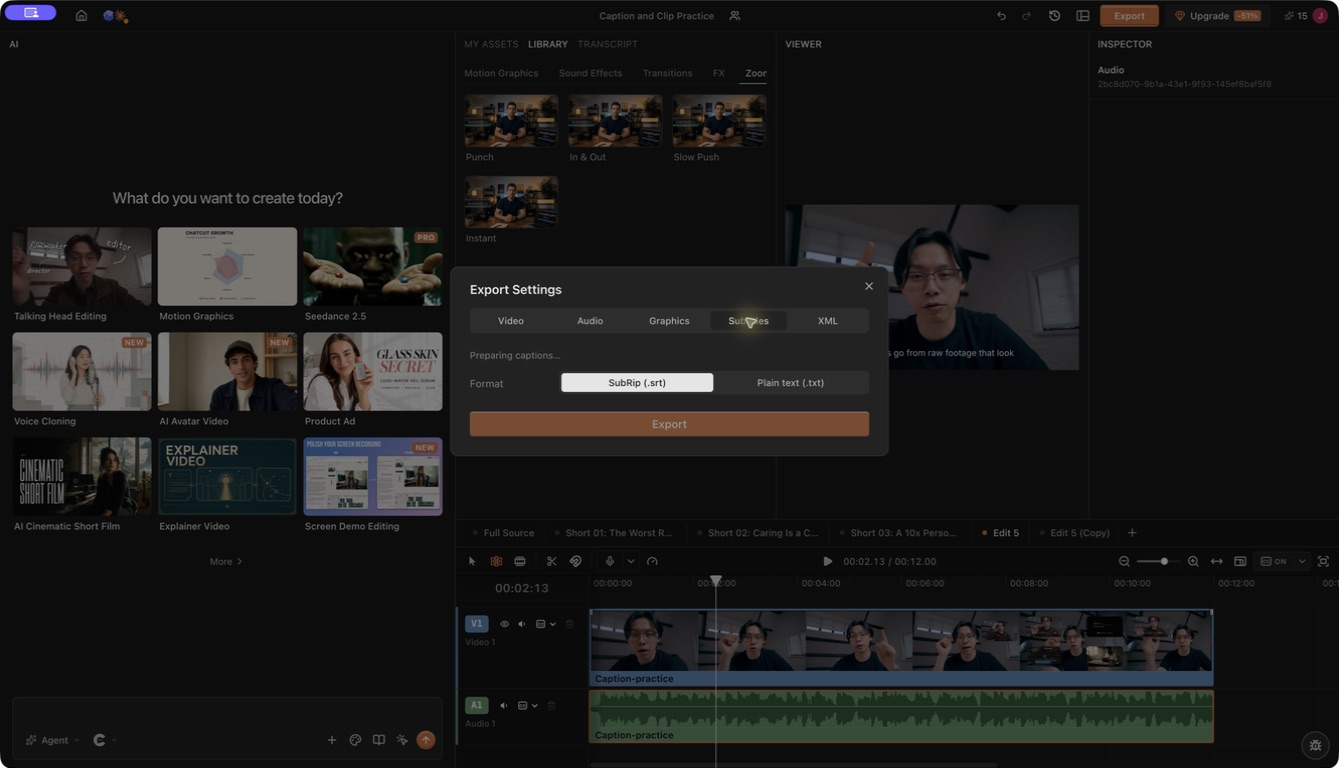
An SRT will not carry your ChatCut fonts, colors, or animated highlights. The player controls how it looks. Test it with the video on the platform where you plan to publish.
To see the file structure, download this practice SRT. It contains one authored eight word sentence from 1.0 to 3.7 seconds, matching the timing calculation above. Open it in a text editor to see the caption number, timecodes, and words. It is a teaching example, not a download from the pictured project.
Add subtitles to a video already on YouTube
In YouTube Studio, choose Subtitles from the left menu and select the video. Add the language if needed, then select Add under Subtitles. Choose Upload file → With timing, select the SRT for that exact video version, and save it. Review the result in the player before publishing the caption track.
Use an SRT timed to the already uploaded cut. If you shortened the video in ChatCut afterward, the newer subtitle timings will not necessarily match the existing upload. Adding a separate track also cannot erase words already rendered into the video picture.
Save a caption style for your next video
In Caption style, select Save current style… and give it a name. You can find it again under Saved styles.
Check the saved style over the next recording before exporting. White text that worked in a dark room may be hard to read in an outdoor shot.
Translate subtitles into another language
Correct the original captions first. A wrong name or number can carry into the translation.
Turn captions on and open the arrow beside Captions. Select Translate captions and choose a language. When it finishes, select the Translation (language) source to view the result. You can style and export it separately from the original captions.
Read the translation over the video. Check names and sentence breaks, especially when the translated text is longer. This changes the subtitles. To change the spoken language too, use video translation.
Frequently asked questions
How do I add automatic subtitles in ChatCut?
Import the recording, add it to the timeline, and wait for its speech to be transcribed. Turn on the left side of Captions below the viewer. If the words follow the wrong recording, open the adjacent menu and choose the intended video or audio source.
How do I fix a wrong subtitle without cutting the video?
Click a caption in the viewer and open Inspector → Content. Find the sentence, correct its wording, and replay it. Use Find and replace for repeated errors, then confirm the change persisted. Deleting selected words in Transcript removes recorded time, so use Content for spelling fixes.
How do I fix subtitles with awkward line breaks or timing?
Keep names and related phrases together when splitting or merging text in Content. Play the sentence to check that the words appear with the voice and remain readable. Merging blocks changes their grouping; it does not create extra time for a long sentence.
What does an exported SRT file contain?
An SRT contains caption numbers, start and end timecodes, and text. Open it in a text editor to inspect the wording, then load it with the matching video in the destination player. ChatCut’s font, color, background, and word highlights are not included in SRT.
Why can’t I export subtitles yet?
Turn captions on and wait for the speech on your chosen track to finish transcribing. Check the active source in a project with several speech tracks. If Preparing captions still appears, the subtitle file is not ready even when words are visible in the viewer. Wait for Export to become available, then open the downloaded file to check it.
Can I add an SRT to a video already on YouTube?
Yes. In YouTube Studio, open Subtitles, choose the video and language, then upload the timed subtitle file. Preview the text against the video before publishing that track. Follow YouTube’s subtitle instructions and use an SRT that matches the uploaded cut.
Are subtitles and captions the same thing?
The terms vary by region. Subtitles often means translated speech. W3C’s caption guidance includes speaker labels and sounds needed to follow the video without hearing it. ChatCut calls its text controls Captions. Use those controls for the words, then check whether your video needs extra sound descriptions.
Can I add subtitles for free in ChatCut?
Yes. The Free plan includes transcription and subtitle export. Manual caption editing does not use credits. Agent usage depends on the connection and plan; generation has its own credit charges. Check the current plan guide for the route you use.
Does an SRT download use the 60 minute export allowance?
No. Subtitle files do not count toward that allowance. Free cloud video rendering has a total allowance of 60 minutes across projects. It does not renew each month. Exporting video locally in Desktop does not count toward it. See Web vs Desktop Export.
Will fixing a caption change the speaker’s voice?
No. Editing the caption changes the words on screen. The recorded speech stays the same.
How accurate are automatic subtitles?
Check them against your recording. Background noise, unfamiliar names, and unclear speech can cause mistakes. Review names and numbers even when the rest of a sentence looks right.
Can I remove subtitles after exporting?
A player cannot hide words that are part of the video picture. Open your ChatCut project, turn captions off, and export again. A separate SRT lets a compatible player show or hide the text.
Choose the subtitle delivery before you correct every line
Start with a stable spoken edit, generate the subtitle text, and correct names, numbers, line breaks, and timing while listening. In ChatCut, use Content for text changes that should not remove the spoken recording, then choose a video export for permanent captions or an SRT route for a compatible player.
Open the actual exported file or subtitle track and check the opening, the busiest frame, the last line, and any speaker names. Keep the SRT paired with the same video version and preview it in the destination player before publishing.