SEO title: How to Add Subtitles to a Video That Viewers Can Read Meta description: Readable video subtitles need accurate words and timing. The guide shows how to correct them in ChatCut and export visible captions or a separate SRT file.
How to Add Subtitles to a Video That Viewers Can Read
Quick summary
Video subtitles can stay visible in the picture or live in a separate SRT file that a compatible player can turn on and off. Both start with the same work: generate the text, correct names and numbers, and check when each line appears. In ChatCut, use Content for text corrections, then choose Video for permanent captions or SRT for a separate subtitle file.
The first decision is where the words must live. If the viewer will watch a downloaded vertical video, captions need to be visible in the picture. If YouTube or another player should let viewers turn them on and off, you need a subtitle file or track. The words, line breaks, and timing still have to be correct in either case.
In ChatCut, open the project’s captions, generate the transcript, and use Content to correct a name or number without cutting the speaker’s voice. Play the busiest section, then choose Video when the captions must be burned into the picture or SRT when the destination accepts a separate file. The visible result and the export state are different checks, so inspect both.
How to add subtitles to a video
Adding subtitles is four steps, whichever editor you open. Transcribe the speech into timed text. Correct the words that the recognizer misheard, most often names, product terms, and numbers. Adjust the line breaks and timing so each line stays on screen long enough to read. Then deliver the result in the form your destination accepts, either burned into the picture or as a separate file.
The step that decides whether the subtitles are usable is the correction pass, not the recognition itself. Every tool makes mistakes on proper nouns, and a viewer who reads a wrong product name in the first ten seconds stops trusting the rest of the text.
Most editors now cover these four steps, so the choice between them comes down to cost and to how much control you get over the finished look. ChatCut is a good place to start because the free plan covers manual timeline editing, uploads, transcription, and standard project work. Subtitle files and XML files do not add rendered duration and do not spend credits, and a render on the desktop app does not count toward the free cloud export quota. That quota is 60 minutes across all your projects rather than per project, and an active paid plan removes it. You can finish a subtitled video without paying, and only move to a paid plan when the recurring credit allocation or a larger web export allowance is worth it. The Free and Pro plan breakdown lists what each one includes.
In ChatCut, upload your recording, put it on the timeline, and wait for the speech to turn into text.
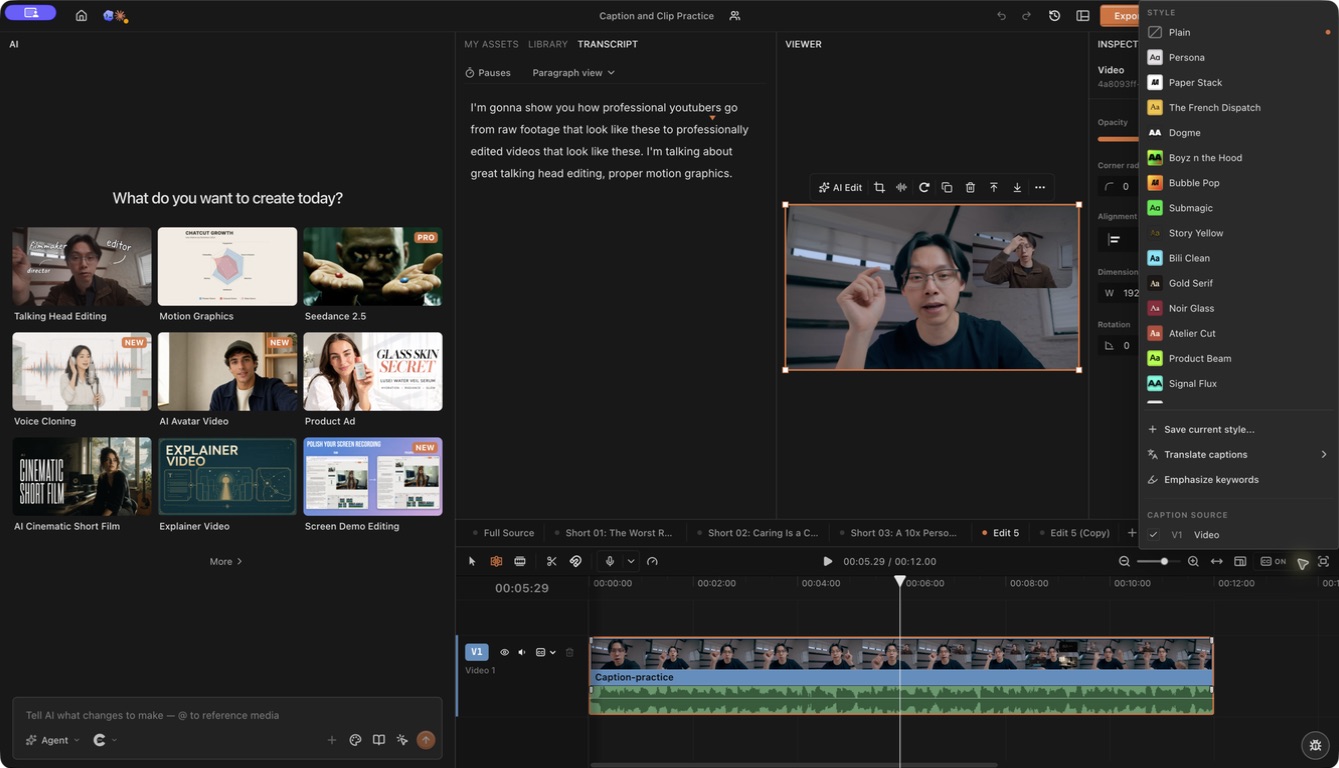
Below the video, select the left side of the Captions control to show the words. The arrow beside it opens Caption style. Choose Plain, Netflix, or TikTok Pop as a starting point.
After the first pass, correct a wrong word in Content. Selecting words in Transcript and pressing Delete cuts that part of the recording, which is a different operation.
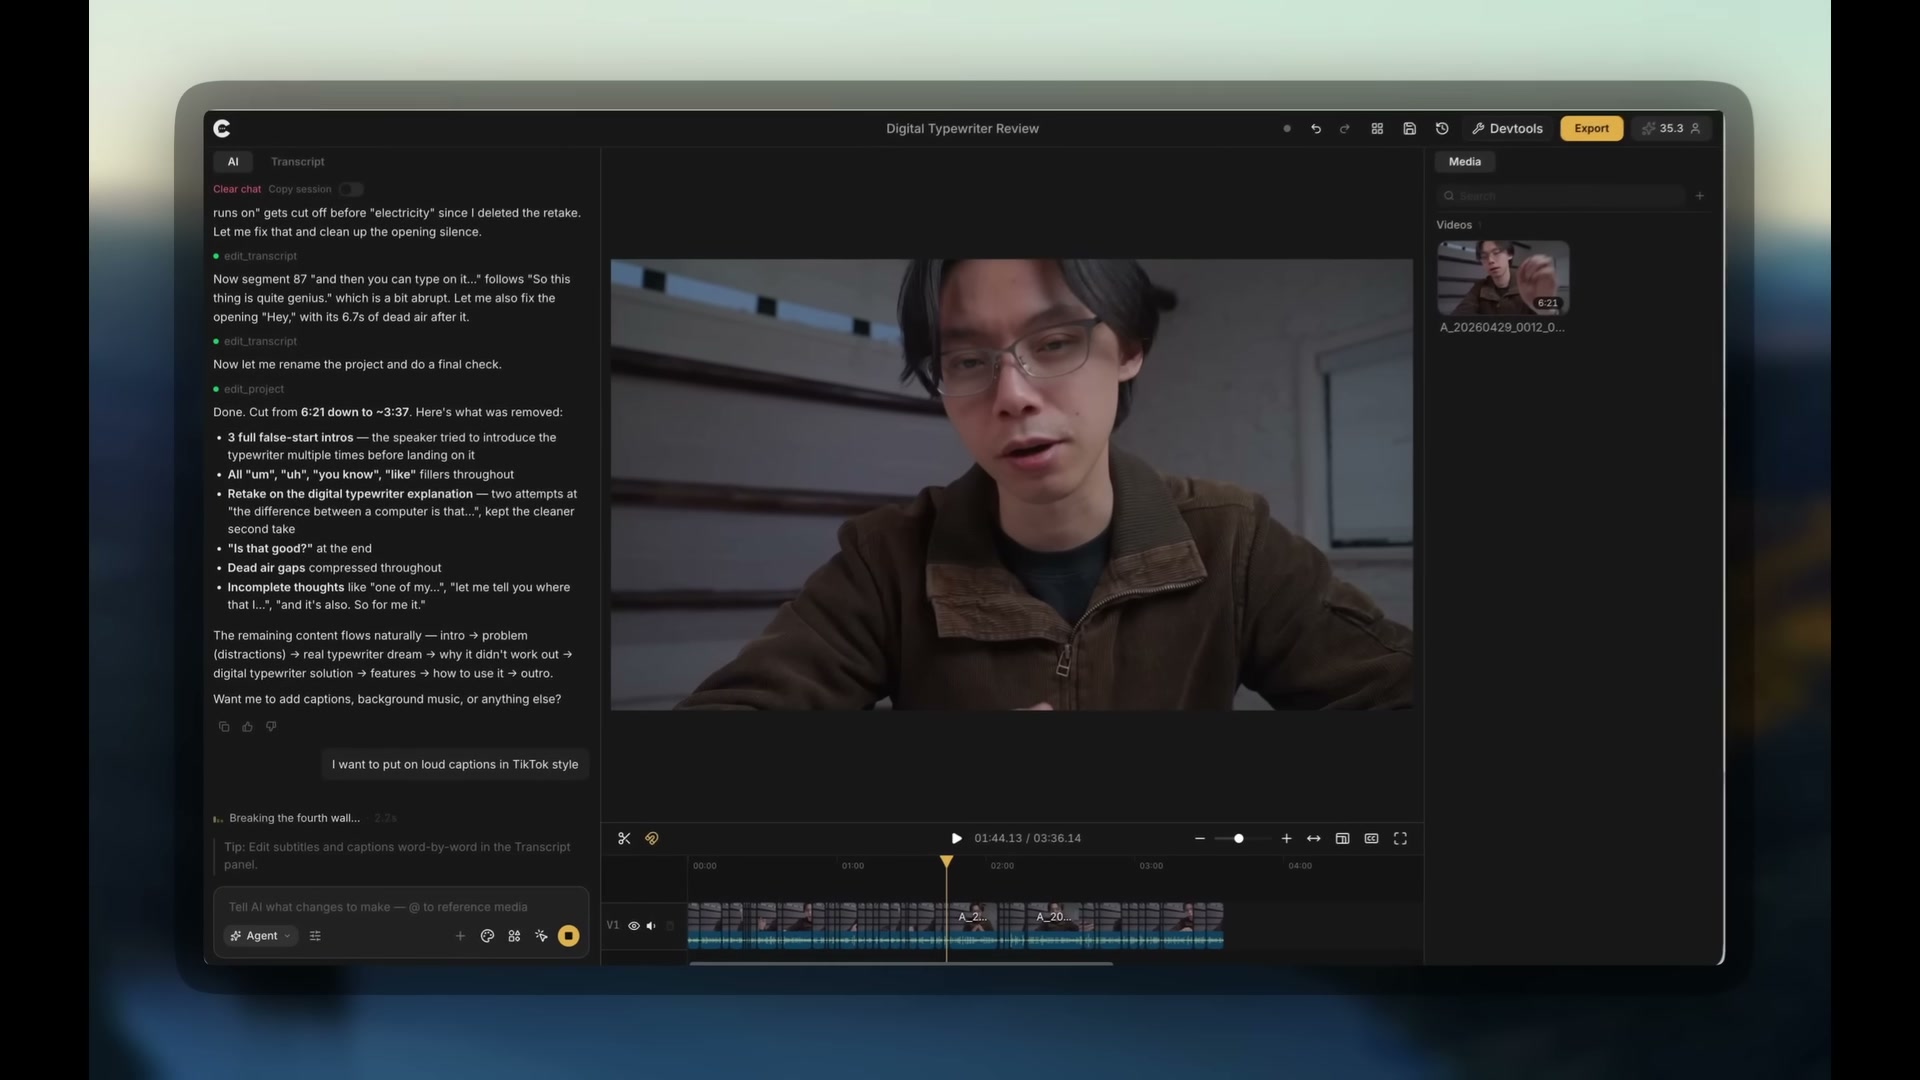
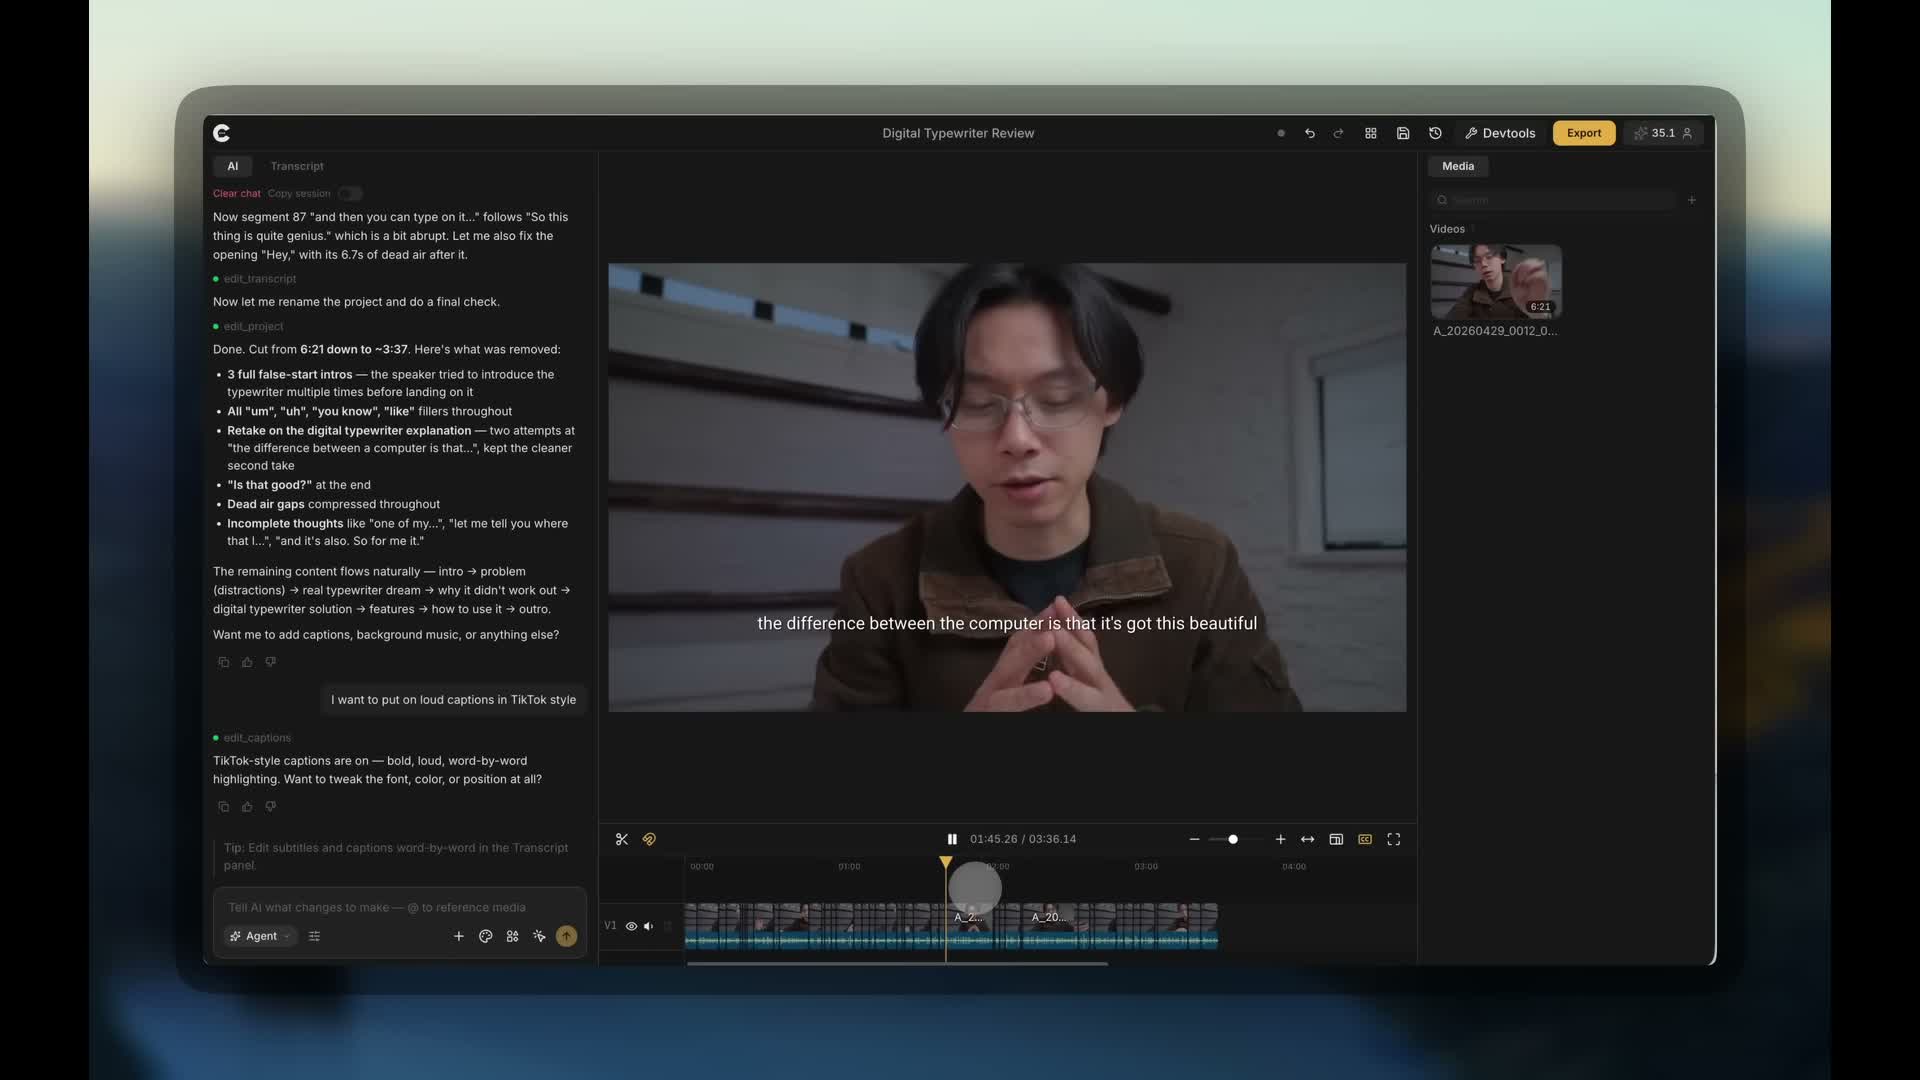
You can also ask the Agent to add captions. In our talking head tutorial, the creator asks for captions in the conversation. The next playback shows the words over the speaker.
At 2:25 in the published tutorial, the creator requests captions in natural language. Compare the next frame from the same recording: the words have appeared over the picture. The style is this creator’s choice.At 2:30 in the tutorial, captions appear over the recording. Play a few sentences to check that the words follow the speaker.
If the captions follow the wrong speaker, check the source track. A project can have speech on more than one video or audio track. Use the V1/V2 or A1/A2 selector to choose the one you want. The caption guide explains the controls.
The chevron beside Captions opens both Style and Caption Source. Check the source at the bottom first. Changing the style cannot repair a caption track that follows the wrong recording.
2. Correct subtitle text without cutting the voice
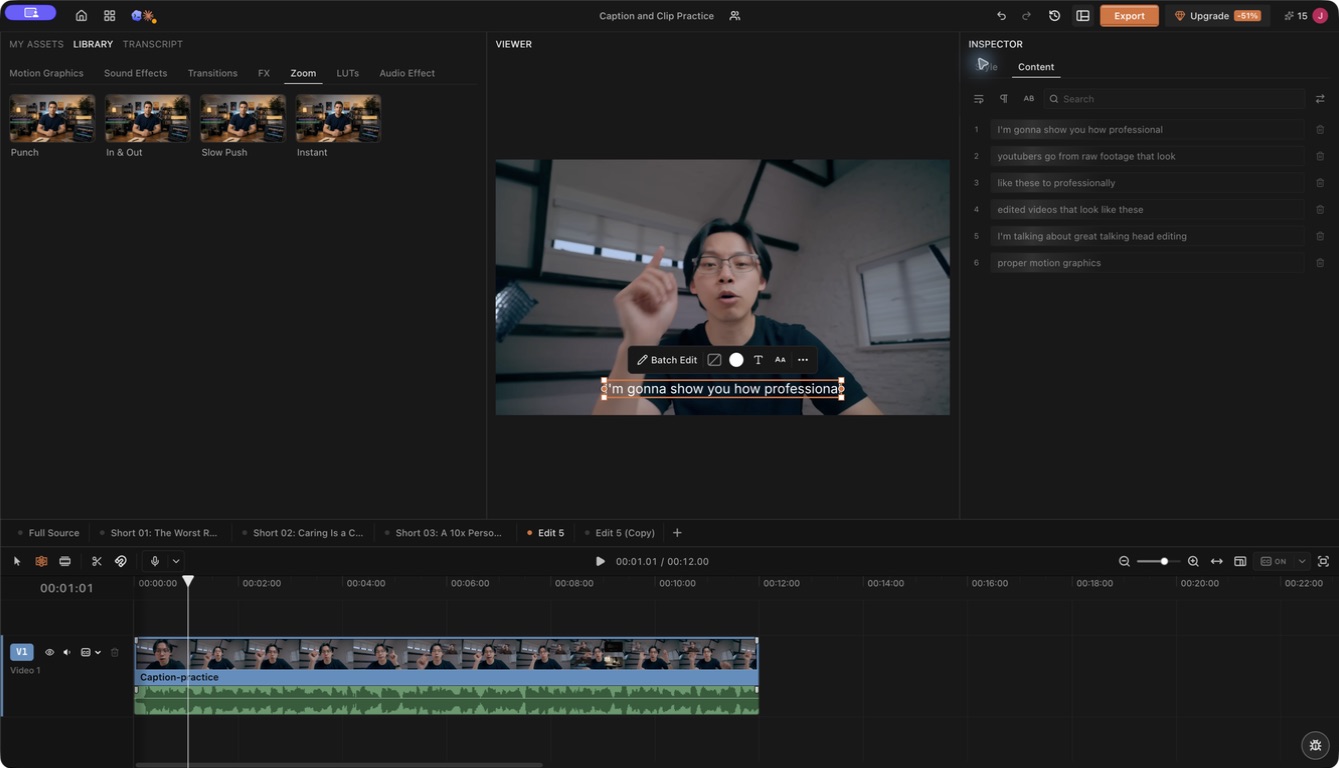
With captions turned on, open Content. Each caption appears as a block of text, called a card in ChatCut. You can correct its words or split and join the blocks.
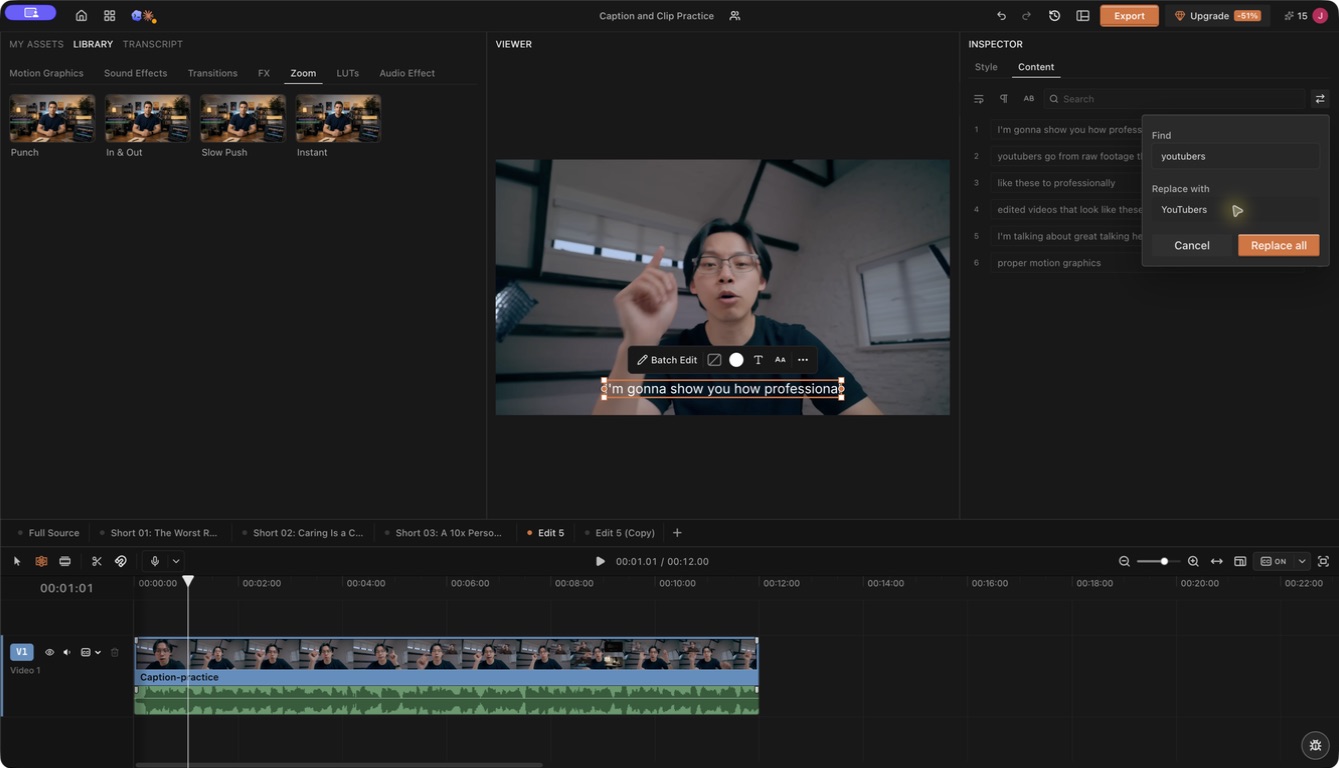
Click the visible caption in the viewer, then choose Content in the Inspector on the right. The six text blocks here belong to the 12 second practice clip. Find the matching sentence before changing its wording, then replay it to check the picture and voice together.
Treat the automatic text as a first draft. Start with names, numbers, and terms the software may have misheard. Listen to the sentence, correct the caption, then play it again. For a mistake that appears throughout the video, use search and replace in Content.
For a repeated spelling error, open Find and replace at the right of the Content search field. Enter the current spelling and its replacement. This example prepares “youtubers” → “YouTubers”; it shows the proposed correction. Check the affected text after Replace all before treating the change as saved.
Keep the speaker’s meaning intact. “We can’t ship on Friday” must not become “We can ship on Friday.” Short words can change the whole message. The BBC subtitle guidelines recommend keeping the original speech when there is time to show it. Avoid rewriting a speaker’s words just to make a caption shorter.
Be careful with Delete in the Transcript panel. Selecting words there and pressing Backspace or Delete removes that part of the recording. To fix the text viewers read, work in the caption’s Content panel.
What you want
What to use
Correct a misspelled name
Edit the caption text in Content
Break a long caption into smaller pieces
Split the caption in Content
Join text that changes too quickly
Merge the captions in Content
Remove a sentence from the recording
Select its words in Transcript and delete
Hide one caption but keep the speech
Delete the caption in Desktop 0.2.28 or later
Content editing works on Web and in Desktop 0.2.25 or later. If the controls are missing, check your version against the caption editing update.
3. Adjust subtitle timing, line breaks, and style
Open Caption style with the arrow beside Captions. Try a preset over a few shots. Choose the one you can read comfortably, even when the background changes.
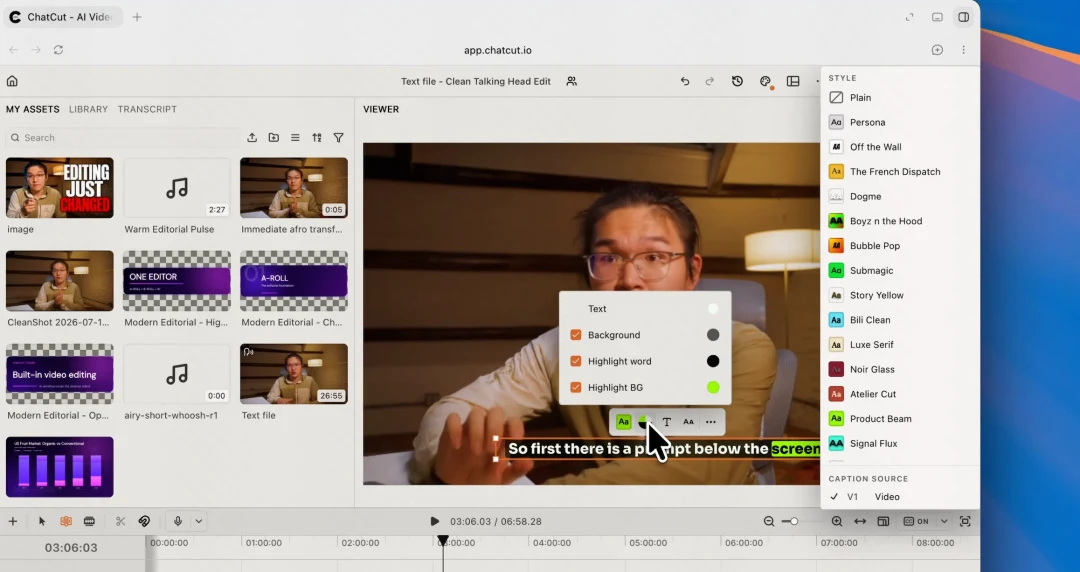
The published walkthrough shows white text on a dark background, with “screen” highlighted in green. The background separates the words from the picture. The frame shows the highlighted word; play the source tutorial to see the caption in motion.
Watch the brightest part of the video. If the words disappear into the picture, add a background or adjust the text color. If they cover a face or product, move them. On a phone, leave room for the app’s buttons and description too.
Keep phrases together
A caption can have every word right and still be awkward to read. Netflix’s line treatment guidance says to avoid separating a first name from a last name, or an adjective from its noun. That is a useful principle when grouping words in ChatCut too.
For example, take the sentence “Send the final draft to Maya Chen before Friday.” Keep “Maya Chen” together. In Content, split or merge the captions so one ends after “final draft” and the next begins with “to Maya Chen.” Replay the sentence to check the change.
Match the words to the voice
Read each caption as it plays. The BBC’s timing guidance recommends matching the subtitle to the start and pace of speech. Check that the words appear when the speaker says them. Watch speaker changes especially closely.
If captions flash past too quickly, review the grouping in Content. Merging captions can reduce how often the text changes, but it does not create more reading time. Keep checking the full sentence against the voice.
The BBC recommends 160 to 180 words per minute. As an example, “Keep the product name visible throughout this shot” has eight words and takes about 2.67 seconds at 180 words per minute. If those words flash for one second, merging cards alone cannot solve the reading problem. Review the available speech time and surrounding shot before changing the caption.
The same guide allows up to two lines for landscape or square video and up to three for vertical video. These are BBC delivery guidelines, not ChatCut defaults or a requirement to fill every available line. Keep related words together and leave the important picture readable.
Leave room for the picture
Viewers also need to see what is happening behind the words. The BBC’s positioning guidance recommends avoiding important visual information. In a product tutorial, that could be the button being pressed or a label on the device. Adjust the caption’s position and check the next shot too.
To emphasize a word, select it in Content. You can change its color, background, or size. Use the highlight for a name or phrase that matters. Too many competing colors make the sentence harder to follow.
4. Export captions in the video or as SRT
For a social clip where the caption design should always be visible, export the video with its words turned on. To let viewers choose, export the video without visible captions and supply a matching SRT. The first route makes the words part of the picture; the second gives a compatible player a separate caption track.
An SRT file contains the subtitle text and the times each caption appears and disappears. Each time is written as a timecode, such as 00:00:03,000 for three seconds into the video.
What you need
What to export
A video with your caption colors, position, and highlights
Video with captions turned on
Subtitles that viewers can switch off in a compatible player
Video with captions turned off, plus an SRT file
A copy of the words to read or reuse
Plain text (.txt)
For a captioned video, keep captions on and select Export → Video. Open the finished file and watch a few sentences to check the text and timing.
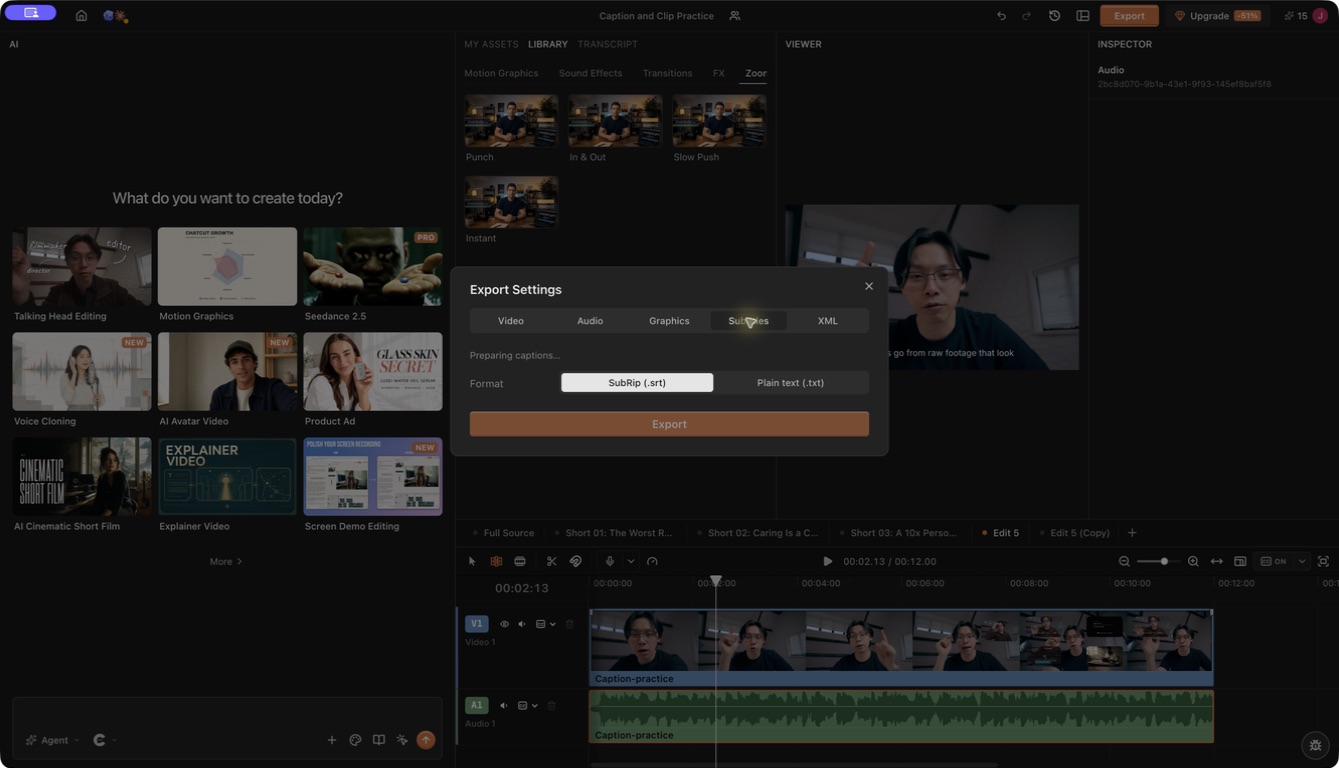
For an SRT, turn captions on and wait for the speech on your chosen track to finish transcribing. Select Export → Subtitles, then choose SubRip (.srt). The file contains the captions or translation you are viewing. See the export guide for the available formats.
Choose Export → Subtitles → SubRip (.srt) for timed text, or Plain text (.txt) for a reading copy. Export is disabled while Preparing captions is shown. In this practice project, captions were visible in the viewer but the subtitle file was still unavailable. Check the preparation status separately from caption visibility.
An SRT will not carry your ChatCut fonts, colors, or animated highlights. The player controls how it looks. Test it with the video on the platform where you plan to publish.
To see the file structure, download this practice SRT. It contains one authored eight word sentence from 1.0 to 3.7 seconds, matching the timing calculation above. Open it in a text editor to see the caption number, timecodes, and words. It is a teaching example, not a download from the pictured project.
Add subtitles to a video already on YouTube
In YouTube Studio, choose Subtitles from the left menu and select the video. Add the language if needed, then select Add under Subtitles. Choose Upload file → With timing, select the SRT for that exact video version, and save it. Review the result in the player before publishing the caption track.
Use an SRT timed to the already uploaded cut. If you shortened the video in ChatCut afterward, the newer subtitle timings will not necessarily match the existing upload. Adding a separate track also cannot erase words already rendered into the video picture.
Save a caption style for your next video
In Caption style, select Save current style… and give it a name. You can find it again under Saved styles.
Check the saved style over the next recording before exporting. White text that worked in a dark room may be hard to read in an outdoor shot.
Translate subtitles into another language
Correct the original captions first. A wrong name or number can carry into the translation.
Turn captions on and open the arrow beside Captions. Select Translate captions and choose a language. When it finishes, select the Translation (language) source to view the result. You can style and export it separately from the original captions.
Read the translation over the video. Check names and sentence breaks, especially when the translated text is longer. This changes the subtitles. To change the spoken language too, use video translation.
Frequently asked questions
How do I add automatic subtitles in ChatCut?
Import the recording, add it to the timeline, and wait for its speech to be transcribed. Turn on the left side of Captions below the viewer. If the words follow the wrong recording, open the adjacent menu and choose the intended video or audio source.
How do I fix a wrong subtitle without cutting the video?
Click a caption in the viewer and open Inspector → Content. Find the sentence, correct its wording, and replay it. Use Find and replace for repeated errors, then confirm the change persisted. Deleting selected words in Transcript removes recorded time, so use Content for spelling fixes.
How do I fix subtitles with awkward line breaks or timing?
Keep names and related phrases together when splitting or merging text in Content. Play the sentence to check that the words appear with the voice and remain readable. Merging blocks changes their grouping; it does not create extra time for a long sentence.
What does an exported SRT file contain?
An SRT contains caption numbers, start and end timecodes, and text. Open it in a text editor to inspect the wording, then load it with the matching video in the destination player. ChatCut’s font, color, background, and word highlights are not included in SRT.
Why can’t I export subtitles yet?
Turn captions on and wait for the speech on your chosen track to finish transcribing. Check the active source in a project with several speech tracks. In the practice project shown here, visible captions did not clear the Preparing captions state. Confirm Export is available; the screenshot does not establish a completed download.
Can I add an SRT to a video already on YouTube?
Yes. In YouTube Studio, open Subtitles, choose the video and language, then upload the timed subtitle file. Preview the text against the video before publishing that track. Follow YouTube’s subtitle instructions and use an SRT that matches the uploaded cut.
Are subtitles and captions the same thing?
The terms vary by region. Subtitles often means translated speech. W3C’s caption guidance includes speaker labels and sounds needed to follow the video without hearing it. ChatCut calls its text controls Captions. Use those controls for the words, then check whether your video needs extra sound descriptions.
Can I add subtitles for free in ChatCut?
Yes. The Free plan includes transcription and subtitle export. Manual caption editing does not use credits. Agent usage depends on the connection and plan; generation has its own credit charges. Check the current plan guide for the route you use.
Does an SRT download use the 60 minute export allowance?
No. Subtitle files do not count toward that allowance. Free cloud video rendering has a total allowance of 60 minutes across projects. It does not renew each month. Exporting video locally in Desktop does not count toward it. See Web vs Desktop Export.
Will fixing a caption change the speaker’s voice?
No. Editing the caption changes the words on screen. The recorded speech stays the same.
How accurate are automatic subtitles?
Check them against your recording. Background noise, unfamiliar names, and unclear speech can cause mistakes. Review names and numbers even when the rest of a sentence looks right.
Can I remove subtitles after exporting?
A player cannot hide words that are part of the video picture. Open your ChatCut project, turn captions off, and export again. A separate SRT lets a compatible player show or hide the text.
Choose the subtitle delivery before you correct every line
Start with a stable spoken edit, generate the subtitle text, and correct names, numbers, line breaks, and timing while listening. In ChatCut, use Content for text changes that should not remove the spoken recording, then choose a video export for permanent captions or an SRT route for a compatible player.
Open the actual exported file or subtitle track and check the opening, the busiest frame, the last line, and any speaker names. A prepared subtitle state is not the same as a downloaded SRT, so do not publish until the destination accepts the file you inspected.
SEO title: How to Remove Silence and Filler Words from a Video Meta description: Natural speech cleanup starts with repeated takes, then unnecessary pauses and fillers. ChatCut lets you review the cuts and listen for abrupt joins before export.
How to Remove Silence and Filler Words Without Choppy Speech
Quick summary
Speech cleanup is a listening decision. Remove repeated takes first, then shorten pauses and filler words only when the remaining sentence still sounds like the speaker. In ChatCut, use Transcript for recorded words and Pauses for gaps, then listen across every join and check separate microphone tracks.
Removing silence and filler words from a video means deleting the dead air and the verbal stumbles that slow a viewer down, while leaving the words that carry meaning. The job sounds mechanical and is not. Every cut closes a gap in the recording, and enough of those cuts in a row turn a person talking into a person reciting.
Start by separating the two problems. Silence is the time between words, and filler words are the sounds people say while thinking. A pause before a new idea gives the viewer a moment to catch up, while the same length of silence after a false start only makes them wait. Filler words work the same way: a repeated “um” adds nothing, but a hesitation that qualifies a claim can change what the claim means once you delete it.
A clean talking head edit should sound intentional, not hurried. This guide covers how to remove silence and filler words from a video in that order, which cuts to make first, and what to check after the cut.
In ChatCut, open Transcript for the spoken passage and Pauses for the gaps, then ask for a small repair: “Remove the abandoned take after the first answer. Suggest filler words to cut, but keep the qualification and natural pauses.” Play the join at normal speed and listen to the separate microphone track before you apply the cleanup to the whole recording.
Make the speech complete before making it short
Cut repeated takes and abandoned sentences before tightening small pauses. Removing a whole failed attempt can solve the structural problem without making every surviving sentence faster.
Read the transcript and play the passages that repeat. Choose the take that expresses the complete thought, including any qualifier that changes its meaning. A phrase such as “I mean” can be hesitation, but it can also introduce a correction. Listen before deleting it throughout a project.
For example, imagine the recording says, “We can ship Friday. Sorry, we can ship Friday if legal approves.” The first attempt is disposable; the condition “if legal approves” belongs to the final meaning. Select the abandoned first sentence and the restart, then listen to the surviving conditional sentence. This authored example is a selection exercise, not an excerpt from the demonstration below.
Duplicate the timeline before a broad cleanup. In ChatCut, open the timeline tab’s menu and choose Duplicate. Name the copy so you can compare it with the original without confusing the next instruction.
Protect qualifications and the speaker’s intent
Listen for a filler that adds no meaning to this sentence. In Transcript, choose the track containing that speech and select the unwanted words. Press Backspace or Delete to cut that time range and close the gap on the edited track.
The Transcript guide distinguishes Paragraph view, which reads continuously, from Clip view, which shows a block for each timeline cut. Click a word to move the viewer to its start, then play the surrounding phrase before deciding.
For an agent assisted pass, make the editorial constraint explicit:
Remove obvious false starts and repeated takes from this sequence. Suggest filler words to cut, but preserve words that qualify the statement and pauses that help the point land. Keep the original timeline available for comparison.
This is an example instruction, not a promise that every “um,” breath, or hesitation will be detected correctly. Review the resulting cuts. If the request changes too much, return to the earlier timeline or undo the last operation and narrow the selected passage.
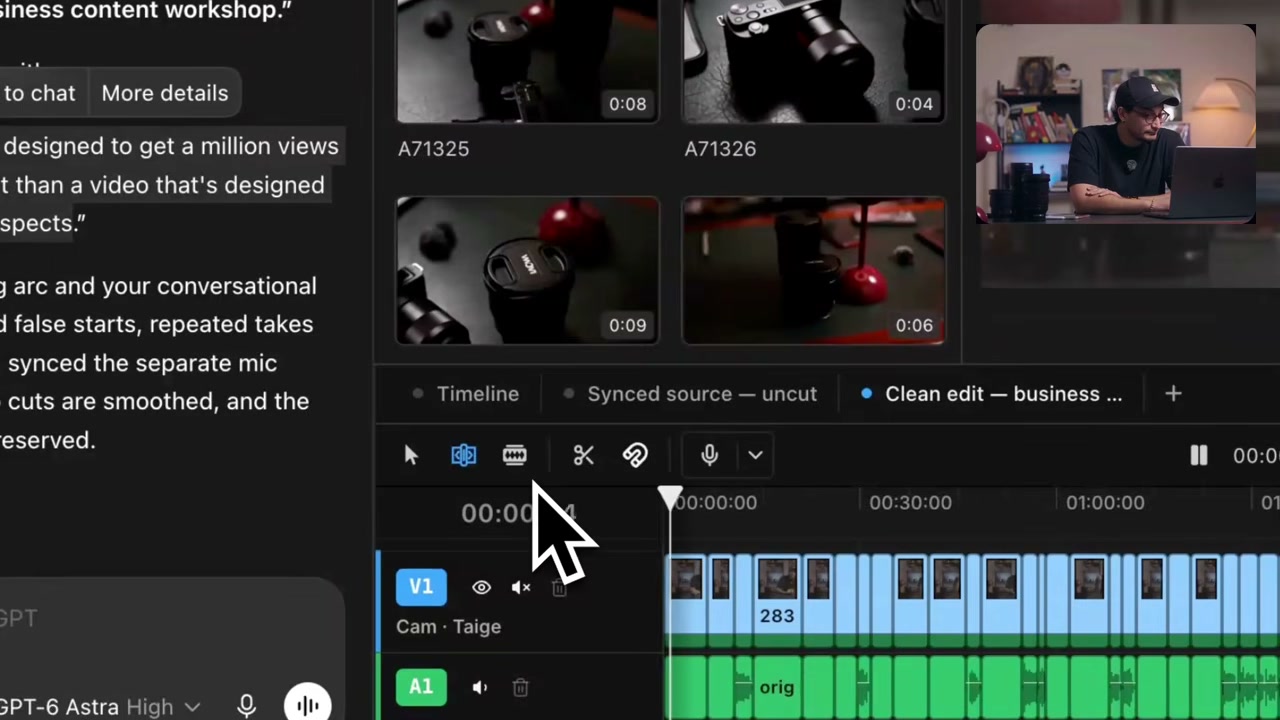
At 5:20 in the same tutorial, the uncut source and clean edit have separate tabs. V1 and A1 show multiple segments in the edited sequence. Use the retained source to review any join that sounds clipped; the gap correction below shows why that review still matters.
Keep rhythm where the idea needs it
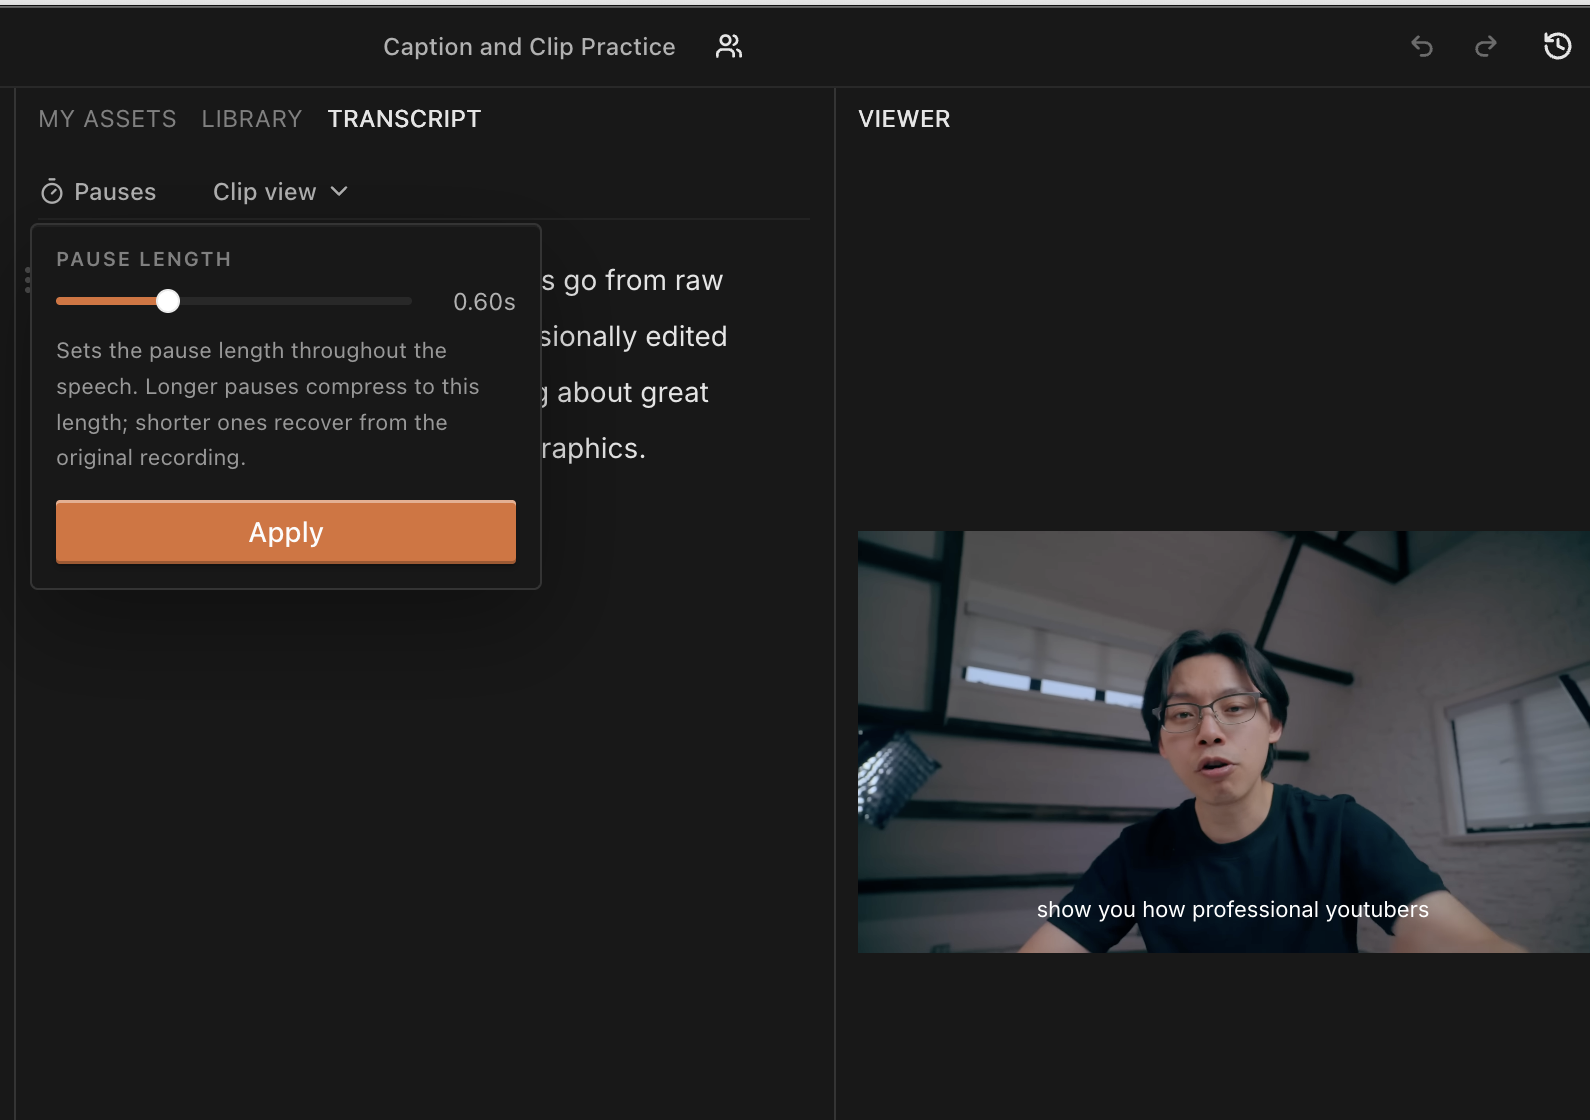
Play the sentence with the one before and after it. Once you know how much space it needs, use Pauses to adjust the selected transcript track and listen again. Current documentation says the control can restore existing source pause time; it cannot invent silence that was not recorded.
This focused crop shows the control the paragraph refers to: open Pauses above Transcript, choose a target length, and click Apply. The edited speech and viewer remain visible for the before and after listening check. The 0.60 second value is an example setting, not a universal pace recommendation.
Listen to the speaker at their natural pace and adjust a short passage first. Keep a pause that separates ideas or lets a reaction land, even if it is longer than the surrounding gaps.
Keep a pause before a reveal, after a difficult question, or between subjects when it helps the listener follow the thought. If sentences run together, give the cut more room using available source material. Judge the sentence in playback instead of aiming for a fixed percentage reduction in the total runtime.
Describe one gap and the words around it
Name the words and the time range in the current sequence, then request one local correction. This is more useful than repeating “remove all silence” after an incomplete pass.
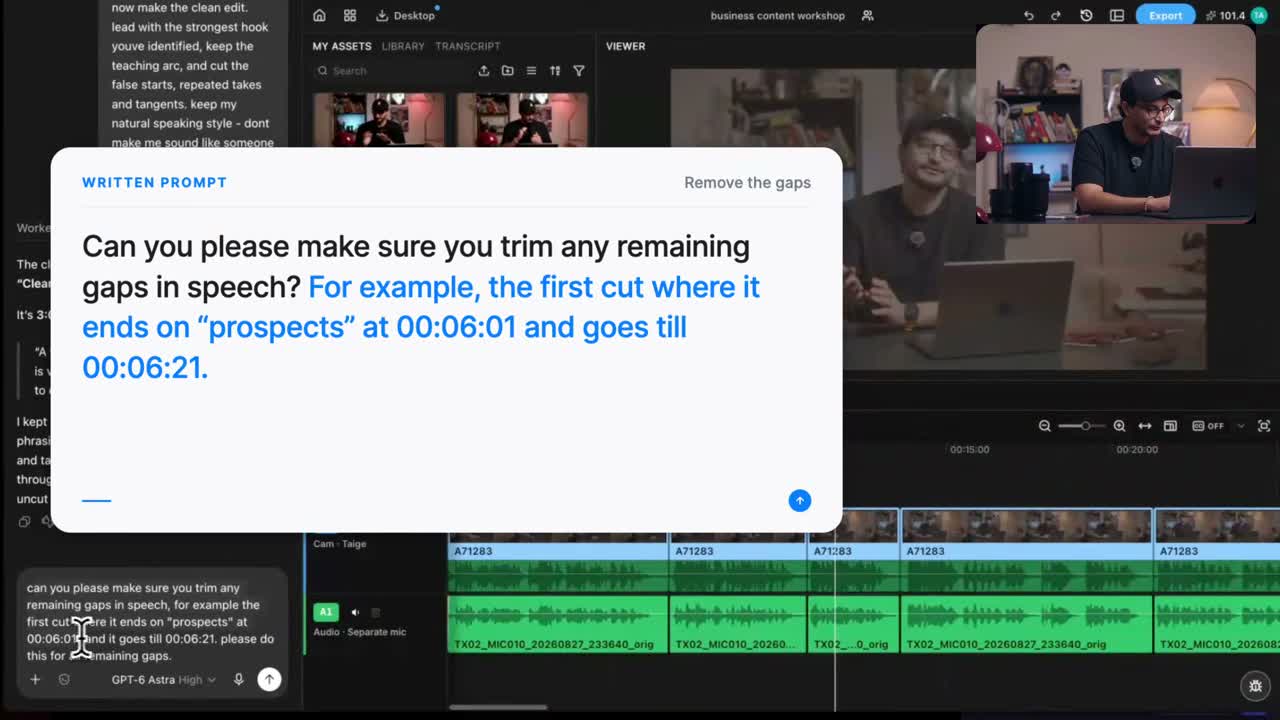
At 5:51 in ChatCut’s published tutorial, the creator identifies the gap after “prospects” using the project timecode. The frame shows the correction request.
In that example, the first cut still needed another pause cleanup. The useful lesson is to inspect the draft and identify the remaining problem precisely. The video’s on screen report of removed time is a report from that project, not a general performance benchmark.
In [sequence name], shorten the empty pause after “[last spoken words]” between [start] and [end]. Preserve the next word and the rest of this sequence.
Use the time display shown by your project. A colon separated timecode can include frames, so do not assume its last field represents decimal seconds.
For example, in a 30 fps project, 00:01:12:15 means 1 minute, 12 seconds, and 15 frames, or 72.5 seconds. It is not 72.15 seconds. Confirm the project frame rate before translating a displayed timecode into a decimal range.
Check every track after a transcript cut
Check synchronization after a cut, move, or restoration that affects picture and a separate microphone track. The lips and voice should still agree at the beginning and end of the changed section.
ChatCut’s AI multicam sync aligns recordings that share recognizable audio. It does not automatically choose camera angles. When selecting clips already on the timeline, use separate tracks and the documented 1× playback speed before synchronization.
In the published tutorial, the creator reports drift after restoring a clip. After a restoration, check lip movement against the voice at several points. Listen for an echo from two active microphone sources as well as visible sync errors.
Match the tool to the recording you must preserve
Choose by the surrounding editing job and verify the cleanup on your own speech. ChatCut combines direct transcript cuts, an editable timeline, and instructions for broader changes. Descript also offers conversational editing alongside its transcript workflow. For a focused cleanup tool such as Gling, check whether its controls let you preserve the pauses and retakes your particular recording needs.
If you need a full podcast or interview tool comparison, use the podcast editing guide. Avoid assuming that all tools expose the same filler list, audio threshold, or cut restoration control.
Frequently asked questions
Should I remove every filler word and hesitation?
Remove abandoned takes and repetitions that distract from the message. Keep a hesitation when it conveys uncertainty, emotion, or a meaningful qualification. Listen to the surrounding sentence before selecting the passage in Transcript, then compare the cut with the original.
How do I shorten pauses automatically in ChatCut?
Open Pauses above Transcript, choose the length for that speech track, and apply it to a duplicate you can compare. Replay both short and long gaps. The control can restore available pause time from the source; it cannot add silence that was never recorded.
Why does a cut sound clipped?
The boundary may remove part of a word or leave too little breathing room. Restore some source material and listen again. Compare the surviving sentence with the original, especially its first and last sounds. A clean looking transcript does not establish a natural sounding cut.
What should I ask when AI leaves an unwanted gap?
Give the current timeline and the gap’s start and end times. Name the words on either side and ask to preserve them. Replay that same range after the correction. Use times from the current edit because earlier cuts may have moved the passage.
How do I check a separate microphone track after a cut?
Play a clear word or visible mouth movement before and after the changed range. Confirm that picture and the intended microphone remain aligned, including after restoring a passage. Inspect each separate track; editing one transcript source does not prove every other track received the same change.
Will deleting a caption remove the pause?
Use Transcript for cuts to recorded speech. Content changes visible caption wording. The two surfaces perform different jobs.
Does removing silence also remove background noise?
No. Cutting a time range and cleaning noise during speech are different operations. ChatCut’s AI Voice Isolation targets nonvoice sound around spoken voice; preview its result before keeping it.
How long does cleanup take?
Source length, transcription, requested edits, and review all affect the work. This article does not establish a fixed processing time or a manual editing benchmark.
Clean speech is the version you can still listen to
Remove repeated takes first, then shorten a pause or filler only when the sentence remains complete and the speaker still sounds natural. In ChatCut, use Transcript for recorded words, Pauses for empty gaps, and a bounded instruction for any missed join. Listen to the entry and exit of each edit with every microphone track enabled.
Watch the exported file from the opening to the last sentence. If a cut sounds clipped or changes a qualification, restore the original range and make a smaller correction. The goal is a clear speaker, not the fewest pauses.
SEO title: How to Turn Long Videos into Shorts with a Complete Story Meta description: A useful short carries a complete idea from the longer video. The guide covers clip selection, separate edits, vertical framing, captions, and export checks.
How to Turn Long Videos into Shorts with a Complete Story
Quick summary
A short must make sense to someone who never watched the long video. Choose a complete idea with its needed context, give each accepted clip its own timeline, and adapt framing, captions, sound, and ending for the destination. ChatCut can propose source ranges, but you still need to review the idea and the exported file.
The first question is not which minute of the recording performed best. It is whether a stranger can understand the idea without the question, setup, or qualification that came before it. A strong short has its own opening, evidence, and ending, even when it came from a longer conversation.
In ChatCut, attach the recording and ask for complete candidates: “Find three ideas for people learning to hire their first team. Give each a title and source range, keep qualifications that affect the advice, and show me the choices before creating timelines.” Review the candidates against the full conversation, then create a separate timeline for each accepted idea. That keeps one correction from changing every short.
Choose the meaning before the format
Play the proposed clip without the rest of the episode. Its opening should tell a new viewer what the speaker is talking about, and its ending should deliver the point. If you have to explain the missing context afterward, keep more of the source or choose another moment.
For an interview, keep the question when the answer begins with “that” or “it” and would otherwise be unclear. For a tutorial, include the action and the result, not only an instruction to click something. For an event or gaming clip, inspect the picture directly because the transcript may omit the important action.
You can ask for more candidates than you intend to publish, but do not assume every recording contains a fixed number of strong clips. Reject a candidate that repeats another clip’s idea or needs too much missing context.
Take a practice answer: “Only after the first ten customers renewed did we raise the price.” A clip that starts at “we raised the price” loses the condition that makes the advice useful. Keep the renewal test and the pricing decision together, or select a different passage. Ask whether a viewer can explain why the speaker made the decision using only the chosen clip.
Request candidates with their missing context
Import your source through My Assets, wait for processing, and give the agent an audience and a selection rule. If you prefer the external agent workflow, use the current ChatCut setup in a supported desktop app.
Find three complete ideas in this interview for people learning to hire their first team. Suggest a title and source range for each. Keep the qualifications that affect the advice. Show the choices before creating separate vertical timelines.
Three is a practice choice in this example. Change the count and audience to suit your source. Asking for a review before cutting lets you reject an attractive quote that misrepresents the conversation.
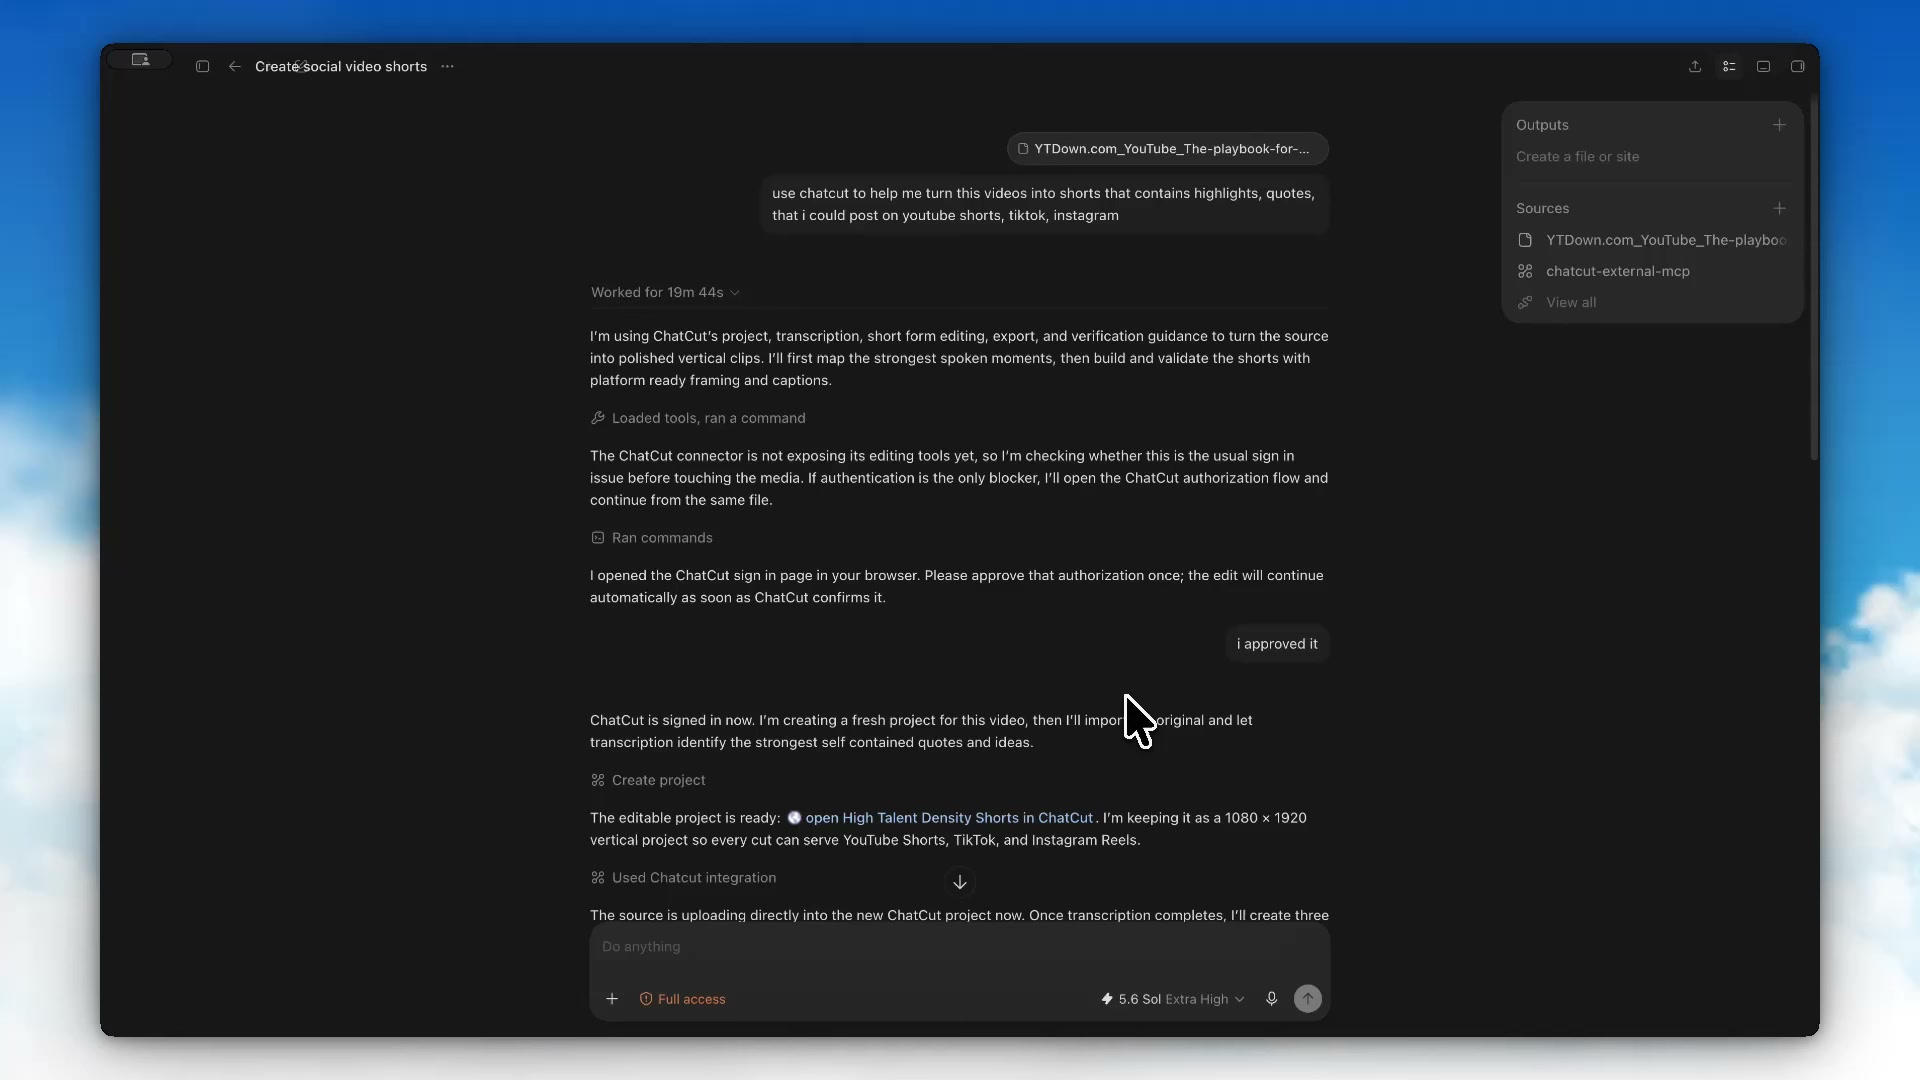
The opening frame of the recorded ChatGPT editing case shows the attached source and the actual highlight request. No timestamps or quotes were supplied. Use an audience and selection rule when you want tighter control over the candidates.
A source link is useful only when the connection can actually access and import it. If a public page does not provide usable media, upload a file you are authorized to edit. Do not assume any YouTube or Vimeo link will import automatically.
Give every accepted idea its own edit
Create one timeline per accepted idea, then give each a name that describes the point. ChatCut supports multiple timelines in one project with a shared media pool.
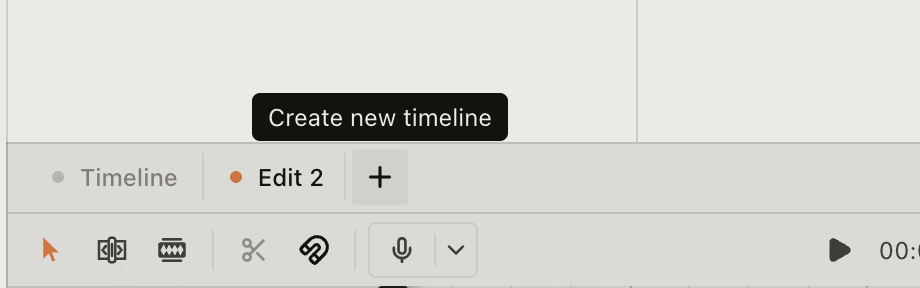
Use the plus beside the timeline tabs to create another version. Give each accepted idea its own name, then select that tab before requesting a correction or exporting.
Start each clip on a complete line and end after the idea resolves. Remove repeated takes and empty pauses while retaining the speaker’s meaning. Listen across each new cut and compare the shortened statement with the source.
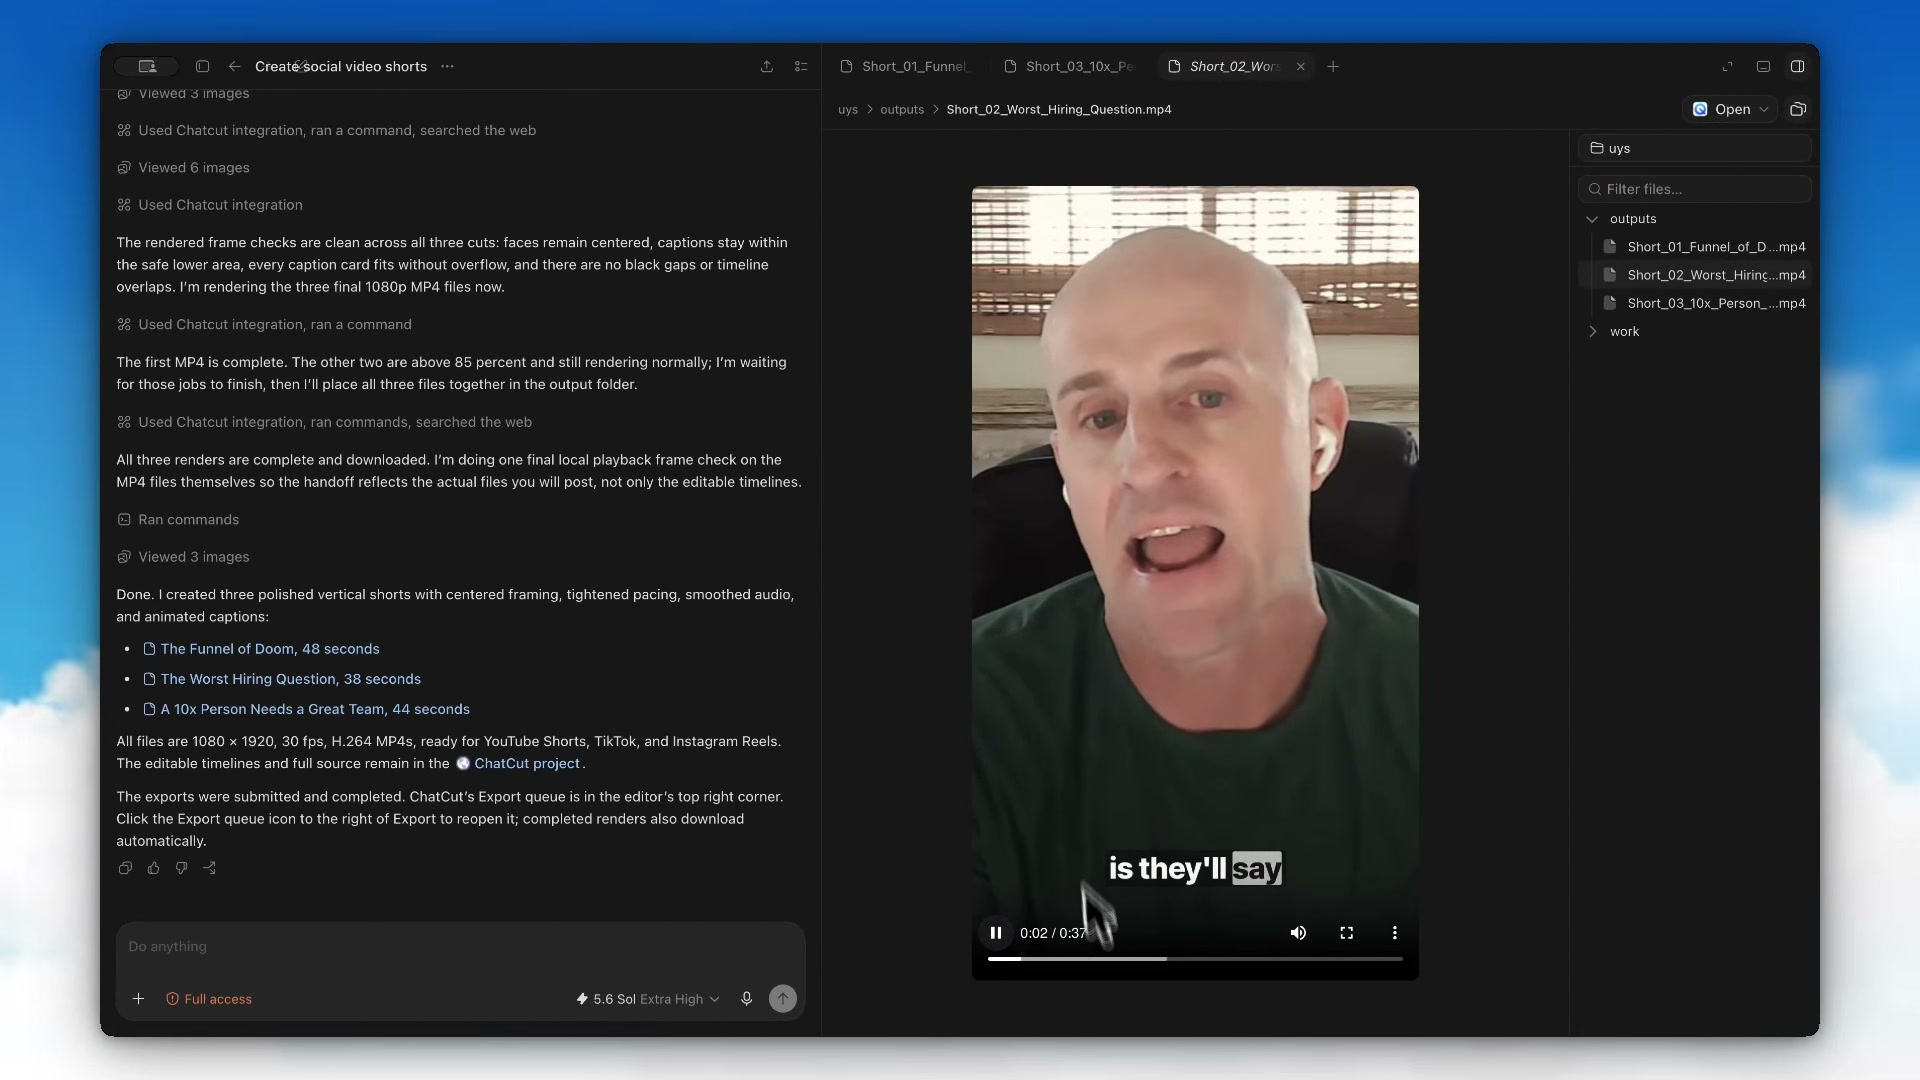
The Can ChatGPT Edit Videos? case supplies a concrete example. From an episode of Lenny’s Podcast, the High Talent Density Shorts task reports these three outputs:
Selected idea
Reported length
What to check in the source
The Funnel of Doom
48 seconds
Keep the explanation of what makes the hiring funnel fail
The Worst Hiring Question
38 seconds
Include enough of the question and answer to understand the criticism
A 10x Person Needs a Great Team
44 seconds
Preserve the relationship between the individual and the team
These checks are editing recommendations for the named topics. The task reports separate editable timelines and 1080 × 1920 MP4 exports. The recording shows output previews; the three original MP4 files are unavailable for independent audio and metadata review. Three clips are this project’s result, not a guaranteed yield from another episode.
At 20 seconds, one returned clip plays in portrait format beside the output list. Compare this with the attached source and brief above: the task has returned a preview of an edited clip, beyond a list of candidate quotes.
Protect the people and action in a 9:16 crop
Check every change of speaker and composition after setting a vertical format. A 9:16 frame is a useful starting choice for vertical delivery, but the intended platform’s current requirements determine the final dimensions and duration.
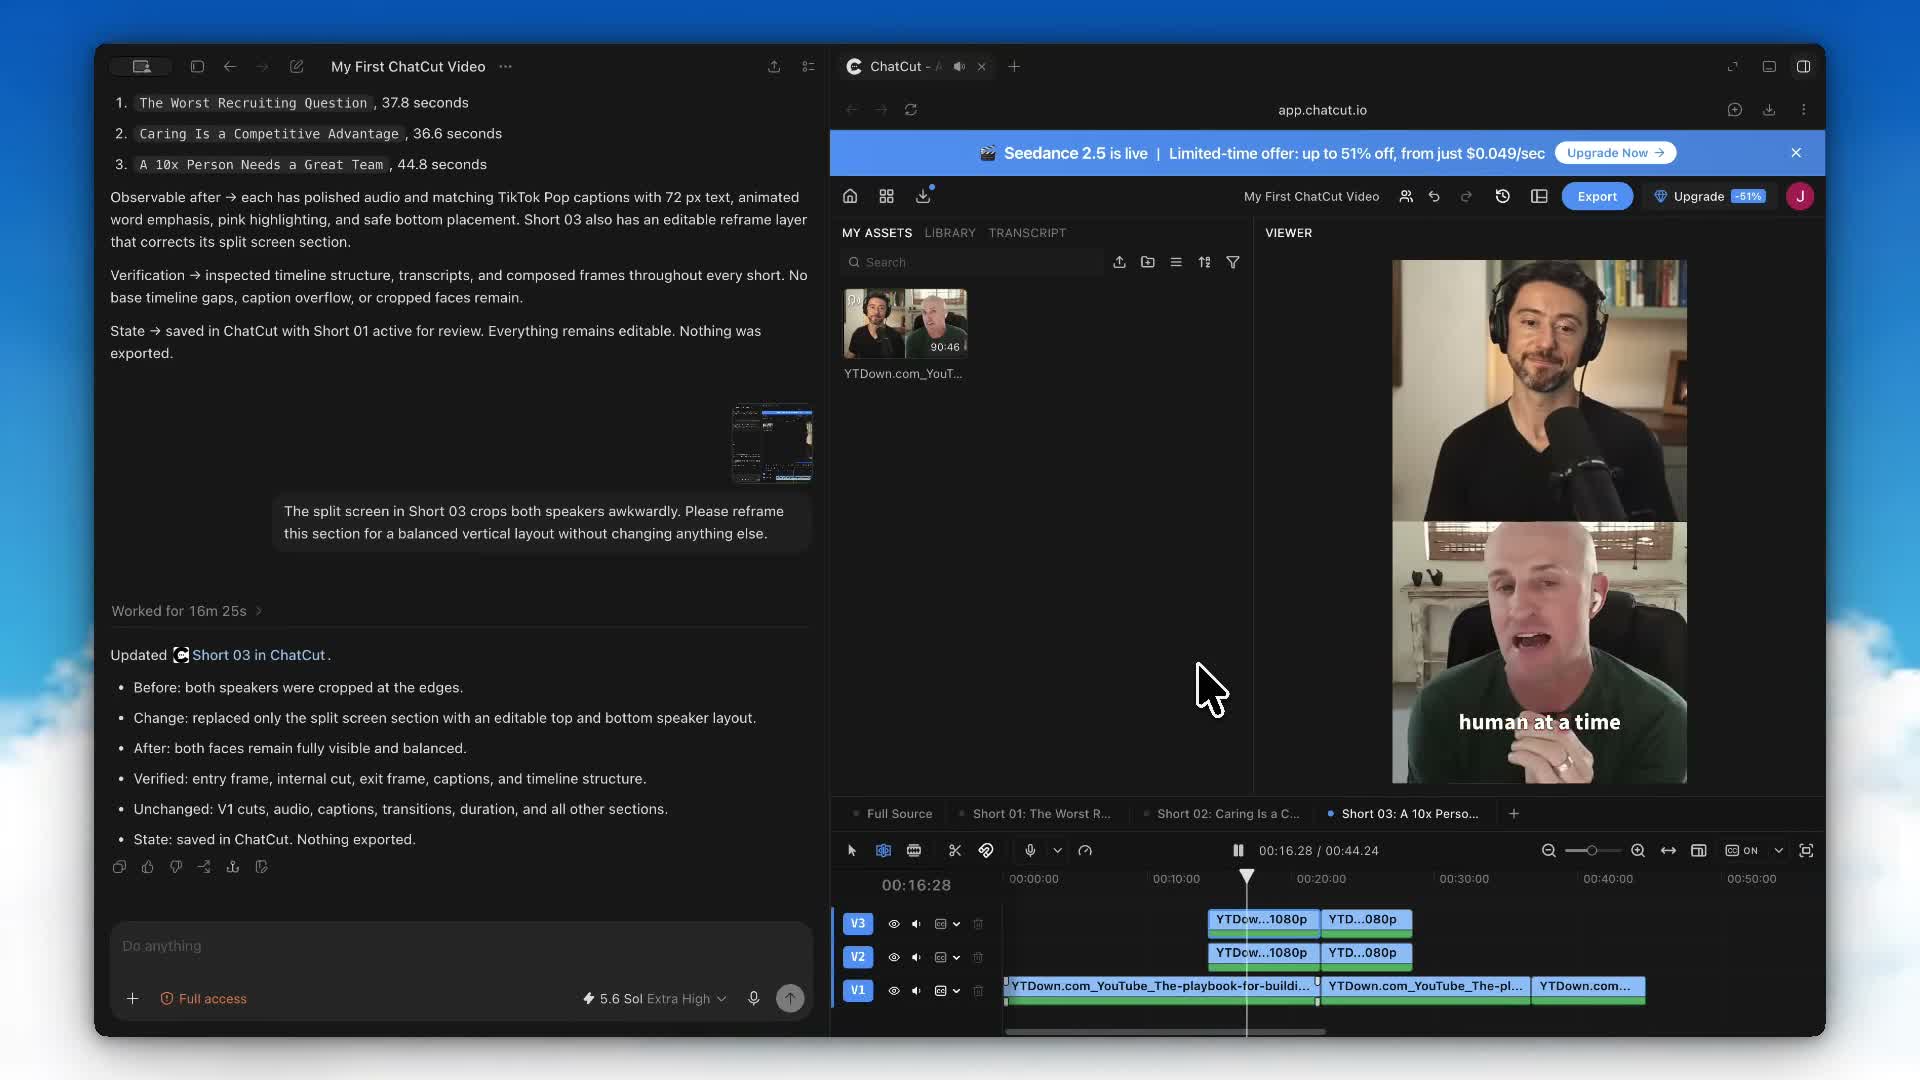
Keep faces and useful gestures visible. When two speakers must remain on screen, try a top and bottom layout instead of squeezing both into a narrow horizontal row. For a screen demonstration, prioritize readable controls; sometimes a different crop or a dedicated close view explains the action better.
This separate recording belongs to My First ChatCut Video. It shows a Short 03 reframe on editable layers; its task response says “Nothing exported.” It is not the revision or export record of High Talent Density Shorts above.At 24 seconds in the local recording above, V2 and V3 hold the two speaker layers. Inspect each face, the space between them, and the caption position before accepting this layout.
In My First ChatCut Video, the creator reports that the split screen crops both speakers awkwardly. The correction requested a balanced vertical layout while preserving the surrounding edit. Use the same level of specificity:
In [clip name], reframe [time range] so both speakers’ faces remain fully visible. Use a top and bottom layout if needed. Keep the dialogue, captions, and all other sections unchanged.
Keep words clear without hiding the evidence
Turn on Captions after the cut is stable, then correct names, numbers, and technical terms in Content. Deleting words in Transcript changes the recorded edit; Content is the place for visible caption wording.
Preview the video at phone size. Keep text away from faces and important demonstration details, and leave room for the destination app’s controls. Read each caption while the clip plays; adjust text density or timing when it is difficult to follow.
A style that works for one speaker may cover the face in a different composition. Check the entry, middle, and exit of a layout change, including any highlighted words. The subtitle tutorial covers the full caption workflow.
Fit the rhythm to the destination
YouTube’s current guide classifies square or vertical videos up to three minutes as Shorts under the general upload rule introduced October 15, 2024. You do not need to force a complete two minute explanation into 60 seconds merely to meet an outdated limit. Choose the shortest cut that still delivers the idea.
Music can change delivery eligibility. The guide now announces a policy change effective September 24, 2026 for new Shorts longer than one minute and shorter than three minutes with active Content ID claims. That date is still ahead of this September 18 review. Check the linked rule for your upload date and track instead of assuming every licensed or claimed song behaves the same way. TikTok and Instagram have their own current requirements.
Check the finished file one short at a time
Play each short from its first frame, as someone who has never seen the episode would. Confirm that the opening supplies context and the ending resolves the idea, then check its picture, sound, captions, duration, and orientation in the downloaded file.
Export from the intended active timeline. If you need a separate SRT, keep it paired with that version of the video so the timecodes agree. Check current export limits and available formats before preparing a large set.
ChatCut’s free cloud export allowance and generation credits are separate. Creating generated music or a new supporting shot is not the same billing operation as a manual crop or subtitle correction.
Frequently asked questions
How do I choose a clip that works outside the full video?
Find a complete idea with enough setup to understand the point and an ending that resolves it. Watch the source before and after the proposed range. Keep qualifications and references the viewer needs, then remove repetition inside that boundary.
Does every YouTube Short have to be under 60 seconds?
No. Eligible square or vertical videos uploaded from October 15, 2024 can be categorized as Shorts up to three minutes long under YouTube’s guidance. Choose a length that completes the idea and check current music and Content ID rules for the intended upload.
How do I keep two speakers visible in a vertical clip?
Inspect both people throughout the exchange after choosing 9:16. Try a top and bottom arrangement when a narrow crop loses a face or gesture. Check each speaker layer, the space between them, and caption placement at the beginning, middle, and end.
How do I manage several shorts from one recording?
Keep each accepted clip on a separately named timeline. Duplicate a timeline when testing another opening or layout so you can compare versions. Select the intended timeline before exporting and check that the downloaded file starts and ends with that clip.
What should I check before posting the same short elsewhere?
Review the destination’s format, duration, music rights, and interface overlays. Check faces, caption spelling, reading time, and text placement in the exported file. A clip that fits one app can cover important content or use audio that is not cleared for another destination.
Does AI know which clip will go viral?
A suggested highlight is an editorial candidate. Review its clarity, relevance, and context; this workflow cannot guarantee audience response.
Can I revise a clip after it is created?
Yes. Select its timeline, identify the range or caption, and describe the change or use the editor controls directly. Duplicate the timeline first when trying a substantially different opening.
How quickly can I process an hour of footage?
Processing and review depend on the source, connection, requested operations, and export. The recorded case is one example, not proof of a ten minute turnaround for any hour of footage.
Should I compare ChatCut with a dedicated clipping tool?
Compare the ability to correct the result you need. OpusClip offers a clipping workflow; ChatCut offers editable timelines alongside transcript and agent instructions. Try a clip that needs a framing correction, then compare how easily you can make that correction and review the export.
A short is ready when the full idea survives on its own
Select a complete idea, keep the qualification that changes its meaning, and give the accepted clip its own timeline. In ChatCut, ask for candidate ranges first, approve the one that works outside the episode, then reframe speakers, place captions, and adjust sound for the destination.
Export and review each short separately. Check the first sentence, the crop, the captions, the ending, and the platform requirement. A highlight label or an AI score cannot tell you whether a viewer who missed the long video will understand the point.