SEO title: How to Add Music to a Video Without Covering the Speech Meta description: Background music belongs on its own audio track. This guide covers adding it in ChatCut, fitting the scene, keeping speech clear, and checking music rights.
How to Add Music to a Video
Quick summary
Background music is easier to control on a separate audio track, where you can trim it and change its volume without changing the dialogue. To add it to your video, import the track, place it beneath the footage, and fit its entrance and ending to the scene. Keep every spoken word clear, check the license for your platform, and listen to the exported video before publishing.
Music does more than fill silence. A well matched track can make an edit feel more polished by giving its scenes a shared mood and pace. A quiet explanation may need a sparse instrumental track; a product reveal may suit a stronger entrance. Listen to a candidate beneath the actual footage before choosing it. The track should support the moment while leaving the words easy to follow.
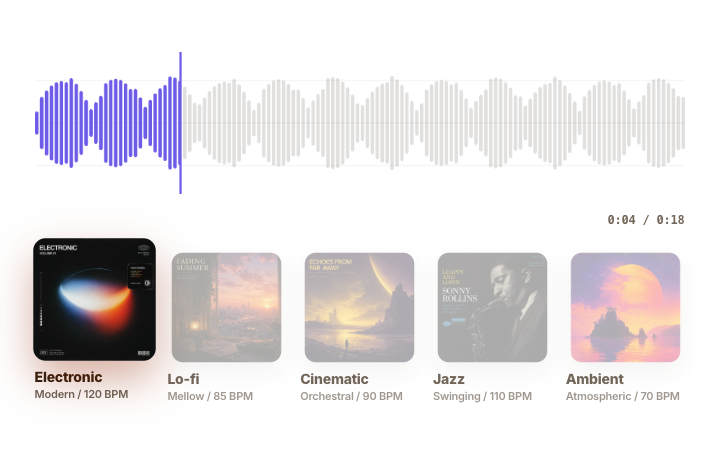
ChatCut’s music generator includes styles and tempo descriptions to help you describe a track. BPM means beats per minute, a measure of its pace.
The same sequence works in any timeline editor: choose a track, import it, place it under the video, trim or loop it, lower it under speech, and listen to the export. ChatCut keeps those decisions in one project. You can import a file through My Assets, keep music on its own track, open Track controls for Volume and Audio ducking, or ask the Agent to generate a track from natural language. The request, timeline result, and next adjustment stay visible together, so you can continue editing without rebuilding the context.
How do I add music without replacing the original voice?
Before you import a track, confirm that its license covers the platform where you will publish. If you already have a licensed file, open ChatCut and choose My Assets → Import → Files. Drag the imported file to an audio track below the video. You should see the music waveform on its own row while the original voice remains on its existing track.
Keep the voice, music, and sound effects on separate tracks. Select the music clip and move it to the moment where it should enter, such as the start of a demonstration or a change of subject. Drag either edge to remove unused lead in or extra music at the end. Start playback before the entry point and check that the music arrives after the spoken line instead of cutting into it.
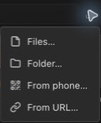
The Import menu in My Assets opens the file picker through Files. After importing your music, drag it to a separate audio track beneath the footage.
If you also need supplied sound effects, the ChatCut music and sound guide points to Library → Sound Effects. Preview an effect before adding it because a short sound can be much louder than the surrounding speech.
How do I stop music from covering speech?
Set the dialogue to a comfortable listening level first. Then raise the music until it supports the scene without making the quietest sentence hard to understand. There is no single volume number that works for every voice and every recording, so judge the two tracks together.
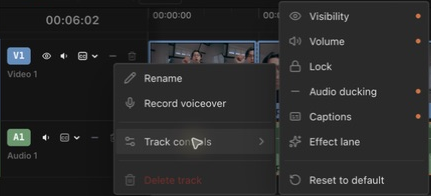
For automatic volume changes in ChatCut, right click the music track’s header and open Track controls → Audio ducking. This adds the ducking control to the track header. Close the menu and click that icon to cycle through anchor, follower, and off. Set the track carrying the dialogue to anchor and the music track to follower. The anchor tells ChatCut when the voice takes priority; the follower becomes quieter beneath it. Use off for a track that should ignore ducking.
Audio ducking is enabled in the A1 track’s controls menu. The small horizontal mark beside the track controls is the ducking icon in its off state; click it to cycle through the roles.
The ChatCut Timeline documentation explains the three roles. Play through a quiet sentence and the pauses between sentences. If the music rises too much when speech stops, lower the music track’s overall volume and replay that section. Ducking handles the change around speech; you still choose how loud the music should be.
How do I make music end naturally with the video?
On the ChatCut timeline, listen to the last spoken line and the final image together. Trim the music to a phrase that can end with them. Add a fade if a hard stop sounds abrupt. Check the entrance as well, so the video does not spend its opening waiting for the chosen musical section.
If you want a visual cut to land on a beat, find the beat by listening and align the cut in the timeline. A BPM value in a music description does not place a visual edit on that beat. Play through the cut to confirm the timing.
When you loop a section, listen where the two copies meet. A loop that looks aligned can still reveal a click, doubled percussion, or a broken phrase. Move the boundary or use another section if the join draws attention.
How does ChatCut add generated music to an existing edit?
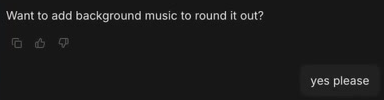
ChatCut can suggest music as the edit takes shape. In the typewriter review tutorial at 4:45, the product shots are already in place when the Agent asks, “Want to add background music to round it out?” The creator replies, “yes please.” The conversation already contains the footage and the editing work so far.
The creator accepts ChatCut’s suggestion to add background music to the review.
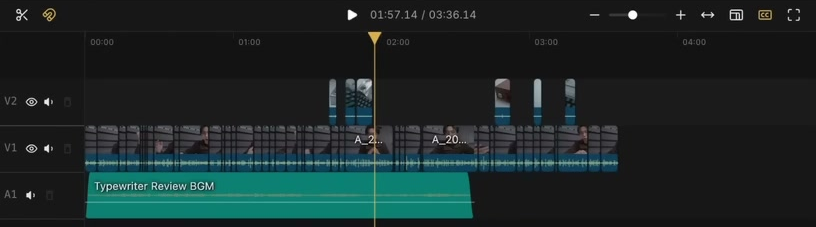
ChatCut adds Typewriter Review BGM to A1 below the picture tracks. It reports that the generated track is 2:38 long while the edited review runs for about 3:37, leaving roughly the last minute without music. That gives the editor a clear next decision: keep a quiet ending, extend the arrangement, or use another musical section.
The generated music has its own A1 clip. Its right edge ends before the footage, making the remaining gap visible on the timeline.
You can continue from that result in the same project. Move the music clip to a later entrance, trim its end, or lower it beneath the voice. If the arrangement needs changing, describe the mood, instruments, vocal preference, and length in the conversation. Review the returned track against the scene before deciding whether to use it.
Music generation uses credits. If ChatCut asks for confirmation, review the estimate before proceeding; the generation credits guide explains the charges and transaction history. Check the terms for generated audio before using it in a paid ad or another commercial project.
Can I use this music on YouTube, TikTok, or in an ad?
Use a source that states the license for the actual recording. Check whether it covers your account, channel, commercial use, attribution, territory, and advertising. YouTube Audio Library, Pixabay, Bensound, Mixkit, and Uppbeat have different catalogs and terms.
“Royalty free” does not always mean free of charge or cleared for every use. Creative Commons licenses have different conditions, and a public domain composition does not make every modern recording of it public domain. Read the license for the recording you will actually use.
For YouTube, open YouTube Studio → Audio Library, preview the track, and check its License type. If attribution is required, copy the supplied text into the video description and keep a copy with the music file. If the edit will also become an advertisement or appear on another platform, check the selected track’s terms again before exporting that version. Music selected inside TikTok or Instagram may be limited to that platform and account. If this is a paid TikTok campaign, see our guide to creating TikTok video ads with AI for the ad editing workflow.
What should I do if YouTube claims the track?
A Content ID claim and a copyright strike are different processes. Read the actual notice and YouTube’s claim guidance to see how the claim affects the video. Keep the license, receipt, and required attribution so you can assess whether you have grounds to dispute it.
A license receipt can help establish permission, but it does not guarantee that a dispute will be released. The copyright strike guidance explains the separate takedown process.
Can I add music in CapCut, iMovie, or Premiere Pro?
Yes. The same sequence applies: import the video and music, place the music below the picture, trim it, lower it under speech, listen through the transitions, and export. Menu names and automatic mixing tools differ by version. ChatCut also lets you request generated music in the editing conversation and adjust the resulting track alongside your footage.
YouTube Studio is a delivery context rather than a replacement for an editable source project. Check its current Audio Library and editing options before assuming you can upload a custom music file into an already published video.
How do I check the mix before publishing?
In ChatCut, export the video and play the downloaded file outside the editor. Listen from the opening to the ending. Confirm that speech stays understandable, music enters and ends where intended, and no section becomes unexpectedly silent or loud.
If music covers a sentence, return to the project, lower that range or change the track section, and export again. A completed render message confirms that the job finished. The exported file is where you judge the mix.
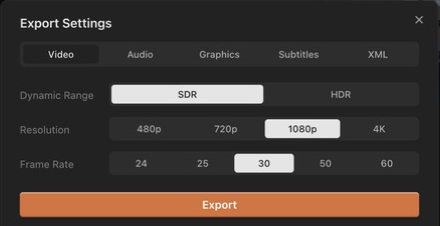
For the finished video, open Export → Video, choose the resolution and frame rate, and export. Listen to that file with its picture so you can judge dialogue, music, and scene changes together.
Frequently asked questions
Can I replace the music after finishing the video edit?
Yes. If music is on a separate audio track, replace that clip while keeping the picture edit in place. Check the new track’s entrance, ending, and level again. A cut timed to the old track’s beat may need moving.
Can I use the same track in several versions of a video?
Keep a copy of the first edit using the timeline tab’s menu → Duplicate. Change the opening or length in the copy, then fit the music to that version. Check that the license covers every platform and paid placement you plan to use.
Does generated music automatically include commercial rights?
Generation and licensing are separate checks. Read the current terms for the audio service used to create the track, including any restrictions on advertising, distribution, and attribution. Keep the applicable terms with the project; a completed generation alone does not establish permission.
Where can I find free music for a YouTube video?
YouTube Audio Library lets you filter for tracks that do or do not require attribution. Check the selected track’s License type and copy the supplied credit when required. A free download from another site still needs a license check for your intended use.
Can I add music for free?
You can use an editor and a track whose terms fit your project. Check export limits and the actual track license. Generating new music in ChatCut uses credits.
Can I use a popular commercial song?
Only when the necessary permission or applicable platform license covers your use. Popularity, attribution, or a short excerpt does not establish permission.
Finish with clear speech and music that fits
A finished mix starts with music that fits both the scene and its intended use. You can import a licensed recording or ask ChatCut to generate a track for the edit. In ChatCut, import the file through My Assets or make the request in natural language, then keep the result on a separate audio track. Place its entrance around the scene, trim or loop it to fit the ending, and adjust Volume to keep the quietest speech clear. For automatic ducking, expose its track control and set the voice to anchor and music to follower.
Before publishing, listen from the opening through the last frame, including pauses, loops, and fades, in the exported video outside the editor. Recheck the track terms for YouTube, TikTok, or paid ads, copy attribution when required, and keep the license record with the project.
SEO title: How a UGC Video Maker Turns Creator Footage into Product Videos Meta description: Real creator footage needs clear speech and product shots that match the words. See ChatCut requests and results for cleanup, captions, and product B roll.
How a UGC Video Maker Turns Creator Footage into Product Videos
Quick summary
A useful UGC video maker helps you turn a creator’s recording into a clear product story. The first cut keeps their experience and removes repeated takes. Product close ups then show what they are talking about, while captions make the words easier to follow. In ChatCut, you can request these changes in the conversation, inspect the timeline, and adjust the parts that need more work before exporting.
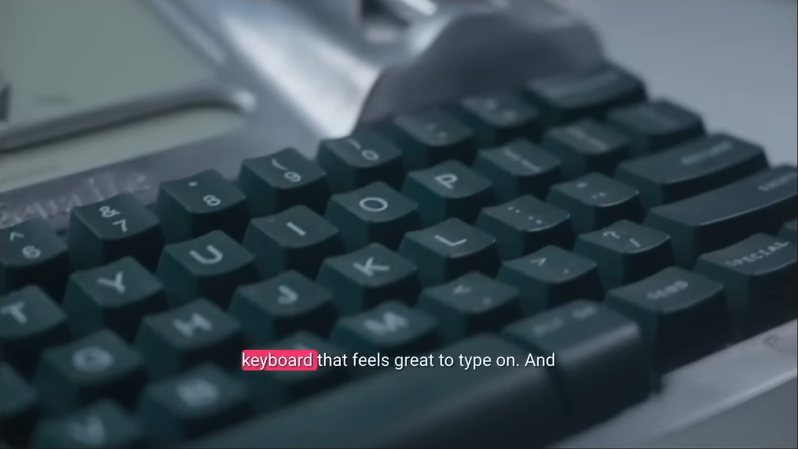
A creator says the keyboard feels good to type on. At that moment, the video shows the keys up close. The viewer can see the design while hearing the creator’s opinion. That connection between the person, their words, and the product is what the edit needs to preserve.
The screenshots below follow one digital typewriter review in ChatCut’s published editing tutorial. The creator supplies the review and product footage, then asks ChatCut to clean up the speech, add captions, and place the supporting shots.
The keyboard appears while the creator describes typing on it. The close up shows the product detail behind the opinion.
In a timeline editor, this means choosing the useful take, cutting repeats, placing product shots over the related sentences, and checking captions and sound. ChatCut lets you describe those editing decisions in ordinary language. You can ask it to match the uploaded shots to the explanation, then review where they landed in the editable timeline.
What should a UGC video maker help you keep?
Whether you are editing a customer review, a creator demonstration, or an ad made from approved footage, the source should contain something specific. A person showing how they use a product gives you more to work with than a list of compliments.
For a digital typewriter, that might be the feel of the keys, how the screen behaves, or the distraction the creator was trying to avoid. A close up can show the keys and screen. The creator’s words explain their experience of using them. Neither needs to make a broader promise about everyone who buys the product.
Before the first cut, gather the creator recording, the matching product shots, and the brief that says where the video will run. Note any sentence that must remain intact, especially a limitation or condition. If a creator says a device suits short writing sessions, removing “short” changes the recommendation.
A suitable editor should let you inspect those cuts, move a product shot, correct a caption without deleting the speech, and export the format you need. Those controls matter when the first AI result gets most of the edit right but misses one important detail.
How do you make the first cut in ChatCut?
Open a ChatCut project and add the creator recording to My Assets. In the chat composer, attach or reference that recording and describe the edit. Include any words or demonstrations that must stay. If you are still setting up the connection, the ChatCut setup guide walks through adding the plugin and your footage.
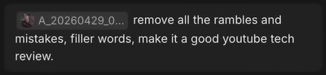
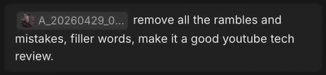
In the typewriter tutorial, the creator submits this request with the recording attached:
remove all the rambles and mistakes, filler words, make it a good youtube tech review.
The submitted request identifies the recording and asks for speech cleanup.
The tutorial’s source recording is 6:21 long. After the request, ChatCut reports a cut of roughly 3:37. Below, the edited timeline shows its duration and the individual cuts. Keeping those cuts editable lets you restore a useful phrase without starting the whole review again.
The edited review remains on the timeline as separate clips, so a cut can be checked or adjusted.
Your first review should be a listen through the joins. Does a sentence begin halfway through a thought? Did a useful qualification disappear with a repeated take? Restore that phrase or narrow the cleanup before adding more layers. A shorter duration alone does not tell you whether the edit sounds natural.
For a specific spoken cut, use Transcript to select the unwanted passage and delete it. Play the sentence before and after the join. A pause that lets the viewer understand the product may deserve to stay, even when the surrounding delivery could be tighter. The guide to removing silence and filler words explains how to make that distinction.
How do you add captions that are easy to follow?
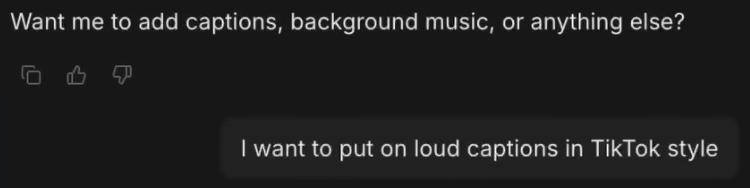
Once the spoken edit holds together, ask for captions in the same conversation. In this project, the creator submits:
I want to put on loud captions in TikTok style
The caption request follows speech cleanup. ChatCut replies that the captions are on and offers to adjust their font, color, or position.
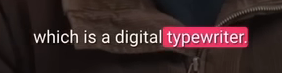
The caption detail below shows white text with “typewriter” highlighted in pink. This makes the product word stand out within the line. Check the full shot when choosing the caption position so the creator’s expression stays visible.
The word “typewriter” is highlighted within the caption introducing the product.
Read the product name, numbers, and any claim carefully. If only the displayed text is wrong, correct it in Content. Deleting words in Transcript changes the recording itself. The subtitle tutorial shows those controls and the choice between visible captions and a separate subtitle file.
Check captions again when the product shots are in place. A line that fits neatly below the creator’s face may cover a switch or label in the next shot. Move the text or adjust its line breaks so the action remains visible, then replay that transition.
Where should product B roll go?
Product B roll means supporting footage that appears while the creator continues speaking. Its most useful job is to show the detail being described: hands pressing a key, a screen updating, or a case opening.
Add those recordings to the same project. In the tutorial, the creator uploads the typewriter close ups and submits:
I just uploaded b roll footage of the typewriter, study these, and put them in the correct places
The creator submits the placement request. ChatCut responds that it will check the uploaded clips against the timeline.
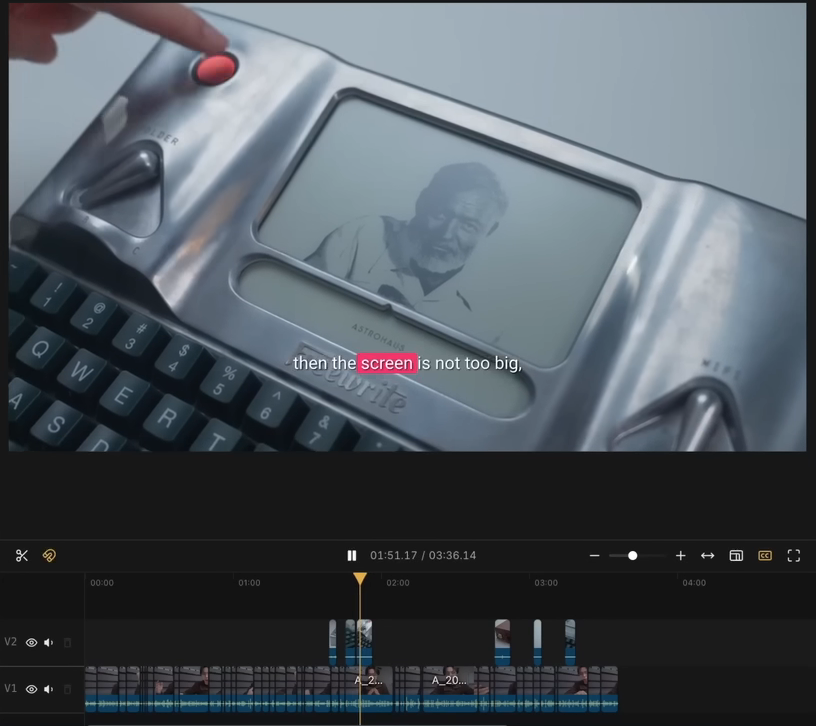
The resulting edit shows the keyboard during the keyboard description and switches to the screen when the creator describes its size. In the timeline below, the product inserts sit on V2, above the creator footage on V1.
The screen close up accompanies “then the screen is not too big.” The upper track shows where the product inserts sit in the review.
This is a practical reason to use ChatCut for creator footage: the request can describe the relationship between the words and the shots. The returned timeline gives you a place to check that relationship and correct it.
Play each insert with the surrounding sentence. If a shot begins before the product is mentioned, move its left edge to the relevant phrase. If it leaves before the action finishes, extend it within the available source. Keep the creator’s speech underneath, and listen for unwanted sound from the product recording. Check that the model, color, and feature shown match the words.
How do you turn a longer review into a short UGC ad?
A short ad needs a smaller story than the full review above. One useful structure is a reason to care, a product demonstration, and a next step. The footage should determine what you can say in each part.
For the typewriter, an ad could focus on the creator’s reason for wanting a dedicated writing device, followed by the typing demonstration. A different version could focus on the screen. Each opening would lead to a different short ad from the longer review.
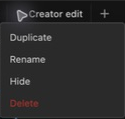
In ChatCut, open the longer timeline tab’s three dot menu and choose Duplicate. Switch to the new tab before shortening it; Rename lets you give each version a useful name. Select the passage that explains one complete experience, retain its matching product shot, and remove sections about other features. Add only an approved next step, such as visiting the product page. The shorter version still needs enough context for a new viewer to understand the claim.
Duplicate keeps the longer edit available while you work on a shorter version. Rename the copy before testing another opening.
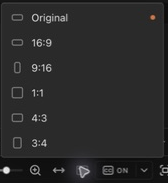
For a vertical destination, open Aspect Ratio in ChatCut’s timeline toolbar and choose 9:16. The Viewer changes to a portrait frame. Check each clip: a landscape shot can leave space above and below the picture, and enlarging it can cut off a product detail.
Choose 9:16 in the Aspect Ratio menu, then check the picture inside the portrait Viewer.
Select the affected clip on the timeline to show its Inspector. With Keep aspect ratio enabled, adjust its Dimensions to change the size without stretching it, then drag the picture in the Viewer to reposition it. A face may fit a tight crop while the keyboard needs more width. Keep the product feature visible and check the captions again at phone size. In Export → Video, choose the delivery resolution and frame rate, then watch the resulting file. The guide to making TikTok video ads with AI covers openings, product demonstrations, music, and creative variants in more detail.
What should you check before publishing?
Watch the exported file from the beginning. The first sentence should make sense without the original interview question. Product shots should match the claim, captions should be readable, and music should leave the quietest words audible. The ending needs enough time for the viewer to understand the next step.
Confirm the creator’s permission covers your intended platforms, paid use, editing, and campaign period. Keep the approved brief, footage, and required disclosure together. The FTC’s Consumer Reviews and Testimonials Rule FAQ explains restrictions on testimonials that misrepresent someone’s experience. Editing should preserve what the person actually said and experienced.
When the first version is ready, duplicate it before testing another opening or call to action. Change one creative element while keeping the creator, offer, destination, and other layers consistent. That makes the campaign results easier to interpret; changing the opening, music, and product shot together makes it harder to tell which change mattered.
Frequently asked questions
Can I make a UGC video from footage I already have?
Yes, if you have permission to use it and it contains a complete product experience. Check for an understandable spoken passage, a matching demonstration, and enough image quality for the intended crop. Missing product details may require another recording.
Is there an ideal length for a UGC ad?
There is no single length that guarantees a useful ad. The cut needs time to establish the situation, show the product, and finish its message. Check the destination’s current limits, then remove anything that does not help that particular story.
Can AI choose the strongest product claim for me?
AI can help locate candidate passages, but the source and approved brief determine which claims you can use. Read a suggested quote with the sentences around it. Keep conditions or limitations that change its meaning.
Can generated footage replace a missing product demonstration?
A generated scene cannot establish that a real product performed a test. For a demonstration of fit, function, or results, record the actual item. An illustrative background may serve a different purpose, provided it does not imply evidence the footage does not contain.
Should I add music to a creator review?
Music can support the mood and pace when it leaves the speech clear. Preview it beneath the quietest sentence, and confirm that the license covers the intended use. The music guide explains placement, volume, and endings.
Can I reuse one creator video across several platforms?
First confirm that the creator’s permission covers those platforms and uses. Then check the aspect ratio, caption position, disclosure, and destination of each version. A clear wide review may need different framing and a shorter setup for a vertical feed.
A clear product story starts with the creator’s experience
The best starting material is a creator explaining something specific and footage that lets the viewer see it. In ChatCut, make the spoken edit first, check the joins, add readable captions, and place product close ups at the matching lines. The typewriter example shows how those requests lead to visible changes in one editable project.
For an ad, narrow the longer story to one supported message and an approved next step. Review the crop, captions, sound, and claims in the exported file, then confirm permissions before publishing. Keep that version available when testing a new opening so each change has a clear purpose.
SEO title: How Text Based Video Editing Works with Transcripts and AI Meta description: Text based video editing uses transcripts or AI requests to change a cut. This guide shows how to remove recorded words, correct captions, and review the timeline.
How Text Based Video Editing Works with Transcripts and AI
Quick summary
Text based video editing lets you find and change spoken passages by reading their words. In ChatCut, deleting a sentence in Transcript cuts that part of the recording; correcting a word in Content changes the visible caption. For a broader edit, describe what to remove and what must stay, then review the returned timeline.
Text is useful in a video editor for two different reasons. It can represent words that were spoken and should be cut from the recording, or it can represent captions that viewers read while the audio stays the same. Confusing those two actions is how a simple correction becomes a missing sentence.
In a timeline editor, you would normally locate the unwanted take, cut around it, close the gap, and check the join. A transcript helps you find that passage by reading. ChatCut also lets you describe a broader cleanup in the conversation, then inspect the individual cuts it returns. You can move between a request and a precise manual correction as the edit develops.
What does text based video editing actually change?
Decide whether the mistake is in what was said or in the words on screen. Delete a recorded sentence in Transcript; correct a misspelled caption in Content. The table shows which surface changes which part of your video.
Your task
Where to work in ChatCut
What changes
Remove an unwanted spoken sentence
Transcript
Its recorded time range on the selected track
Move a recorded passage
Transcript Clip view
The corresponding clip’s place in the edit
Correct a misspelled caption
Content
Visible caption wording
Ask for several editorial changes
Agent conversation
The operations the agent applies to the project
Refine a cut by picture or sound
Timeline
Clip boundaries, position, and other selected properties
The current Transcript documentation specifies these behaviors. Editing text does not synthesize new speech simply because you typed different words. If the speaker said the wrong thing, a new recording or an authorized voice generation workflow is a separate decision.
How do I ask AI to make the first cut?
In a ChatCut project, import the recording through My Assets. Attach or reference it in the conversation, describe the edit, and name anything that must stay. In ChatCut’s typewriter review tutorial at 1:19, the creator submits this request:
remove all the rambles and mistakes, filler words, make it a good youtube tech review.
The recording is attached to the submitted request to remove rambles, mistakes, and filler words.
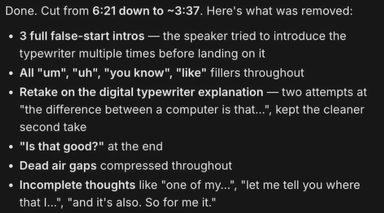
At 1:40, ChatCut reports a reduction from 6:21 to about 3:37. Its reply lists abandoned introductions, a repeated explanation, and gaps it compressed. That list tells the creator where to begin reviewing the cut.
ChatCut lists the changes made to the review, including keeping the cleaner take of a repeated explanation.
The timeline shows the result as separate clips. A useful phrase can be restored or a boundary adjusted without rebuilding the edit. This is where ChatCut’s combination of a conversation and an editable timeline helps: you can ask for the whole cleanup, then work on one cut that needs attention.
The edited review runs for about 3:37. Play across its joins to check whether the surviving sentences still make sense.
Read the removal list, inspect the cuts, and listen at their boundaries. In the tutorial, ChatCut also reports repairing a phrase that had been cut before “electricity.” A shorter timeline is useful only if it preserves what the speaker meant. For your own recording, include protected material such as “Keep the product demonstration and the limitation about battery life” in the request.
Import a recording through My Assets, place it on the timeline, and wait for transcription. Choose a short passage with an obvious repeated take so you can compare the result easily.
Open Transcript in the media panel. If it is hidden, use Workspace → Transcript. Select the intended video or audio source with the V1/V2 or A1/A2 selector when more than one speech track exists.
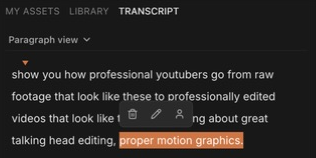
In Paragraph view, read the surrounding sentence. Click a word to move the viewer and timeline to that point, then listen to the full passage. Select the unwanted take and press Backspace or Delete. Play across the new join and confirm that the intended take remains.
This is a real cut, so keep a duplicate timeline before making broad changes. You can also use Undo immediately when a deletion removes more than intended.
Try this selection exercise on a repeated take in your own recording:
Stage
Spoken words in this example
Before
“The launch is Tuesday. Sorry, the launch is Thursday if approval arrives.”
Select for deletion
“The launch is Tuesday. Sorry,”
After
“The launch is Thursday if approval arrives.”
Read the last clause again before cutting. Deleting “if approval arrives” would change the promise. If the audio already says Thursday but its caption reads Tuesday, leave the recording intact and correct Content instead.
A selected phrase brings up a small toolbar. The trash icon deletes its recorded range; Backspace or Delete performs the same action.
How do I fix a caption without cutting the recording?
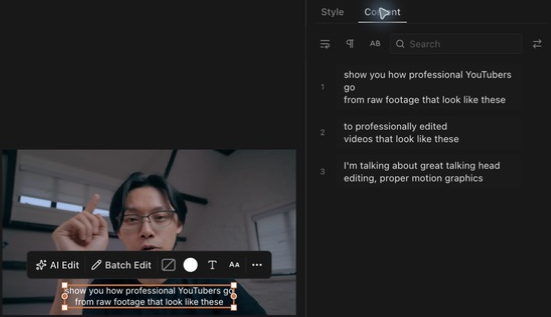
When the spoken words are right but the caption is wrong, turn on Captions in the playback toolbar. Select the caption in the Viewer, then choose Content in the Inspector. Click the caption card containing the mistake and replace only the text that needs correcting.
In this example, a capitalization correction changes “youtubers” to “YouTubers” while leaving the recorded passage in place. The corrected word appears in both Content and the Viewer.
The corrected “YouTubers” appears in the Content card and in the Viewer caption.
After a correction, read the full line in the Viewer. A longer name can change the line break or cover part of the picture. Check numbers and product names against the source, and replay the caption to confirm its timing.
Move complete ideas with their visual context
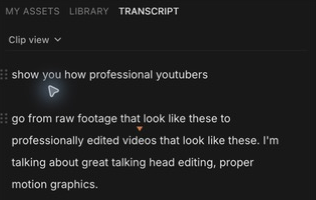
In Transcript, open the view menu and choose Clip view. Each block follows one existing timeline cut, so a block can contain less than a complete sentence. Use the dotted handle at its left edge to drag it to another position. Move all the blocks needed to preserve a complete idea, then play the new joins.
Clip view separates the transcript at existing cuts. The dotted handles let you reorder the corresponding clips.
Check the new transition after moving it. A sentence beginning “as I said earlier” may lose its reference when placed near the opening. Keep the explanation it depends on, or choose a different opening rather than changing the quotation’s meaning.
When another audio or video track must remain aligned, inspect those tracks too. A word deletion on the selected track is not a promise that every separate recording receives the same edit. Check picture and microphone synchronization after the change.
Ask for candidates before you commit to a timeline
Use a prompt when the task involves finding or arranging material across a longer source. Direct selection is useful when you already know the exact passage.
Find the section where the guest explains pricing. Suggest a complete excerpt with its source range, including any qualification about who the advice applies to. Wait for me to choose it before creating another timeline.
Once you accept the excerpt, ask for the specific result you want. Keep selection, cleanup, and visual styling as separate reviewable passes when the project is unfamiliar.
A prompt does not prove the agent understood the recording correctly. Read the chosen passage, play it, and verify the result in the timeline. For a complete connected workflow, see how to edit videos with ChatGPT.
Listen to the cut, not only the transcript
Remove a filler only when it adds no meaning, then listen to the shortened phrase. An apparent hesitation can be part of a correction or an intentional pause.
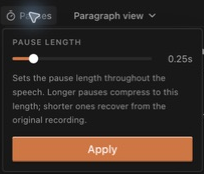
Where Pauses is available above the transcript, open it, adjust Pause length, and choose Apply. It sets a common pause length across the selected transcript track. Shorter gaps can recover pause time from the original recording, but the control cannot add silence beyond what was recorded. Review a short section before using one pacing choice across the whole track.
The slider sets the requested pause length. The 0.25 second value shown is one setting to audition, not a target for every speaker.
If a broad cleanup misses a pause, identify its words and current project range in the next instruction. The silence and filler guide includes a published example of this correction.
Verify what the text cannot show
Use picture and sound to judge the join, framing, and rhythm after the words are right. A readable paragraph can still produce a clipped consonant or an abrupt visual jump.
Listen around every changed boundary. Inspect reactions that occur without speech, screen actions that the transcript does not describe, and images that carry the meaning. For music, sports, or a visual montage, the transcript is only one source of information.
Text editing is useful for interviews, courses, presentations, and spoken tutorials because you can find a passage by reading it. It does not make an entire category of timeline editors obsolete, nor does it establish a fixed time saving for every recording.
Which export lets me keep editing in Premiere or Resolve?
Turn on Captions after the spoken cut is stable, correct visible words in Content, and review the complete sequence. Open Export for the delivery you need, then play the downloaded file.
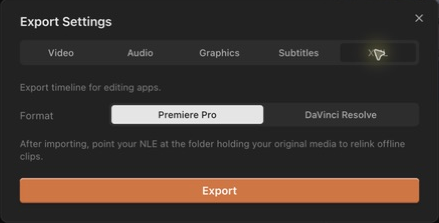
If you intend to continue in Premiere Pro or DaVinci Resolve, open Export → XML, select that editor, and export. Keep the XML and the original media together. In the destination editor, import the XML and relink any offline clips to the source folder.
Choose the editor that will receive the timeline. After importing its XML, relink the original media when prompted.
XML does not carry every feature. Captions, effects, transitions, and other unsupported elements can be omitted. Review the export warning and inspect the imported timeline. Keep a reference video as well when another editor needs to reproduce the finished look.
Frequently asked questions
If I delete speech after adding captions, do the captions still match?
Recheck the caption track after the deletion. Play the line before the join, the join itself, and the line after it. Confirm that words from the removed passage are gone and that the surviving captions still match the audio. Correct or regenerate the affected captions when they do not.
Does text based editing overwrite my source file?
Transcript cuts change the timeline’s use of the recording. The source asset remains available in My Assets. Keep a duplicate timeline as well if you want to compare the complete edit before and after a broad cleanup.
Why can I see captions but no transcript for the track I want?
Check the source selector in Transcript when the project contains several video or audio tracks. Choose the track carrying the speech and confirm that its source asset has finished transcribing. A caption overlay can be visible while you have a different transcript source selected.
Can I edit interviews with multiple speakers?
Yes, but choose the intended transcript source and check speaker labels and synchronization. A speaker label is not automatically a separate camera or audio track. Review any separate microphone recordings after moving or deleting a spoken passage.
How accurate is the transcript?
Check names, numbers, overlapping speech, and specialist vocabulary against the audio. A transcript error can send you to the wrong passage, so listen before deleting uncertain words. Clear speech makes this review easier, but accuracy still depends on the recording.
Can I use text based editing for footage without speech?
A speech transcript will not tell you where a silent product action or sporting moment occurs. Use the Viewer and timeline to inspect those shots. You can describe the desired edit to an agent, but check its choices against the picture rather than relying on a transcript.
Use text to direct the cut, then watch what it changed
Decide whether the text represents spoken audio or visible captions. Use Transcript for recorded ranges, Content for caption corrections, and a bounded natural language request when you need ChatCut to find and assemble a broader edit. Name what should change and which explanation or qualification must stay, then inspect the returned timeline and listen across each join.
Export a video when the destination only needs the finished picture, or use an editable handoff when another editor must continue. Text makes the request precise; playback confirms that the picture, speaker, timing, and meaning still agree.