Gaming Video Editing Software for Montages and YouTube Videos
Quick summary
The best gaming video editor depends on the montage you want to publish. A beat driven highlight reel needs different control from a long YouTube walkthrough. Keep the setup and payoff of each play, test the editor with your own gameplay and audio tracks, and check the export at the frame rate your footage uses.
A gaming montage is not a pile of kills cut to music. The viewer needs to understand the setup, see why the moment matters, and feel the payoff before the next clip starts. That is why a tool that finds highlights quickly may still be a poor fit when you need to protect game sound, microphone audio, or a specific rhythm.
For a first test, use a short gameplay recording with one complete play, a separate voice or game track, and a song you can legally use. In ChatCut, open a new timeline, name the moments and their order, and ask for a cut such as, “Keep the setup before each overtake, place the payoff on the beat, preserve game audio, and leave the timeline editable.” Play the result before you compare editors by a feature list.
Choose the montage you actually want to finish
For a first montage on a desktop, start with DaVinci Resolve. Its free edition combines editing, color, effects, and audio in one application. Choose another option when its particular workflow fits your project better.
| What you want to make | Start with | Why it fits | Check before committing |
|---|---|---|---|
| A montage with precise cuts, effects, and a detailed sound mix | DaVinci Resolve | Editing, Fusion effects, color, and Fairlight audio share one project | Free and Studio support differ by codec and feature. Test your recording format. |
| A montage built around changing playback speed | CapCut | Speed Curve includes presets such as Montage and Bullet, plus custom curves | Check your edition and the paid status of the effects or assets you select. |
| Gaming videos edited with an Adobe team or existing Premiere projects | Premiere Pro | Stay in the project format and workflow your collaborators already use | Confirm subscription cost and any required plugins. |
| A free open source workflow on Windows, macOS, or Linux | Shotcut | Documented markers, speed controls, keyframes, proxies, and preview scaling | Its interface and available filters differ from tutorials made for other editors. |
| A short montage assembled from selected ranges through instructions | ChatCut | Keep a visible timeline while directing clip order, timing, speed, and sound changes | Use precise source ranges and review the result. Check your plan for the export you need. |
There is a concrete reason to try Resolve Free before buying Studio: Blackmagic says the free edition handles virtually all 8 bit video formats at up to 60 fps and 3840 × 2160. That covers the resolution and frame rate of many gameplay projects, provided the source codec is supported. It does not mean every 10 bit recording or AI feature is included.
For CapCut, the relevant feature is the speed curve. It lets the playback rate change within a clip. A constant 2× speed change, used later in this tutorial, is a simpler operation. Choose based on the movement you need to shape.
Vegas Pro, Filmora, and PowerDirector are also worth keeping if you already edit comfortably in one. Switching tools makes sense when you can name a missing capability, such as a particular speed curve, an audio workflow, or project compatibility with an editor you work with.
Match the tool to the channel’s repeated job
Premiere Pro and DaVinci Resolve both appear in published gaming creator tutorials. Here are two specific examples you can learn from:
| Creator and dated tutorial | Software shown in the tutorial | What the tutorial focuses on |
|---|---|---|
| JamFam, The ULTIMATE Editing Guide for Gaming Videos, August 9, 2024 | Premiere Pro | Pacing, cutting, subtitles, tracking, greenscreen, and rotoscoping. Its pacing chapter features Finzar. |
| Joshyy, Edit PRO Gaming Montages for FREE!, April 17, 2025 | DaVinci Resolve | A gaming montage workflow described for Fortnite, Call of Duty, and other games. The description also lists optional presets and a paid editing pack. |
These are dated examples of creators teaching a workflow. They do not establish which editor most YouTubers use or what either creator uses for every current project. An optional creator pack is also separate from the price of the editor.
Use the example closest to your format. A commentary video puts more weight on pacing, readable subtitles, and reactions. A music driven montage needs closer control over the timing of the action and sound. For a broader comparison across video formats, see what editing software YouTubers use.
Build and inspect one real sequence
Start with three or four moments that are understandable on their own. Keep the approach, the decisive move, and enough of the result to show why it matters. For a shooter, that might be the target appearing, the shot, and the confirmed hit. For a racing game, it might be the approach to a bend, the turn, and the exit.
The practice below uses SuperTuxKart racing footage and a simple 120 BPM percussion track. A 65 second source recording becomes a 16 second sequence with four shots. Both the source file and the finished export are 1920 × 1080 at 60 fps. These timings are practice choices, not a recommended length for every montage or a ChatCut preset.
1. Import gameplay and keep a source timeline
In ChatCut Desktop, use Import in My Assets to add your gameplay and music. Place the gameplay on a timeline named Source. Keep that version intact, then create a second timeline for the montage. With an OBS recording, prepare the file and audio tracks first if import fails or your microphone needs a separate mix.
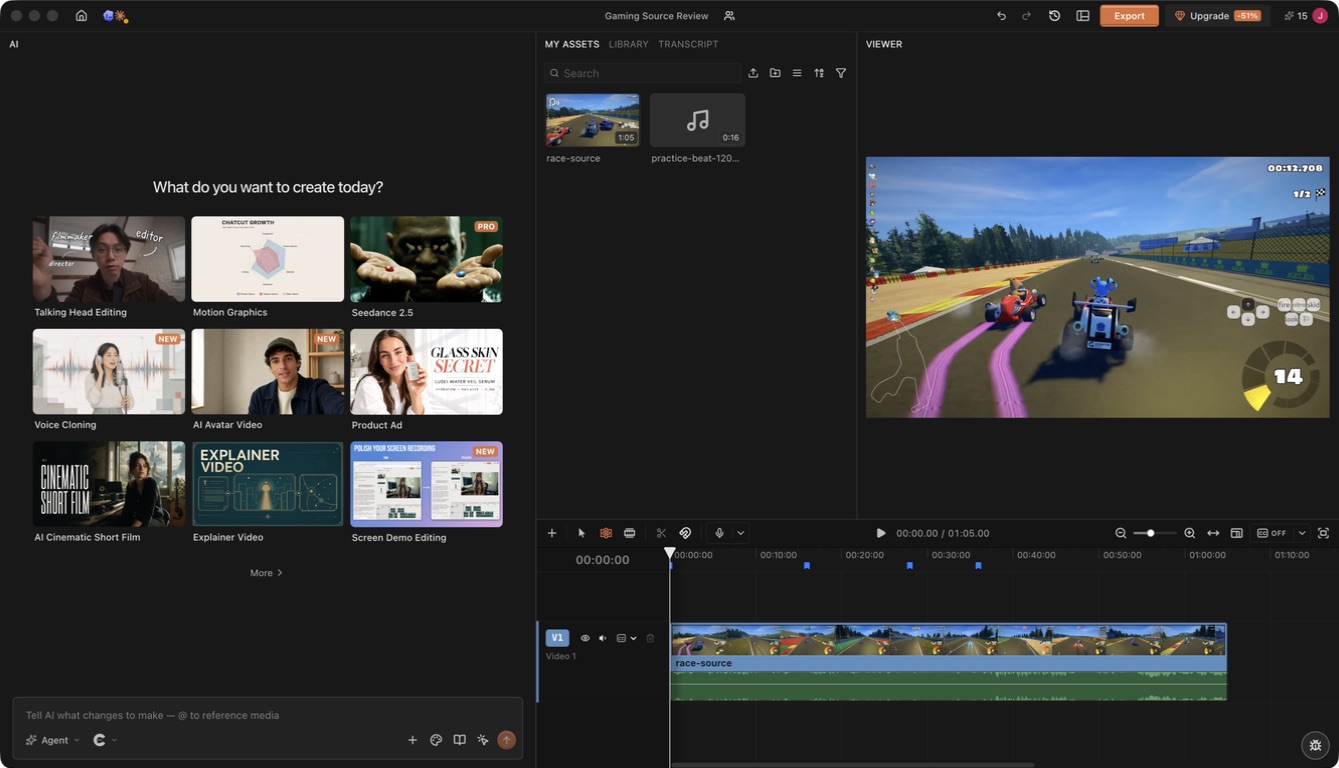
Watch the recording for complete actions. Put a marker near a moment you might use, and give it a note that explains the action. ChatCut's timeline guide explains where to find the marker shortcut under Avatar → Keyboard shortcuts → Markers. A marker is a note and navigation point; it does not cut the clip.
2. Keep the setup and payoff when you select clips
| Moment | Range in race-source.mp4 | Speed | Position in the montage |
|---|---|---|---|
| Establish the pack of racers | 0 to 4 seconds | 1× | 0 to 4 seconds |
| Move along the straight | 16 to 24 seconds | 2× | 4 to 8 seconds |
| Boost past another kart | 28 to 32 seconds | 1× | 8 to 12 seconds |
| Enter the corner and show the exit | 36 to 40 seconds | 1× | 12 to 16 seconds |
The times in the table belong to the downloadable excerpt, not the race clock visible in the game. Use these ranges for the practice clip, or choose equivalent moments in your own recording. Play each selection without music first. If the action starts halfway through a move, extend the beginning. If the cut hides the result, extend the end before trying to fit it to a beat.
The first edit used 34 to 38 seconds for the final shot and stopped while the corner was still unfolding. Moving that selection to 36 to 40 seconds preserves the turn and shows the position changing from fourth to third. That visible result is the payoff to keep.
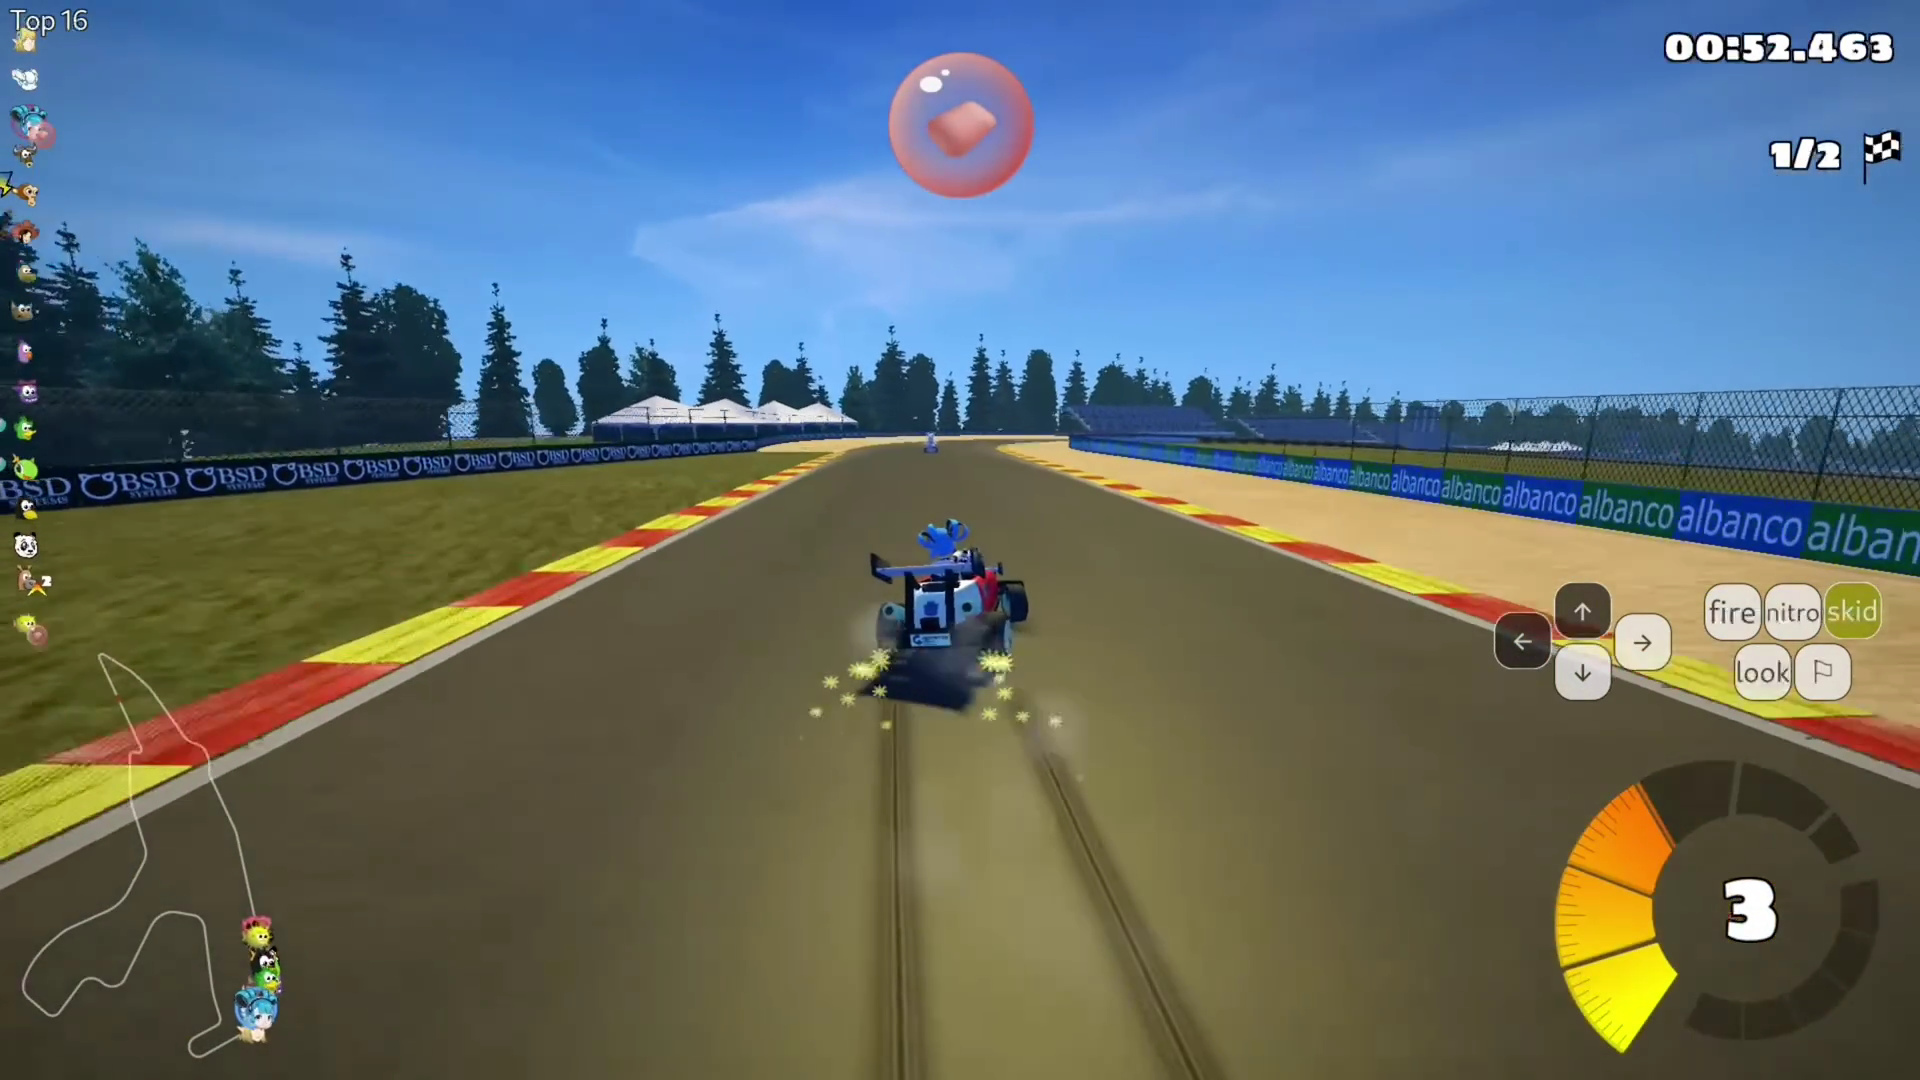
A useful instruction gives ChatCut the source, ranges, order, and outcome. For this practice:
In the Montage timeline, use race-source.mp4 in this order: 0 to 4 seconds at normal speed, 16 to 24 seconds at 2× speed, 28 to 32 seconds at normal speed, and 36 to 40 seconds at normal speed. Place them without gaps. Put practice-beat-120bpm.wav underneath from the start. Keep the full game frame and HUD visible.
After the edit appears, check each clip against the table and play across every join. The ranges in this exercise were chosen from the recording; check your own selections the same way.
3. Put important moments on the music
At 120 BPM, a beat lasts half a second: 60 ÷ 120 = 0.5. A four beat bar lasts two seconds. In this exercise, the larger cuts fall on four second boundaries, giving each shot two bars. You can use this as a starting grid, then adjust when the action needs more space.
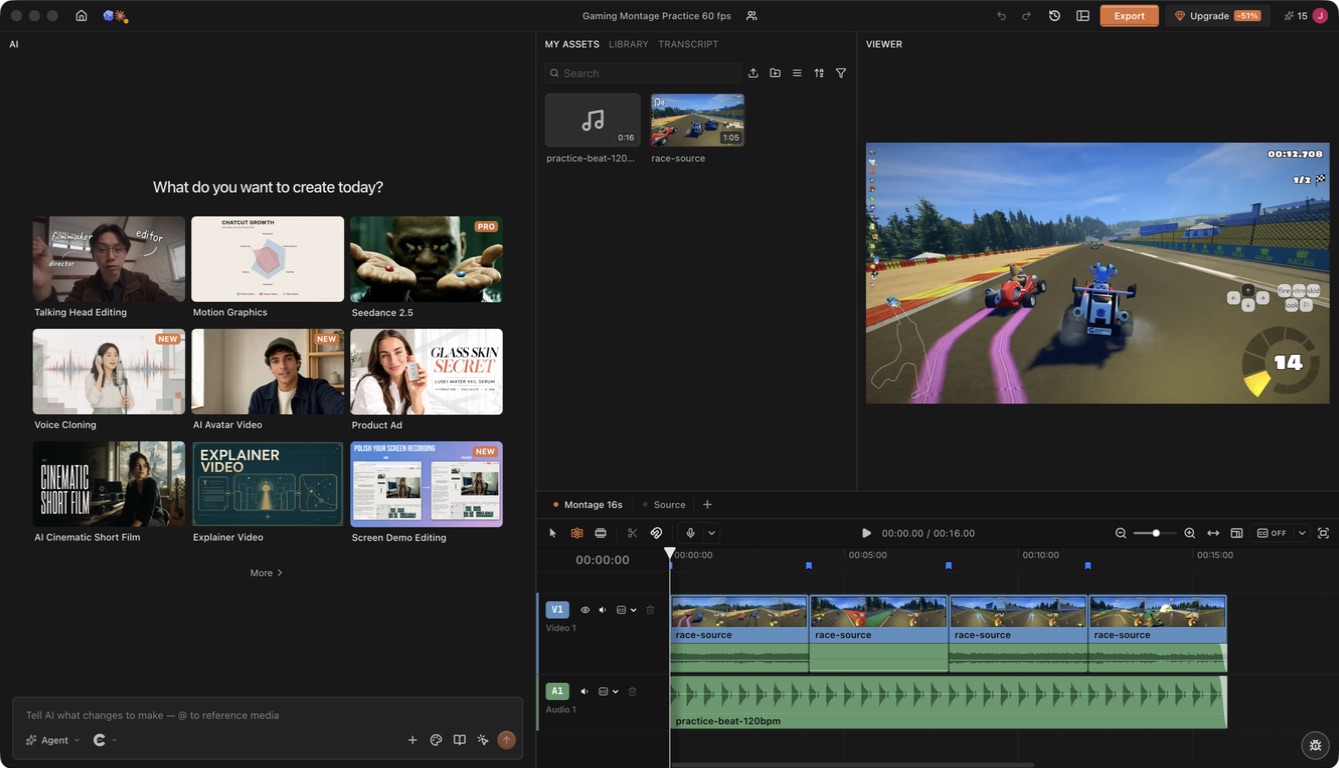
The useful synchronization point can be the payoff inside a shot. If the hit occurs one second after a clip begins, position the clip so that hit meets the chosen beat. Cutting to the clip on the beat would place the hit a second late. Keep listening across the join and preserve the action's setup.
This example uses deliberately placed edits and markers. It does not rely on automatic beat detection or automatic kill recognition.
4. Use speed to shorten the approach
The second shot uses eight seconds of source footage, from 16 to 24 seconds, played at 2× speed. It occupies four seconds in the montage. The later boost and corner remain at normal speed so the viewer can follow the passing move.
For a manual change, right click the clip and choose Speed, as documented in ChatCut's timeline controls. Return to normal speed where viewers need to read the action. Preview across both ends of the change and check the clip duration afterward.
If your main creative goal is a smooth acceleration into a hit followed by slow motion, choose an editor with the curve controls you want. The constant speed segment shown here demonstrates a smaller, specific operation.
5. Balance music and game sound
Place the music on its own audio track. Keep the useful game sounds audible: a hit, engine change, crowd reaction, or spoken reaction can make the moment easier to follow. Lower the music around those sounds and use a short fade at the end so it does not stop abruptly.
For this exercise, the percussion is set to minus 6 dB. The source recording has a single mixed audio stream, set to minus 18 dB on the normal speed clips and muted on the accelerated clip. The final clip and percussion have a 0.25 second audio fade. These values demonstrate separate control; adjust them for your own recording and music.
When commentary matters, use separate microphone and game tracks. A single mixed recording gives you less control: reducing the music already inside that recording also reduces the game effects. For speech selection in ChatCut, use Transcript, then review the matching gameplay before removing a passage.
6. Export and watch the finished montage
Use Export → Video, choose the intended resolution and frame rate, and play the saved file. In this practice, ChatCut Desktop produced a 16 second H.264 MP4 with AAC audio at 1080p and 60 fps.
Review three things: can you understand the action before each cut, can you hear the sound that matters, and is the HUD still readable? If an effect makes any of those worse, remove or simplify it. A montage with clear timing is already a complete result.
Practice gameplay: SuperTuxKart 2.x GP with 24% handicap and road tracks by kimden STK, CC BY 3.0. The excerpt was trimmed, reordered, and retimed for this demonstration. Percussion was created for the exercise. Practice files: 65 second gameplay excerpt (compressed review copy) and 120 BPM percussion.
Prepare OBS or console footage for editing
Recording choices determine what you can fix later. For PC gameplay in OBS, open Advanced Audio Properties and route game sound and microphone audio to separate tracks. Keep a complete mix on track 1 if you want a convenient playback copy.
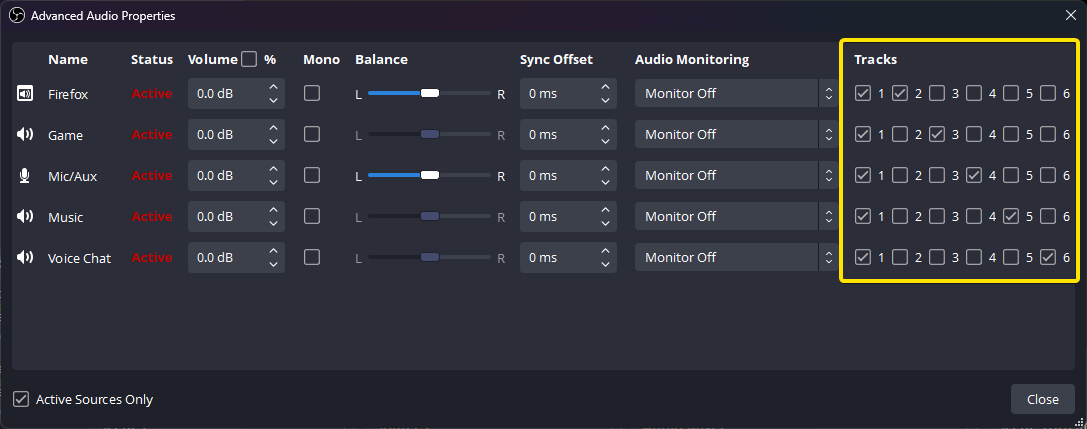
Next, enable the same track numbers under Settings → Output for the recording. Otherwise, a source can be routed to a track that never reaches the saved file. Record a short exchange and check the isolated tracks in your editor. Avoid playing the complete mix and all isolated tracks together, which doubles the sound.
OBS recommends MKV because an interrupted recording need not corrupt the whole file. If your editor needs MP4, choose File → Remux Recordings, select the MKV source and MP4 destination, then run Remux. This changes the container without reencoding the picture. It does not fix an unsupported codec inside the file.
For PS5 footage, copy a saved gameplay clip to the computer and inspect its resolution, frame rate, and color format before selecting an editor. Import one representative file first. If it is HDR, decide whether the finished montage will stay HDR or be converted for SDR viewing; the editor needs to support that path. The console name alone does not establish codec compatibility.
Protect gameplay, faces, captions, and HUD details
Finish the horizontal montage first when the full game screen is important. A 16:9 composition can preserve the minimap, score, crosshair, and opponents around the edge of the frame.
For a Short, make a separate 9:16 timeline and adjust the composition around the event. Check the whole shot: a centered crop may show the player but lose the opponent they are reacting to. Where both sides matter, keep the relevant gameplay area together and use the remaining space for a separate face camera or captions. Keep labels away from the HUD.
Use a short title or motion graphic only when it adds context, such as the map or challenge. Generated artwork can work for an intro, but a clip teaching or demonstrating a play needs the actual gameplay. For a longer source, the guide to turning videos into Shorts covers separate versions and local revisions.
For YouTube uploads, YouTube recommends the recording's frame rate. Its SDR 1080p guidance lists 8 Mbps at standard frame rates such as 30 fps and 12 Mbps at high frame rates such as 60 fps. These are upload recommendations, not a guarantee of sharp fast motion or a ChatCut bitrate setting. Keep a 60 fps source at 60 fps when that is your intended delivery, then inspect motion and small HUD text in the exported file.
Frequently asked questions
What is the best free software for gaming montages?
Start with DaVinci Resolve if you want a complete desktop workflow for cutting, sound, color, and effects. Check your source codec against its free edition. Shotcut is another free option on Windows, macOS, and Linux, with documented markers, speed changes, and keyframes. CapCut is useful for speed curves, but check the paid status of the specific features and assets in your project.
What do gaming YouTubers use to edit their videos?
There is no single editor established by the examples in this guide. JamFam published a Premiere Pro gaming tutorial in August 2024, while Joshyy published a Resolve montage tutorial in April 2025. Learn from the creator whose format resembles yours, and treat those dates as the evidence for the examples.
How do I make a gaming montage that matches the music?
Choose complete actions, then place the important visual moment on a beat or musical change. At 120 BPM, beats are half a second apart. Use markers as timing notes and trim around them. Keep enough setup to understand each move; a cut on every beat can make the play hard to follow.
Do I need After Effects for a gaming montage?
You can complete cuts, clip timing, sound, and a finished export in an editor such as Resolve or Premiere Pro. Add After Effects when you have a specific animation or compositing job that needs it, or a collaborator's existing project. Ordinary montage assembly does not require buying a second application first.
Which software should I use for PS5 gameplay?
Start with the same montage shortlist, then test a file captured with your actual PS5 settings. Resolution, frame rate, codec, and HDR handling matter more than the console label. Confirm import and a short export before committing to a whole session.
How do I edit an OBS recording with separate game and mic audio?
Assign game and microphone to different tracks in OBS Advanced Audio Properties, then enable those tracks in Settings → Output. Check them separately in the editor. If the editor needs MP4, use OBS File → Remux Recordings and verify that the remuxed file retains the tracks you need.
Should I export a gaming montage at 30 or 60 fps?
Use the recorded frame rate when it matches the intended delivery. Preserve 60 fps gameplay for a 60 fps montage. Changing a 30 fps recording to a 60 fps export does not by itself add new captured motion. Check the saved file's frame rate and watch fast movement before uploading.
Can ChatCut automatically find kills and cut to the beat?
The workflow demonstrated here uses selected source ranges, timeline edits, and manually placed timing markers. It does not establish automatic kill recognition or beat detection. You can direct and revise those edits through instructions, then inspect the actual game action and music together.
Which gaming editor works best on a slower computer?
Use proxy files or reduced preview resolution where the editor supports them. Shotcut documents both proxies and preview scaling. Try the effects you actually need on a short recording, then compare playback and exported quality. This guide has no hardware benchmark establishing one editor as the fastest.
Choose gaming software by the moment you need to protect
Decide whether the job is a beat driven montage, a longer gameplay episode, or a vertical highlight. Test a real recording with its game and microphone tracks, keep the setup and payoff of each moment, and inspect the export at the destination frame rate. In ChatCut, name the source ranges and desired rhythm, then review the editable timeline and audio before you repeat the cut.
The software a YouTuber uses is useful context, not a guarantee that it fits your computer or footage. Keep the original recording, confirm the music rights, and watch the final file before publishing.